Planning on Data on a Weekly Basis
The week granularity allows you to refine date dimensions and expand the time hierarchies available.
Week Granularity
If you’re in the retail industry for instance, it’s highly possible that data is processed at a week level due to seasonality. With sales performance being highly seasonable, the week granularity helps you track and analyze that data precisely. It’s also highly beneficial if you’re responsible for staffing, need to plan special timely initiatives for specific weeks, organize replenishment work, manage weekly discounts,… Other use cases could be product launches, inventory receipts, weekly promotions, variance analyses,…
- 445/454/544: splits a period (a quarter, typically), into sets of four weeks, four weeks, and five weeks. Each set represents a month. This rounds up to 52 weeks, just like in a typical calendar year.
- 13x4: splits a year into 13 periods rather than 12 months, with each period being divided into sets of four weeks. This rounds up to 52 weeks, just like in a typical calendar year, with each period having the exact same number of weeks.
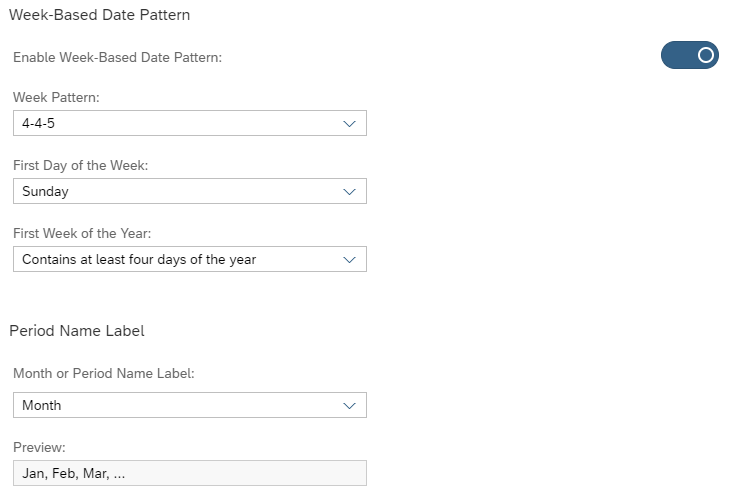
These patterns are available in the Model Preferences, via the Enable Week Settings toggle under the Time Settings tab. You can tune the week further and select the first day of the week, the first week of the year, and decide how you would like the month or period to be labeled. For period planning, you might want to show periods as P1-P12 rather than month names, especially if you add periods to a year.
Enabling Week Granularity
Context
Procedure
- Create a new model with measure, or open an existing one.
- Go to the Model Preferences, and click the Time Settings tab.
- Click the Enable Week Settings toggle to switch week settings on.
- Select a week pattern, the first day of the week, and the first week of the year.
- Back in the Modeler, select a date dimension and open the Dimension Settings panel.
- Click the Granularity dropdown and select Week.
- Select a default hierarchy using the dedicated dropdown.