Lifecycle Management with SAP Analytics Cloud
Learn how to plan your SAP Analytics Cloud landscape, including how to choose the number and type of test systems in your landscape, what a typical lifecycle management workflow looks like, and how to successfully integrate SAP Business Content into your solution.
Planning Your Landscape
One of the first decisions you must make when planning your SAP Analytics Cloud landscape is how many number of systems or tenants to have.
A landscape with a single system is appropriate for very small deployments, or for the initial phase of your SAP Analytics Cloud rollout.
This landscape is not supported for reliable lifecycle management. However, you can store test and production content in different folders. But updating the content can be time consuming and error prone. For example, problems may arise while updating models and importing new versions of business content.
Add at least two SAP Analytics Cloud systems (also known as tenants) to your landscape. You can use one system to develop and test the content, and other to promote that content to a separate production system where users can do their work.
Here are some of the advantages of such a landscape:
- Your test content is fully separate from the production data and content. Content creators won’t have access to sensitive production data.
- Lifecycle management is easier. You can use Import and Export features to promote content, and the production system contains fully tested content.
- Performance can be improved, as there is no need to use your production data sources for testing and development tasks. You may want to add more non-productive systems so that the SAP Analytics Cloud landscape matches the structure of your data source systems.
If you plan to use business content from the Content Network, it is recommended to use a separate system to try out the different content packages, and then figure out which packages you want to import to your test system.
Later, you can connect each one to the corresponding S/4HANA system.
Choosing Test Systems
To cover the costs of software infrastructure and operation, you need to get a paid license for a non-productive SAP Analytics Cloud system.
There are two types of test systems:
There are two types of test tenant available for non-productive testing purposes that are not used with any personal information:
- A public edition test tenant supports a minimum of 20 users
- A private edition test tenant supports a minimum of 50 users. The default option for a private edition test tenant is 128 GB. This tenant is licensed only for non-productive use.
This type of tenant shares its underlying SAP HANA system
with other customers and tenants. You can request a separate tenant for any
number of users using the standard SAP Analytics Cloud public edition licensing model .
.
If you don’t need a dedicated private SAP HANA system supporting SAP Analytics Cloud and you just need a few non-productive users, a public tenant can be a good option with a lower licensing cost. Customers can have any number of tenants.
Public tenants share an SAP HANA system with other customers, so there’s no way to directly control the amount of memory or storage dedicated to one tenant. If you need explicit control over the amount of memory or storage, you should license a dedicated private test tenant instead. This tenant can be used for productive or non-productive use.
Setting Up Security on Your Test System
Once the SAP Analytics Cloud systems are in place, start your deployment by setting up roles, users, and teams in your test system.
To get started, see Security Concepts and Best
Practice.
You can keep the same name across different systems for the objects that you want to export to production.
For example, it’s easier to use a name like “ConnectionBW” than “TestConnectionBW”.
- Set Up Roles
- Each SAP Analytics Cloud system comes with standard roles such as Admin, Content Creator, and Viewer.
- Along with this, it is recommended to have your own custom roles in your test system. You can assign multiple roles to each user or team. They’ll get the combined permissions from all their roles (that is, the union of the roles).
- Create test and development users
- Set up users manually in your test system, or upload a CSV file with the user data.
- You can also manage your users and teams with the User and Team Provisioning
API. Note
- Do not create your business users in the test system since it has limited user licenses.
- For more information, see the Choose Test Systems.
- Set Up SSO
- To make your users log in with single sign on (SSO), you need to set it up on each system. It is also recommended to set up SSO for connections to live data sources.
- Create Teams
- Teams let you share files and assign roles to groups of users, instead of individual users.
- For example, you can create two separate teams for each project, one for content creators and one for viewers.
- Follow these instructions to set
teams up manually, or use the API. Note
- Include the team’s name in the description field to make sharing easier.
- With SSO enabled, you can automatically assign users to teams based on SAML attributes.
- Avoid using team folders for lifecycle management, as you can’t export content in these folders.
- Create folders and set permissions
- Folder structures help you organize your content and restrict access to it.
- For example, you can create content in the private My Files folder on your test system, and then save it to a folder within the Public folder before exporting it.
- You can use sharing settings to restrict access to this folder and
any files saved within it, which is quicker than managing access to
individual files.Note
- Keep your folder structure simple to make navigation quicker and easier for your business users.
- For example, create one folder for each project or line of business.
- To apply folder-level permissions to your models, save
them in their project folders instead of saving them all
together in the Models folder. For the
best practices, see SAP Analytics Cloud -
Security Concepts and Best Practices.
- When you export a file, its folder structure will be added to the export automatically. Configure sharing settings again based on how you export it.
Creating Content on Your Test System
Once you’ve set up your users, teams, and other security configurations on your test system, you’re ready to create some content. There’s a few steps involved to create powerful analytics from your data with SAP Analytics Cloud.
- Create Connections:
Create connections to data sources in the test system.
You can connect to test data and change the connections after you import the data to the production system. There are two types of connections:- Live data connections
- Import data connections
For import data connections, share with the users who need to create models based on them. For more information on setting up both data connections, see Data Connections.
- Create Models:
Build your models in the test system within the My Files folder, and then save them to a restricted folder in the Public folder. Then, set up security for models using sharing settings. Also set up security for the data within the model, if needed.
For models based on live data connections, you can let the source system determine each user’s access level. For import data models, you can use model privacy to grant access by role to all model data, or to segments of it.
You can also use Data Access Control on one or more dimensions to grant read and write access to individual users or teams. If you use both Data Access Control and model privacy, users must meet both conditions to view data. For more details, see Model and Version Security.
- Create Stories, Story Templates, Planning Processes, Analytic Applications, Digital
Boardroom presentations, or any other content:
You can now get started with creating rest of your content. As with models, save files in the My Files area first, and then to a folder in the Public folder once you’re ready to export them.
To get started with a basic story, see Creating Your First Story. To get started with prebuilt stories, create a few story templates. Your users can create their own stories based on these templates to keep a consistent look and feel.
For more details, see Video: Save Stories as Templates. After the stories are ready, you can organize story pages to create Digital Boardroom presentations. To see a complete presentation, users will need to have permissions for the story pages as well as the presentation itself.
Exporting Content
Once you’re ready to start promoting content to your production system, you can choose whether to use local .tgz files or transfer over the cloud using the content network. To keep your content organized, available, and secured by appropriate permissions, we recommend using the content network.
- To get an overview of both tools, see Transporting Content (Lifecycle Management)
- For detailed steps to export to the content network, see Transport Your Private Content Through Content Network Storage.
- For steps to export to a .tgz file, see Transport Your Private Content Through
File System.
Either way, the workflow is the same.
Note- Sharing settings are included with .tgz exports, but not with the content network exports.
- You need to maintain and share access for the lifecycle permission to access the content network and export packages from it. You need to have read access to export and import .tgz files. For more details, see Permissions.
- By default, each SAP Analytics Cloud system can share up to 300 MB on the content network.
- To import from the content network, your system should be on the same version of SAP Analytics Cloud as the exporting system, or later.
- The .tgz files are only compatible with the same version of SAP Analytics Cloud, or with the subsequent release, so don’t wait too long before importing your content.
Here are the various content sources to export:
- Export roles:
Start by exporting a package with your custom roles.
- Export connections:
If you prefer, you can create the connections again in your production system instead.
- Export remaining content
Start by adding business user content such as stories and Digital Boardroom presentations to your exports. Dependent content such as folders, models, and dimensions will be included as well.
If you’re using the Content Network, you can choose whether to include data for an import data model. If the model has a lot of data, you can exclude it to speed up the import process and save storage space.
If you’re exporting to a file, we recommend leaving the data out and refreshing it in the production system to keep the file size down. To do this, deselect the Include Data checkbox.
Setting Up a Production System
Once you have created and exported content from your fully configured test system, you can import this content in your production system.
-
To get familiar with the process for importing from the Content Network, see Transporting Content (Lifecycle Management).
-
Ensure that you look in the My Content folder to see privately shared content.
-
To learn about importing from .tgz files, see Transport Your Private Content Through File System.
- Set up your system to receive imports from the Content Network
:
If you’re using the Transport, navigate to Main Menu > Transport > Export and open the My Content folder. Select the Settings icon and ensure that your system can accept exports from the test system.
- Create users:
Like in your test system, you can create users manually or by mapping SAML attributes, upload a CSV file with the user data, or add users and teams programmatically.
If your production users are similar to your users in the test system, you can get started on the CSV file by exporting user data from the test system.
- Set up SSO :
If you want to use SSO, set it up in your production system as you did in the test system.
- Create your teams :
You’ll need to set up teams separately in your production system, since they can’t be exported. Use the same names for the production teams. You can also do this with the User and Team Provisioning API.
- Import roles :
Import the package with your custom roles or create the roles manually and assign teams.
- Import connections :
If you need to change the connections for production data sources, you can import connections. You can also create the connections manually in your production system using the same names.
For import data connections, share the connections with teams or users who need to access them. - Import your content :
Now, you’re ready to add the content. Import the models, stories, presentations, apps, and processes that you need.
If you’re importing with .tgz files, you can import the content a second time to include the sharing settings for your content. During the second import, select Update Existing Objects and turn the other options off. - Check permissions:
If you’re using the content network, set up the sharing settings for your folders again, as well as for any individual files with specific sharing settings.
If you are using .tgz exports, verify the sharing settings after the second import. - Tag models to production data : Since now the connections are updated and your models are imported, you can connect the models to the production data.
- If the connection name for a live data model is changed, you can point the model to a different connection.
- For import data models, you can import data from the production data source. You may also want to schedule regular data imports.
Once you’ve finished this step, your content is ready for productive use.
Updating Your Content
When you’re ready to create new content or make updates, verify it in the test system first. Then, import the content to the production system.
If the connections already exist in the production system, you can exclude them from the export. When importing updated content, note that two versions of the same object can’t exist on an SAP Analytics Cloud system.
The content network import workflow identifies any overlapping content. You can choose not to import the overlapping content, or you can overwrite the existing version of the content.
For more details on the overwrite options, see,
You can also use collaboration features to inform users about the new version.
Use Case: Lifecycle Management for SAP Business Content
To get a quicker start on your analytics and planning scenarios, you can import business content packages from the content network.
Check out our Content Package User Guide for full details on all the Business Content currently offered.
If you plan on importing business content, it’s best to set up three SAP Analytics Cloud systems based on different phases of a product lifecycle:
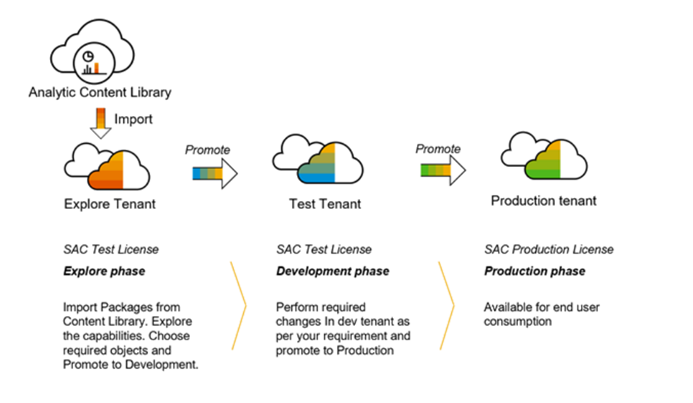
- Explore Phase:
Use separate system to import business content and verify if it meets your needs. You can try the content with sample data or connect live data models to your data sources. If the content matches your needs, choose the objects that you want to promote to the test system for further development.
- Development Phase:
During this phase, you import the business content to your test system and connect it to your data source. Now you can change the models, stories, processes, and presentations to meet your needs.
Note- Objects in the SAP Analytics Cloud have a unique identifier that remains the same when content is imported to a new system. When you import an object with a conflicting ID, you need to discard one of the versions of the object.
- If your test system already has an earlier version of business content, you’ll see a warning during the import process.
- You can choose whether to overwrite the existing objects or discard the conflicting objects from the import.
- In case if you want to copy the existing content before overwriting it to make sure that you don’t lose any data or work.
- You can also use another system in this phase to test your changes to the business content, if needed.
- Production Phase:
When the content is ready, you can include it in your main lifecycle management workflow: import the content to production, set up permissions, and connect it to your production data sources.