Best Practice: Add and Remove Dimensions on a Table
As an application designer or story developer, learn how to let viewers control which measures and dimensions to be displayed on the table.
Prerequisites
-
You've already added a table with Table as the ID.
-
To follow this sample use case, use the model BestRun_Advanced.
Context
-
The first one displays all the available measures for them to select for the table.
-
The second one displays the available dimensions for them to select for the columns.
-
The third one displays the available dimensions for them to select for the rows.
-
The fourth one displays the dimensions for them to add to the second or third checkbox group.
-
The fifth one is invisible at view time and only needed to sort dimensions.
Procedure
-
Create the first checkbox group, which displays all the available measures.
- Add a checkbox group widget, and place it to the left of your table. Leave some space above so that you can add labels and buttons later on.
- Change the ID of the widget to CheckboxGroup_Measures.
- In the Builder panel of the widget, remove the initial values Value 1 and Value 2 from the checkbox group value list.
-
Add a label to the checkbox group.
- Add a text widget, and place it above the checkbox group.
- Enter Measures as the text.
- Change the ID of the widget to CheckboxGroup_Measures_Label.
- Similarly, create a second checkbox group with the ID CheckboxGroup_Columns, which displays the available dimensions for columns. Add a label with CheckboxGroup_Columns_Label as the ID and Columns as the text.
- Create a third checkbox group with the ID CheckboxGroup_Rows, which displays the available dimensions for rows. Add a label with CheckboxGroup_Rows_Label as the ID and Rows as the text.
- Create a fourth checkbox group with the ID CheckboxGroup_Free, which displays the available dimensions for columns and rows checkbox group. Add a label with CheckboxGroup_Free_Label as the ID and Free as the text.
-
Create the last checkbox group:
- Add a checkbox group, and enter CheckboxGroup_AllDimensions as its ID.
- Since the last checkbox group is invisible, it doesn't need a label and can be placed anywhere, for example, on the right.
- To make the checkbox group invisible, under Actions in its Styling panel, deselect Show this item at view time (for analytic applications), or select Hidden under View Time Visibility (for optimized stories).
-
For easy access to the checkbox groups' measures, add the seven buttons:
-
For the first button, enter Button_setMeasureFilter as the ID and set selected as the text. Place it between Measures and the first checkbox group.
This button sets the selected measures from the measures checkbox group as the measures on the table.
-
For the second button, enter Button_removeAllMeasures as the ID and remove all as the text. Place it to the right of the first button.
This button deselects all the measures from the measures checkbox group and removes all from the table.
-
For the third button, enter Button_setAllMeasures as the ID and set all as the text. Place it to the right of the second button.
This button sets all the available measures as the measures on the table.
-
For the fourth button, enter Button_ColRemove as the ID and Remove as the text. Place it next to Columns.
This button removes the selected dimensions from the columns checkbox group and the dimension columns from the table.
-
For the fifth button, enter Button_RowRemove as the ID and Remove as the text. Place it next to Rows.
This button removes the selected dimensions from the rows checkbox group and the dimension rows from the table.
-
For the sixth button, enter Button_AddToCol as the ID and add to Column as the text. Place it next to Free.
This button adds the selected dimensions to the columns.
-
For the seventh button, enter Button_AddToRow as the ID and add to Row as the text. Place it next to the sixth button.
This button adds the selected dimensions to the rows.
-
-
To access the values viewers select from the checkbox group, create five script variables, which act as global variables and can
be accessed from anywhere in your application or story:
-
The first script variable, called AllDimensions, is string type set as an array and holds all the dimensions in the dataset.
-
The second script variable, called AllMeasures, is string type set as an array and holds all the measures that viewers can select from the checkbox group.
-
The third script variable, called CurrentDimensionColumn, is string type set as an array and holds the selected dimensions to add to columns.
-
The fourth script variable, called CurrentDimensionRows, is string type set as an array and holds the selected dimensions to add to the rows.
-
The fifth script variable, called CurrentMeasureFilterSelection, is string type set as an array and holds the selected measures from the measures checkbox group.
-
-
To define what happens when viewers make selections in one of the checkbox groups, create a script object, and write functions in
it.
- In the Scripting section in Outline, add a script object.
-
Hover over ScriptObject_1, and select

 (More)
  Add Script Function
 .
.
- Rename ScriptObject_1 to Utils.
- Rename function1 to setDimensionCheckboxes, and.function2 to setMeasureFilter.
- In the Script Function panel of setMeasureFilter, add an argument, with selectedIds as the name, string as the type and Set As Array on.
-
To write the script for the first function, hover over the setDimensionCheckboxes in the
Outline panel, and select
 . Enter the following script in the script editor:
Sample Code
. Enter the following script in the script editor:
Sample CodeCheckboxGroup_Columns.removeAllItems(); CheckboxGroup_Rows.removeAllItems(); CheckboxGroup_Free.removeAllItems(); CurrentDimensionColumn = ArrayUtils.create(Type.string); CurrentDimensionRows = ArrayUtils.create(Type.string); console.log(["CurrentDimensionColumn should empty", CurrentDimensionColumn.slice()]); console.log(["CurrentDimensionRows should empty", CurrentDimensionRows.slice()]); // Dimension in Columns var dimCol = Table.getDimensionsOnColumns(); if (dimCol.length > 0) { for (var i=0;i<dimCol.length; i++){ CurrentDimensionColumn.push(dimCol[i]); console.log(["CurrentDimensionColumn ", dimCol[i]]); } } // Dimension in Rows var dimRows = Table.getDimensionsOnRows(); if (dimRows.length > 0) { for (i=0;i<dimRows.length; i++){ CurrentDimensionRows.push(dimRows[i]); console.log(["CurrentDimensionRows ", dimRows[i]]); } } // get all Dimensions if (AllDimensions.length > 0) { for (i=0;i<AllDimensions.length; i++){ if (AllDimensions[i] !== "") { CheckboxGroup_AllDimensions.setSelectedKeys([AllDimensions[i]]); var dimdesc = CheckboxGroup_AllDimensions.getSelectedTexts(); CheckboxGroup_Free.addItem(AllDimensions[i],dimdesc[0]); console.log(["AllDimensions",AllDimensions[i], dimdesc[0]]); } } } console.log(["CurrentDimensionColumn",CurrentDimensionColumn]); console.log(["CurrentDimensionRows",CurrentDimensionRows]); // remove the dimensions from the free list, which are in rows / columns if (CurrentDimensionRows.length > 0) { for (i=0;i<CurrentDimensionRows.length;i++){ if (CurrentDimensionRows[i] !== "") { CheckboxGroup_Free.setSelectedKeys([CurrentDimensionRows[i]]); dimdesc = CheckboxGroup_Free.getSelectedTexts(); CheckboxGroup_Rows.addItem(CurrentDimensionRows[i],dimdesc[0]); CheckboxGroup_Free.removeItem(CurrentDimensionRows[i]); } } } if (CurrentDimensionColumn.length > 0) { for (i=0;i<CurrentDimensionColumn.length;i++){ if (CurrentDimensionColumn[i] !== "") { CheckboxGroup_Free.setSelectedKeys([CurrentDimensionColumn[i]]); dimdesc = CheckboxGroup_Free.getSelectedTexts(); CheckboxGroup_Columns.addItem(CurrentDimensionColumn[i],dimdesc[0]); CheckboxGroup_Free.removeItem(CurrentDimensionColumn[i]); } } } -
Write the following script for the second function setMeasureFilter:
Sample Code
// remove Measures
Table.getDataSource().removeDimensionFilter("Account_BestRunJ_sold");

// add Measures
Table.getDataSource().setDimensionFilter("Account_BestRunJ_sold",selectedIds);

// save the current selection into global variable
CurrentMeasureFilterSelection = selectedIds;
-
Write scripts to define what happens when viewers click on the buttons you just created.
-
For setMeasureFilter, write the following script:
Sample Code
Utils.setMeasureFilter(CheckboxGroup_Measures.getSelectedKeys());
This onClick function script calls the Utils.setMeasureFilter function and passes to it the selected measures of the checkbox group.
-
For removeAllMeasures, write the following script:
Sample Code
CheckboxGroup_Measures.setSelectedKeys([""]);
Utils.setMeasureFilter([""]);
This onClick function script removes all the selected measures from the checkbox group and passes an empty array to the Utils.setMeasureFilter, which updates your table.
-
For setAllMeasures , write the following script:
Sample Code
CheckboxGroup_Measures.setSelectedKeys(AllMeasures);
Utils.setMeasureFilter(AllMeasures);
This onClick function script sets the selected keys of the checkbox group to the AllMeasures script variable you defined before and passes the same variable to the Utils.setMeasureFilter function.
-
For ColRemove, write the following script:
Sample Code
var selKeys = CheckboxGroup_Columns.getSelectedKeys();

for (var i=0;i<selKeys.length; i++){
		// remove dimension
		Table.removeDimension(selKeys[i]);
	}

Utils.setDimensionCheckboxes();
This onClick function script gets the selected keys of the columns checkbox group and removes these dimensions from the table. It then calls the setDimensionCheckboxes function to set the checkboxes according to the new selections.
-
For RowRemove, write the following script:
Sample Code
var selKeys = CheckboxGroup_Rows.getSelectedKeys();

for (var i=0;i<selKeys.length; i++){
		// remove dimension
		Table.removeDimension(selKeys[i]);
	}

Utils.setDimensionCheckboxes();
This onClick function script gets the selected keys of the rows checkbox group and then removes these dimensions from the table. It calls the setDimensionCheckboxes function to reset the checkboxes again according to the new selections.
-
For AddtoCol, write the following script:
Sample Code
var selKeys = CheckboxGroup_Free.getSelectedKeys();

for (var i=0;i<selKeys.length; i++){
		// add dimension to Column in table
		Table.addDimensionToColumns(selKeys[i]);
	}

Utils.setDimensionCheckboxes();
This onClick function script gets the selected keys of the free checkbox and adds the dimensions to the columns of the table. The script then calls the setDimensionCheckboxes function to set the checkboxes according to the new selection.
-
For AddtoRow, write the following script:
Sample Code
var selKeys = CheckboxGroup_Free.getSelectedKeys();

for (var i=0;i<selKeys.length; i++){
		// remove dimension
		Table.addDimensionToRows(selKeys[i]);
	}

Utils.setDimensionCheckboxes();
This onClick function script gets the selected keys of the free checkbox and adds the dimensions to the rows of the table. It also calls the setDimensionCheckboxes function to set the checkboxes according to the new selection.
-
For setMeasureFilter, write the following script:
-
Define what happens when the application or story is first run by creating the onInitialization function.
-
In the Outline panel, hover over Canvas (for analytic applications) or the
relevant page (for optimized stories), and select


 onInitialization
 .
.
-
Enter the following script in the script editor:
Sample Code
// Measures
// get all measures from the table data source
var measures = Table.getDataSource().getMeasures();

// define array or the selected Keys
var selectedKeys = ArrayUtils.create(Type.string);

if (measures.length > 0) {
	for (var i=0;i<measures.length; i++){
		// add the Measure to checkbox group
		CheckboxGroup_Measures.addItem(measures[i].id,measures[i].description);
		//add the measure to the selected Keys
		selectedKeys.push(measures[i].id);
	}
}
CheckboxGroup_Measures.setSelectedKeys(selectedKeys);
console.log(["selectedKey ", selectedKeys]);
AllMeasures = selectedKeys;

// define array or the selected Keys
var selectedDims = ArrayUtils.create(Type.string);
var dims = Table.getDataSource().getDimensions();
if (dims.length > 0) {
	for (i=0;i<dims.length; i++){
	CheckboxGroup_AllDimensions.addItem(dims[i ].id,dims[i].description);
selectedDims.push(dims[i].id);
	}
}

console.log(["selectedDims ", selectedDims]);
AllDimensions = selectedDims;

Utils.setMeasureFilter(selectedKeys);

Utils.setDimensionCheckboxes();
With this script, you make sure that on initialization, all the available measures of the table's data source are loaded.
You define a selected keys array of type string and, using a loop, you add the measures to your measures checkbox group and the selected keys array. You set the selected keys of the checkbox group to the selectedKeys variable and set your script variable AllMeasures to selectedKeys since it still holds all the measures of your dataset.
Afterwards, you define another string array and put all the dimensions of the data source in it, and add these dimensions as items of the checkbox group of all dimensions CheckboxGroup_AllDimensions.
Next, you set the script variable AllDimensions to the string array selectedDims that you created to store the dimensions in.
Finally, you call the functions of setMeasureFilter to set the selected keys to the array selectedKeys and to call the setDimensionCheckboxes function to set the dimension checkboxes to its initial state.
-
In the Outline panel, hover over Canvas (for analytic applications) or the
relevant page (for optimized stories), and select
- Save the application or story, and open it in view time.
Results
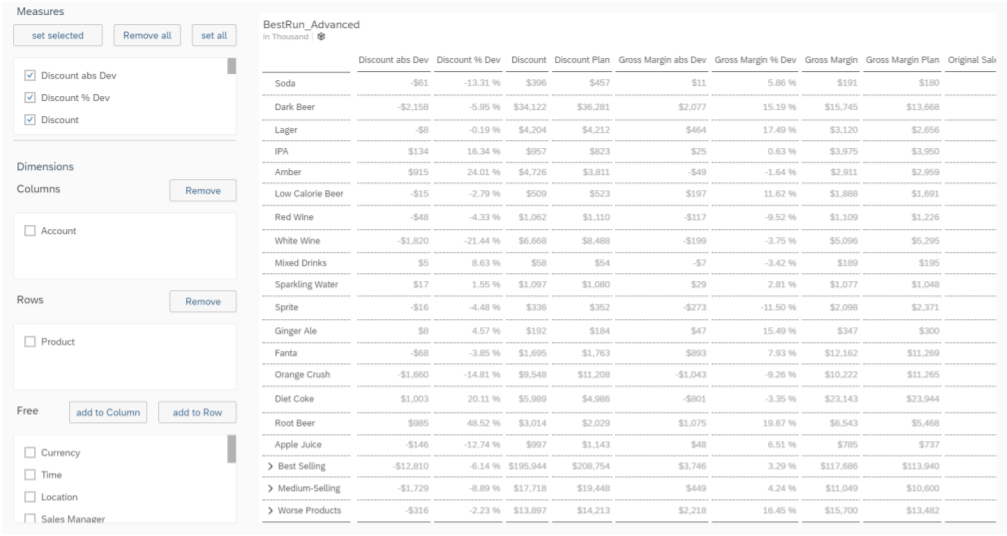
When you run the application or story, it looks like this:

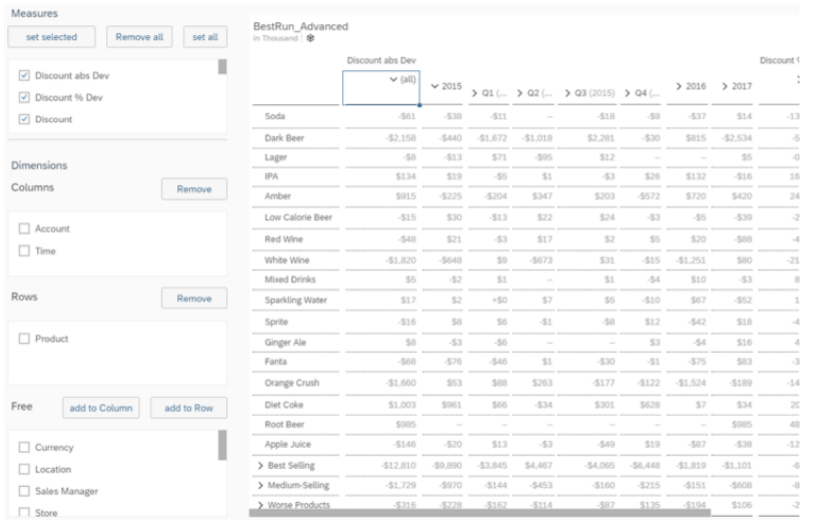
If you select Time in the Free checkbox and select add to Column, this dimension gets added to the table columns so that you can get a more detailed view.

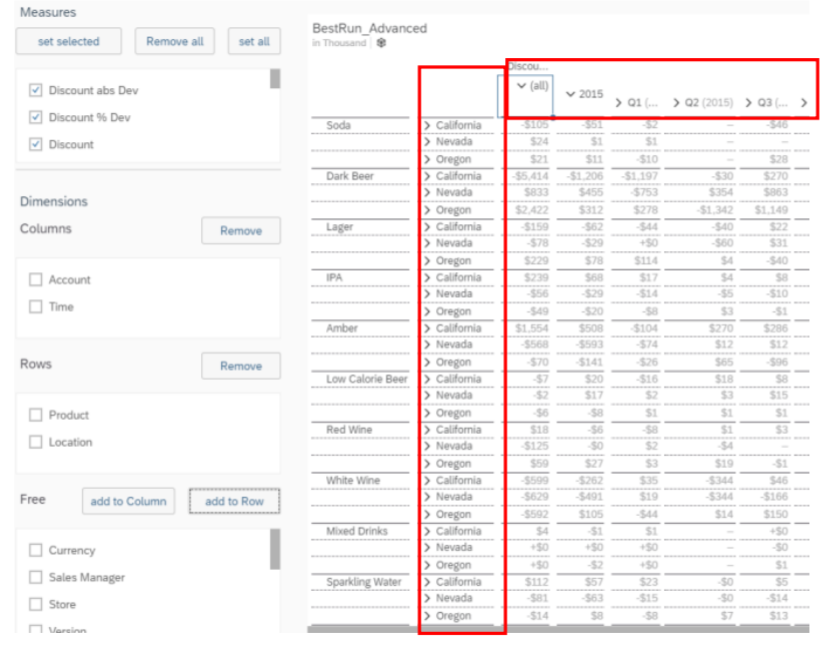
If you select Location and select add to Row, you can see the columns filtered on time and rows on location.

You can get back to starting condition by selecting Remove of the column and row checkboxes.