Changing the Signs of Your Account Values Using Numeric Properties
To change which accounts show positive values and which show negative values for different types of users, you can create a calculated
measure using a numeric property from the account dimension.
Context
In charts and tables, automatic sign switching is applied to measures for income accounts and liabilities and equity accounts. These accounts
usually hold negative values in your model so that they balance out expenses and assets in your financial statements. However, in
stories and analytic applications they’ll show up as positive values to make the data easier to work with. For details, see Attributes of an Account Dimension.
However, you might want to change the signs for different user types. For example, an accountant may want to see income and expense values as
negative, while a manager may want to see negative income values and positive expense values.
To customize your account values in this way, you can add numeric properties to the account dimension and create calculated measures
based on them.
Note
This functionality isn’t available for classic account models, since they don’t support calculated measures in the
modeler.
Procedure
-
From the Model Structure workspace in the modeler, select the account dimension from the list of dimensions to open
the grid display.
-
In the Dimension Settings panel, select
 next to Properties to add a custom property.
-
Type an ID and description, and set the Data Type to Integer. Select
Done.
The new property column is added to the grid view.
-
In the property column, add a value for each account.
The value should be -1 for accounts where you want to change the sign, and otherwise 1.
(Remember that automatic sign switching is still applied to the INC and LEQ account values, so in general use -1 for accounts that should show
negative values. You can also use the calculation preview to make sure that your results are correct when setting up the
calculated measures.)
Fill in values for all account members to avoid null values in the calculation results.
-
If needed, add more properties to set up different representations of the data.

Adding numeric properties for different user types
When all the properties are ready, you can add a calculated measure for each property.
-
Switch to the calculations workspace by selecting
 (Back) and choosing Calculations from the workspace list.
-
Select
 (Add Calculated
Measure) in the Calculated Measures list.
-
Type a name and description for the calculated measure.
-
Set the Units & Currencies and Formatting settings.
Usually you’ll want to match the settings of the base measure for this calculation.
-
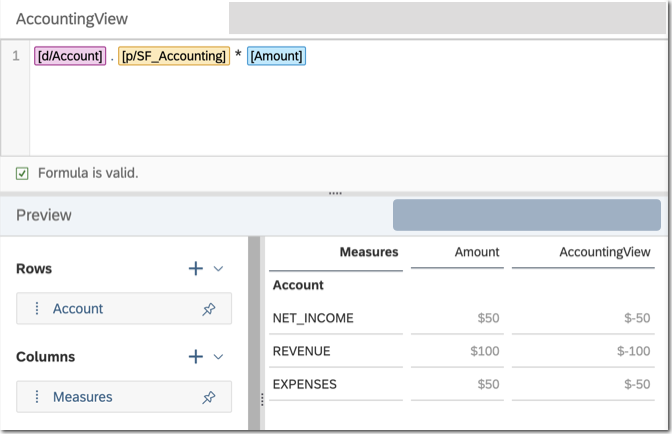
Type the calculation in this format:
[d/AccountDimension].[p/PropertyName]*[BaseMeasure]
If your model has data, you can see a
preview of the results.

A sign flip calculated measure with preview data
-
If you’re setting up the calculated measure for planning, add an inverse function to the formula to let users enter data on
it.
This function lets you change the base measure value by entering data on the formula.
Use the following
format:
[d/AccountDimension].[p/PropertyName]*[BaseMeasure]|INVERSE([BaseMeasure]:=[CalculatedMeasure]/[d/AccountDimension].[p/PropertyName]
For details about inverse formulas, see
Inverse Formulas.
-
Set up more calculated measures for any other account properties that you want to use to switch sign values.
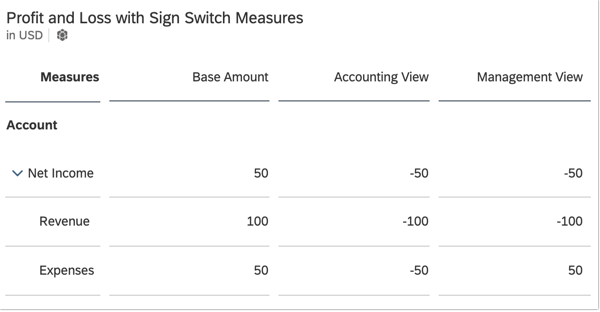
When you’re finished, you can add the calculated measures to tables and charts. If you added inverse formulas to the
calculations for a planning model, users can enter data on the calculations instead of the base measure.

A table showing a base measure and two calculations with sign switching
 next to
 (
(
