Generate Tasks and Processes with the Calendar Wizard

Use a wizard in the SAP Analytics Cloud calendar to generate tasks and processes from a driving dimension, usually an organizational dimension.

Prerequisites

  • You need a planning model that has at least one dimension with responsible users defined in the dimension properties.

  • To let the assignees and the reviewers of the generated events view the correct set of data, make sure your administrator has set up Data Access Control for the dimension you’ll use as driving dimension. For more information, see Set Up Data Access Control.

Context

The calendar wizard lets you generate tasks and processes along a driving dimension. You will be able to select specific members in the dimension hierarchy. Members that are defined as nodes in the dimension hierarchy will generate processes, leaf members will generate tasks. The generated tasks are either general tasks and review tasks, or composite tasks.

By selecting specific dimension properties with assigned user names, you can specify the assignees and reviewers of the generated tasks.

Example

For example, your model may have an "Organization" dimension with users responsible for different regions or departments, and a "Product" dimension with users responsible for different groups of products. In a data collection process, tasks for each region will be generated, and the regional managers will be asked to enter their data as assignees of these tasks, the product managers can be set as reviewers.

You can generate the events for an existing process that is not in final status and not yet due, or you create a new parent process and its child events directly with the wizard.

Video: How to Create Planning Events Using the Calendar

Open this video in a new window

In this video, you will create the events for a planning process using the integrated calendar in SAP Analytics Cloud.

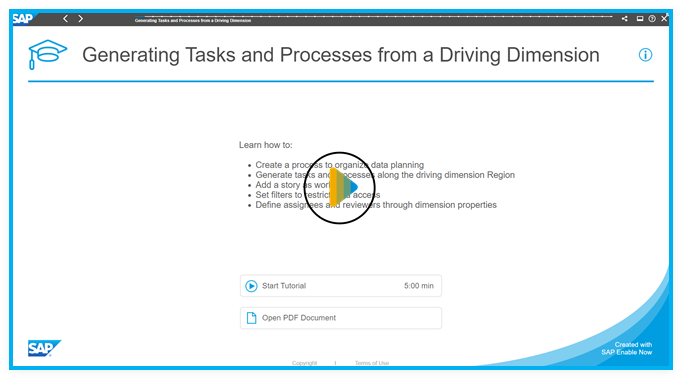
Learning Tutorial

Click through the interactive tutorial illustrating how to create a process and generate child events such as tasks and processes in step-by-step instructions (5:00 min); the tutorial is captioned exclusively in English:

Procedure

  1. Optional: If you’d like to generate events for an existing process, select an Inactive or In Progress process in the calendar that is not yet due.
  2. Choose Start of the navigation path (Create) Next navigation step  Generate Events with WizardEnd of the navigation path.

    The calendar wizard appears.

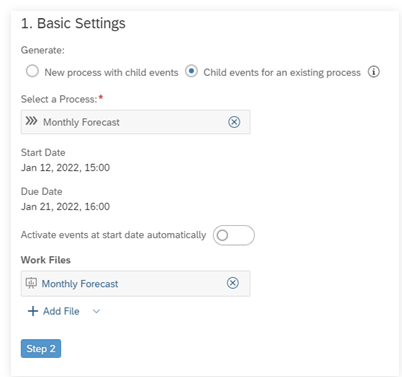
Step 1: Basic Settings

Procedure

  1. If you haven’t selected an existing process, you can generate a new process with child events: Enter a name for the new process that will be used as parent process.

    If you use an existing process:

    All child events will inherit the applicable settings of the process (time settings, work files, description, context, additional information, and reminders).

  2. Define the start and due dates for your generated events.
  3. Optional: If you want the events to start automatically at the selected start date, choose Activate events at start date automatically.
  4. Optional: You can add work files to the generated events by selecting Add File.
    These can be stories, analytic applications, or URLs.
    Note

    If you use an existing process and it already has a work file, the work file will be replicated to the generated events. You can still modify the work file once the events are generated.

  5. To continue, select Step 2.

Step 2: Context

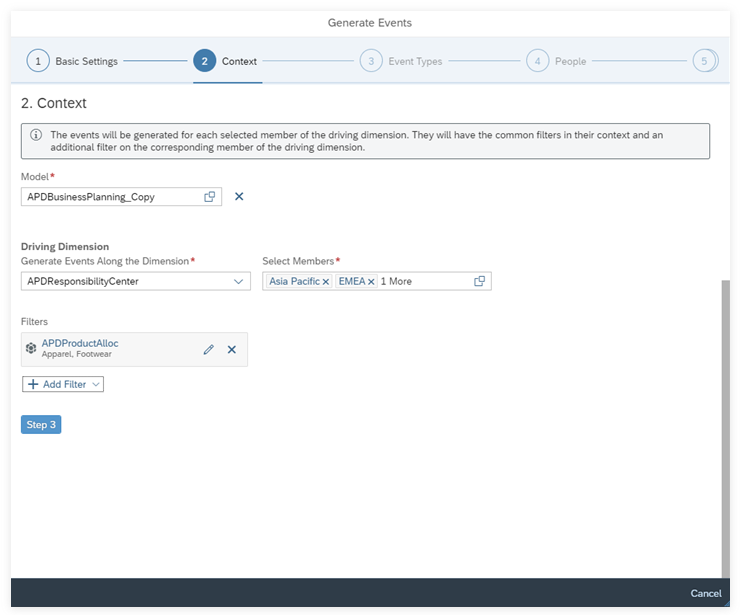
Define the context for the generated events:

Procedure

  1. Select a planning model that has at least one dimension with responsible users defined in the dimension properties.
  2. Select the dimension that will be used as the driving dimension for the event generation.
  3. Select the dimension members.

    The events will be generated for each selected member of the driving dimension. Members that are defined as nodes in the dimension hierarchy will generate processes, leaf members will generate tasks. The work files of each event will be filtered according to the corresponding member.

  4. Optional: You can add additional common filters that will be applied to the work files of all events.
  5. To continue, select Step 3.

Step 3: Event Types

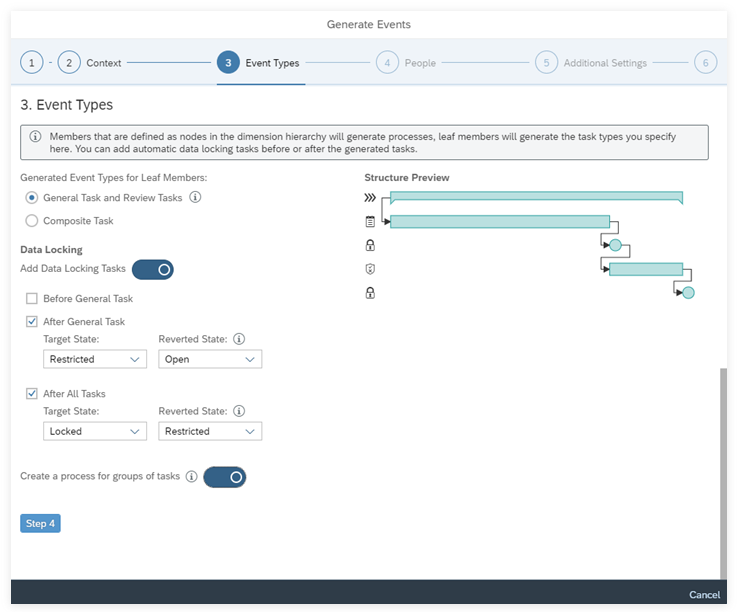
Define which task types to generate for the leaf members and if the data should be locked before or after the generated tasks:

Procedure

  1. Choose one of the following options:
    Generated Event Types for Leaf Members What You Should Know
    General Task and Review Tasks A general task will be generated for each leaf member.
    • If there are users defined for the property you'll select for reviewers in the People step (step 4), a review task will be generated, as well.

    • If you add several review rounds in the People step (step 4), a review task for each round will be generated.

    You can add an automatic data locking task before and after the general task, and after all review tasks.
    Composite Task A composite task will be generated for each leaf member. You can add an automatic data locking task before and after the composite task.
    Note

    You can't lock the data before the review starts. If needed, choose General Task and Review Tasks instead.

  2. Optional: If you need data locking before, in between, or after the generated task, select Add Data Locking Tasks and define the required data locking settings and when they should take place.
  3. Optional: Choose the target lock state that will be set automatically:
    Lock State Description
    Open The data will be unlocked and can be changed by any users who have permissions to enter values for the model.
    Restricted The data will be locked, but data locking owners can still change values.
    Locked The data will be locked, and only Admin users and the model creator can change values.
  4. Optional: Choose the reverted lock state: If the task is reopened, the data will automatically be set to the state you select under Reverted State.

    By default, the reverted lock state is Open.

    Example

    The task can be reopened as follows:

    • You (as owner) click on the arrow next to the status in the header section and select Reopen.

    • The task has a parent process with no assignee and the parent process is reopened. All child events (including data locking tasks) will be reopened as well.

    • The task is part of a dependency chain, and a reviewer rejects the work of the assignees. Then the preceding tasks are reopened, and preceding data locking tasks will apply the reverted lock state to the data. If the reverted lock state is set to Open, for example, the assignees can adapt the data.

    Note

    Note that data locking tasks with a start date in the past can’t apply the reverted lock state and need to be recreated.

  5. Optional: For a better overview of the generated tasks, you can group the generated tasks for each leaf member in a process. Select Create a process for groups of tasks.
  6. To continue, select Step 4.

Step 4: People

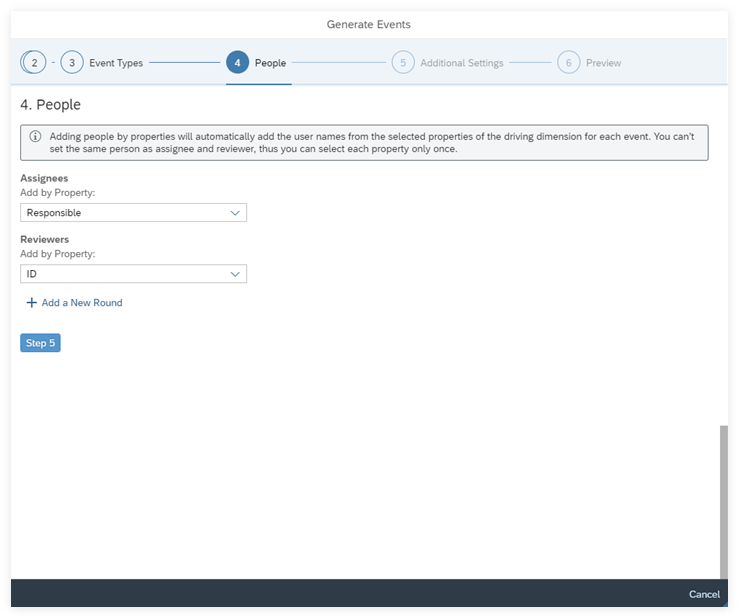
Set the properties for defining assignees or reviewers:

Procedure

  1. Depending on how your modeler has defined the dimension properties, assign either single or multiple users or teams per member.
    Note

    If multiple users or teams are defined in a dimension property, they need to be separated by semicolons like user1;user2;TEAM:team1;user3, for example.

    Tip

    You can view the user or team names in the preview in step 6.

    Note

    You can’t set the same person as assignee and reviewer, thus you can select each property only once.

  2. Optional: If required, you can add multiple review rounds: To do so, select Add a New Round.
    Tip

    You can move up or down the review rounds by clicking on the arrows.

  3. To continue, select Step 5.

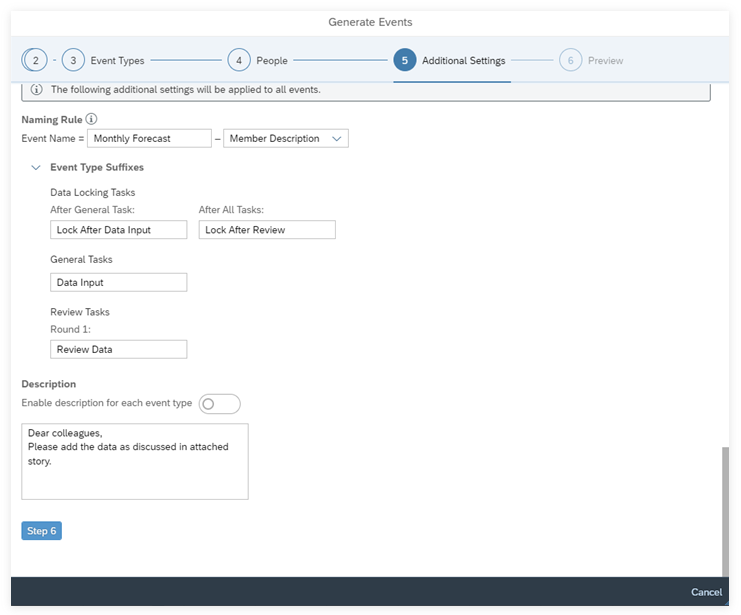
Step 5: Additional Settings

Procedure

  1. Define the names of the events.

    By default, the names are set up of the parent process name and the descriptions of each selected member. You can change the parent process name and choose if you’d like to use the description or the ID of the members to identify the generated child events.

  2. Review the default suffixes of the different task types and change them if needed.
  3. Optional: Add instructions or notes you’d like to share with the assignees and reviewers.
    • You can add a general description for all generated events.

    • To add individual descriptions for each task type, select Enable description for each event type and add some text in the corresponding Description field.

  4. To continue, select Step 6.

Step 6: Preview

Procedure

  1. Preview the list of events.

    If multiple users or teams are added, only the first user or team name is displayed and a link (... 3 More, for example) lets you access a dialog with the complete list of added users and teams.

    • To change the columns of the preview table, click Select columns to configure the table.

    • For more details or for a better overview, you can use the Expand/Collapse menu to expand or collapse the child event hierarchy.

  2. Optional: If you want to make changes, you can scroll up and down to go through the wizard and update your selections.
  3. If everything looks correct, select Generate.

    Your events are now being generated.

  4. Optional: Select Refresh from the menu bar.
    Tip

    Your calendar workspace will also be refreshed when you select Show More in the success message or when you click on the corresponding notification.

Results

The generated events are added to your calendar.

Note

When there are too many tasks to display in the Calendar workspace, a number appears. Select that to see the total number of events. In the List workspace, the hierarchy is collapsed and can be expanded.

Example Scenario: Generate Tasks for a Monthly Forecast Using the Calendar Wizard

This example scenario shows how you can add tasks to an already existing monthly forecast process.

Context

There are three regions that are involved in the monthly forecast: EMEA, Asia Pacific, and North America.
Procedure

  1. Select the "Monthly Forecast" process (in status Inactive or In Progress), and choose Start of the navigation path (Create) Next navigation step  Generate Events with WizardEnd of the navigation path.
  2. Optional: Add the work files that are required for the generated tasks.
    Note

    If you've already added the work file to the process before, it will be automatically added in the wizard.

  3. Select the planning model and the associated required Driving Dimension as well as the respective members for EMEA, Asia Pacific, and North America.
    Note

    If you'd like to add additional common filters that will be applied to the work files of all generated events, you can filter the "Monthly Forecast" story to "Apparel" and "Footwear", for example.

  4. Define the task types for the leaf members and add automatic data locking tasks:
    1. Keep the default setting General Task and Review Tasks as task types for the leaf members EMEA, Asia Pacific, and North America.

    2. Select Add Data Locking Tasks.

    3. To add an automatic data locking task after the assignees added their data, select After General Task and set the target lock state to Restricted and keep the reverted lock state set to Open.

      The data will be locked, but the data locking owners can still change values.

    4. To add an automatic data locking task after the reviewers checked the data, select After All Tasks and set the target lock state to Locked and set the reverted lock state set to Restricted.

      The data will be locked, and only Admin users and the model creator can change values.

    5. Select Create a process for groups of tasks.

      The wizard will generate three child processes for your "Monthly Forecast" process. Each child process will include a general task for data input followed by an automatic data locking task and a review task followed by another automatic data locking task.

  5. Set the properties for defining assignees or reviewers.

    If needed, you can add multiple review rounds.

  6. Optional: Define the names of the events and add a description.
    1. Keep the default names.

      The names are set up of the parent process name "Monthly Forecast" and the descriptions of each selected member.

    2. Review the default suffixes of the different task types and change them according to your needs.

    3. Add some notes or instructions as descriptions of the generated events.

  7. Preview the list of events, and if everything looks correct, select Generate.
  8. Optional: Select Refresh from the menu bar.
    Tip

    Your calendar workspace will also be refreshed when you select Show More in the success message or when you click on the corresponding notification.

Results

You’ve now generated the region specific tasks grouped by a process per region for your "Monthly Forecast" process.