Set Up Data Access Control
You can restrict access to data in your model by setting read and write permissions for individual dimension members. You can activate this security feature for any dimension in the model.
Data Access Control (DAC) Usage Restrictions
- A user having a role with all permissions, like a BI Admin role, can see all data of all models even if you set DAC on your dimensions. Indeed a role with "Full Data Access" privilege provides unrestricted access to all models and dimenstions. For more information, see Standard Application Roles
- On role level, you can define for every dimension whether user has UPDATE (allows to change structure), MAINTAIN (allows to change data) and READ (allows to read data and metadata) permissions. For more information, see Permissions.
- On an individual dimension you can then define data access control, which allows to specify on member level, whether users can READ, WRITE the corresponding facts. With the Hide Parents option in addition, the dimension data gets protected as well. For more information, see the next sections below.
- On model level, you can set the option Model Data Privacy, which allows to specify on role level a data security (READ and WRITE permissions). For more information, see Learn About Data Security in Your Model
- The file repository allows in addition to create private models, which other users per default cannot access. Those models can then be shared with others. For more information, see Share Files or Folders.
- Hierarchy support is only available for dimension based DAC
There is no priorities between roles and access control done at the model level: you access to data based on your role AND the DAC that has been set at the model/global dimension level. In a nutshell, you are able to see the data of a model once all the roles and access control permissions have been satisfied.
Securing Your Data at Dimension’s Level
You can restrict data access to individual values in the model to specific users using the Data Access Control (DAC) setting. When DAC is on, two extra columns, Read and Write, are added to the dimension grid so that you can apply individual settings to each row. To enable dimension security, switch on Data Access Control in the Dimension Settings.
Restrictions created using Data Access Control apply only to transaction data (fact data). Master data (members in member selection dialogs) will still be visible.
Saving DAC settings can be done in the background depending on the number of dimension members with DAC entries. After changing DAC settings, you are notified twice. Once right after you've saved the DAC settings to let you know that a given dimension is going to be updated and saved in the background. And a second time in the notification panel when the save is complete and that the DAC settings have been refreshed for that given dimension.
Setting a Data Access Control on Dimensions
-
Open the dimension that you want to modify.
- In the Dimension Settings panel, switch
Data Access Control on. NoteThe Read and Write columns are added to the dimension grid.
- Switch Hide Parents on if desired.Note
When you switch Hide Parents on, you restrict which dimension members can be seen in the Modeler or in Stories: If this option is enabled, users will see only the members that they have at least Read access to. For more information, see the example 2 at the end of this topic.
- You can now use the two new columns Read and
Write to control access to all rows of the
grid by selecting one or more users in either or both of the columns.
NoteEach user who is granted Write access for a member automatically receives permission to read the data as well. Likewise, a user who receives the Delete permission for a member of the Version dimension also receives Read and Write permissions for it.
Using Data Access Control for Version dimensions
- Only users with the Update privilege (defined in Security Roles) can set DAC for a version dimension.
- Version security applies only to planning-enabled models.
- The default read/write/delete permission is "none". You must explicitly enable read/write/delete access to users or teams, including yourself.
- Open or create a model, and select the version dimension.
- In the Dimension Settings panel, switch Data Access Control on, and then select OK. The three additional columns Read, Write, and Delete appear.
- Select a cell under Read, and then select
 to choose users and
teams who you want to grant read access to.
 - Do the same for the Write and Delete cells, to grant write and delete access.
You can see details of your choices in the Preview panel.
Setting Data Access Control on Dimensions Based on Custom Role
You can restrict access to data contained in your model with a filter, and set read and write permissions based on a custom role.
- Enable Model Data Privacy for your model. For example, my model name is <Model1>.
- Create a custom role <A>.
- Open the created role <A> and add the model <Model1> using Select Model tab.
- Select the access type you want to allow for this role: Full
Access or Limited Access.NoteIf you select Limited Access you can choose between Add Read Access or Define Write Access. You can then define a filter: For example, you add a filter on <Product = Book>.
- As a result, Users that are assigned to the custom role <A> can read only the data allowed by the filter <Product = Book> when opening <Model1>.
Setting Up Data Access Control - Examples
Example 1: How the data permissions restrict what users can do with a model:
- Account: Access control enabled
- Organization: Access control enabled
- Version
- Date
| Member ID | Read | Write |
|---|---|---|
| P00001 | MARTIN_BRODY | MARTIN_BRODY |
| P00002 | MATT_HOOPER | MATT_HOOPER |
| Member ID | Read | Write |
|---|---|---|
| EMEA | MARTIN_BRODY | MARTIN_BRODY |
| Germany | - | - |
| France | - | - |
| APJ | MATT_HOOPER | MATT_HOOPER |
| US | ||
| China | - | - |
| Organization | Public Version: Account.P00001 | Public Version: Account.P00002 |
|---|---|---|
| EMEA | 300 | 400 |
| Germany | 200 | 300 |
| France | 100 | 100 |
| APJ | 400 | 500 |
| US | 200 | 300 |
| China | 200 | 200 |
| Organization | Public Version: Account.P00001 |
|---|---|
| EMEA | 300 |
| Germany | 200 |
| France | 100 |
Don't forget that what Martin Brody can see also depends on his role and permission.
Example 2: Switching on Hide Parents
When you switch Hide Parents on, you restrict which dimension members can be seen in the Modeler or in Stories: If this option is enabled, users will see only the members that they have at least Read access to:
| User Role | Expected Behavior |
|---|---|
| SystemOwner | Will be able to see all the members. |
| Admin | Will be able to see all the members. |
| BI Admin | Will be able to see all the members. |
| BI Content Creator | Will be able to see all the members. |
| BI Content Viewer | Will be able to see only the members that they have at least Read access to. |
| Modeler | Will be able to see all the members. |
| Planner Reporter | Will be able to see only the members that they have at least Read access to. |
| Viewer | Will be able to see only the members that they have at least Read access to. |
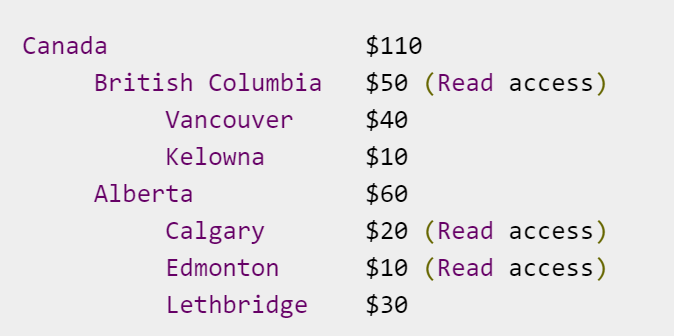
DAC is used to restrict access to the members Alberta and Lethbridge.
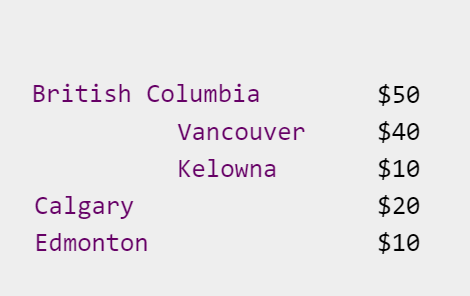
If you switch on the Hide Parents setting, Alberta and Lethbridge are not shown, and British Columbia, Calgary and Edmonton are moved up to the top hierarchy level:
If you turn off the Hide Parents setting, Calgary and Edmonton are displayed below their parent member Alberta:
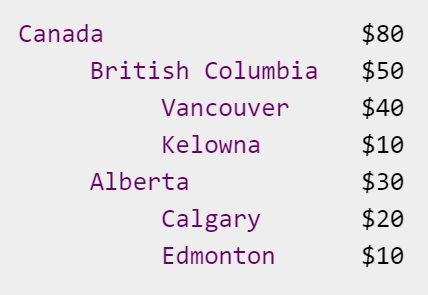
Depending on which dimension members users are authorized to see, the aggregated value for Alberta can be different for different users, which could be misleading. For example, if User A has read access to Lethbridge, but User B does not, then User A would see an aggregated value of $60 for Alberta, while User B would see $30.
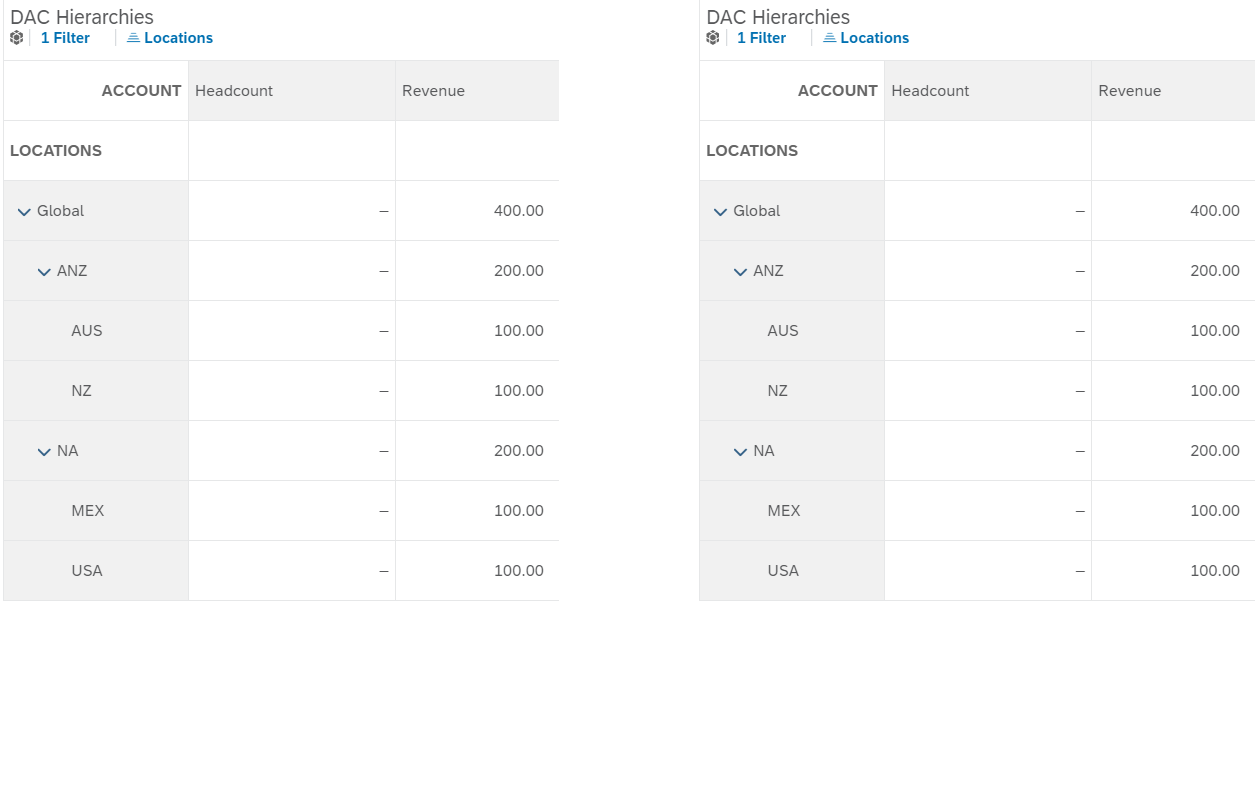
In the case you’ve been provided access on a node that is parent for more than one hierarchy, you won’t be able to view all members of the 2nd hierarchy: You’ll only see the members you were given access to the first hierarchy. Let’s take this example with the Parent “Locations”, which is parent of 2 hierarchies “Markets” and “Offices”:
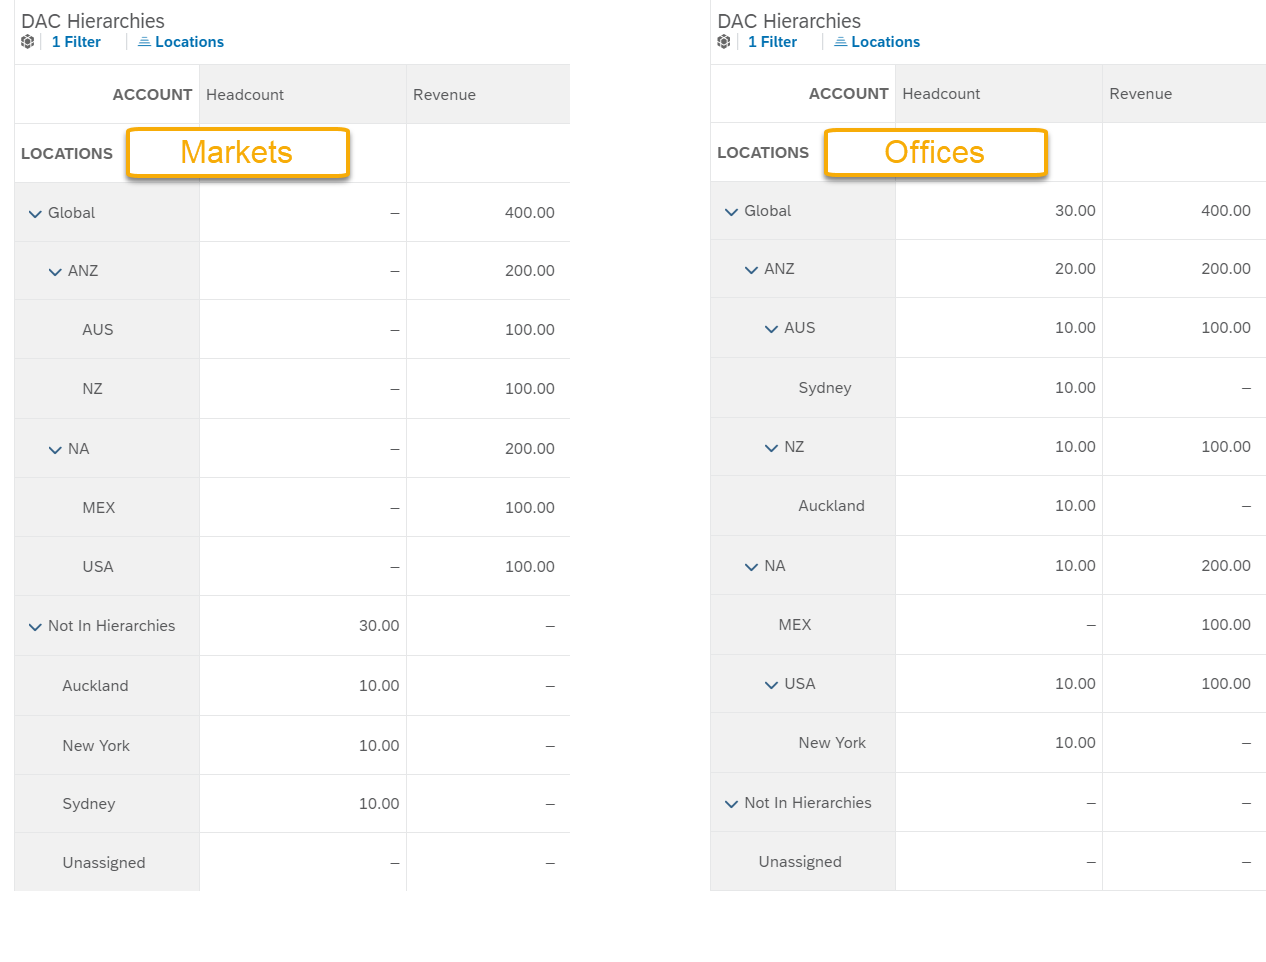
As you can see “Global” is member of both hierarchies. If Data Access Control is ON and Hide Parent is OFF, you won’t be able to see the transactional data for member that are not child of “Global” in hierarchy “Markets”:
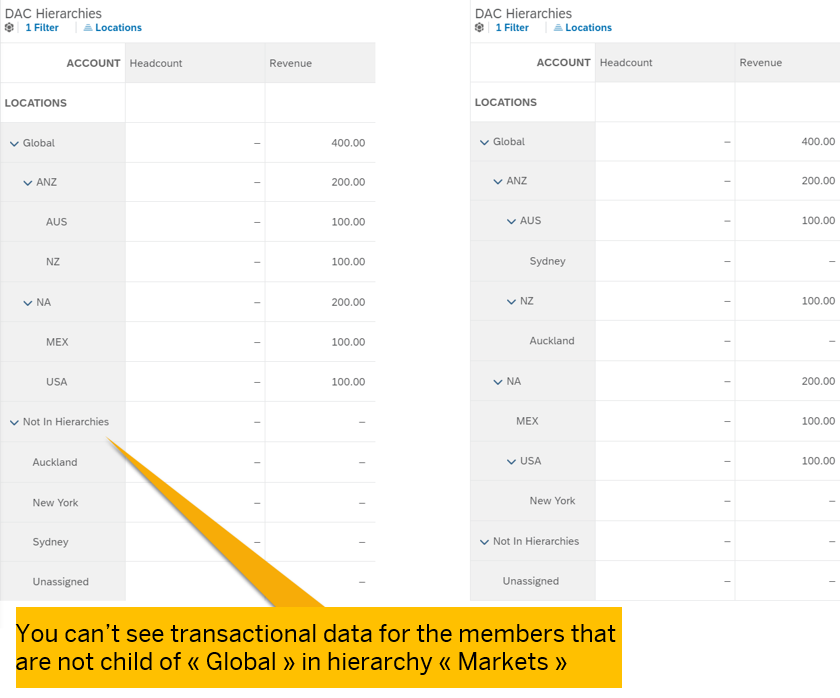
In the first hierarchy, the data access control cascades down: if you have access to the parent, you can see all children. But in the second hierarchy, this does not apply. Even if you have access to the parent, you will only see the children that are part of the first hierarchy and for which you have at least read authorizations.
Now if you switch the Hide Parent on ON, only the "Global" data will be shown:
