Schedule a Publication
As a content owner, you can set a schedule for sharing a copy of your story or analytic application, with users and teams of your choice. You can share the publication with any number of SAP Analytics Cloud users within the tenant and a maximum of three non-SAP Analytics Cloud users.
Getting Started with Scheduling Publication
Scheduling is the process by which you create a specific task and have it run once or at recurring intervals. In our context, you can schedule stories or analytic application and have them delivered to desired recipients both within SAP Analytics Cloud or outside. Let's take a look at some of the common terms you encounter while creating a scheduled publication.
Publication: The output of a story or analytic application that is generated when a schedule runs.
Broadcast: Allows the scheduling and sharing of analytics content with SAP Analytics Cloud users as well as non-SAP Analytics Cloud users. Using the Broadcast mode, publication schedulers can share stories containing data they're authorized to view. A typical example would be sharing a quarterly sales report with all stakeholders within a specific region. You’ll need the Schedule Publication privilege for this operation.
Burst: Allows the scheduling and sharing of analytics content with SAP Analytics Cloud users as well as non-SAP Analytics Cloud users. Using the Burst mode, publication schedulers can share stories with SAP Analytics Cloud users that contain data the recipients are authorized to view. For non-SAP Analytics Cloud recipients in the Burst mode, the publication will still contain information that the schedule creators have access to.
As of now, the bursting functionality is only available on stories.
Destination: The location where the scheduled publication will be delivered to.
Authorization: The data access rights associated with a scheduled publication. While scheduling a publication, if the mode chosen is Broadcast, the publications will be delivered to the desired recipients based on the data that the schedule owner has access to. If the mode chosen is Burst, the publications will be delivered to the respective recipients based on the data each recipient is authorized to view.
Bookmark: The copy of a story that you customize for a specific audience and that's saved for quick reference and retrieval. In scheduling, personalization for a particular audience is achieved through bookmarks and by using Prompts.
Understanding what scheduling publication offers will help you better decide on how and what you want to schedule and share with your team.
| Formats supported |
Note
You can also share a link to the story while scheduling a publication. |
||||
| Delivery channel | |||||
| Maximum email size | 12 MB | ||||
| Maximum number of SAP Analytics Cloud recipients | Infinite | ||||
| Maximum number of Non-SAP Analytics Cloud recipients | Three | ||||
| Content you can schedule | Stories along with the Bookmarks, and Analytic Application | ||||
| Recurrence interval | Hourly, Daily, Weekly, and Monthly | ||||
| Scheduling locations | Favorites menu, Featured files, the Files page, or from within the story itself |
Who Does This Apply To?
-
BI Admin or Admin roles that come with the Schedule Publication privilege by default.
-
Any custom role that has been assigned the Schedule Publication privileges, such as Create and Manage.
-
Anyone with a Copy or Edit permission to a story, once the Schedule Publication privilege is granted.
NoteWhen a user is deleted, all schedules created and owned by the user will be deleted.
NoteIf you're an administrator and are looking at configuring the publication schedule as well as understanding how many licenses you would need to create the necessary number of scheduled publications, see Configure Scheduling of Publication.
NoteFor information on permissions and privileges of a Schedule Manager, Schedule Administrator, or Publication Admin, see Schedule Manager, Schedule Administrator, or Publication Admin
NoteYou can also assign Schedule Publication permission to custom roles. To create custom roles, see Create Roles.
While choosing Burst as the scheduling mode, make sure that the recipients have access to the story and underlying models.
- Once you have the required privileges to create a schedule, and you choose Broadcast as the scheduling mode, the output generated when the schedule runs is based on the data you're authorized to access. To put it simply, the recipients get to view the information that you can view.
- If you choose Burst, the output generated will be based on the
recipient’s data authorization for SAP Analytics Cloud
users and the scheduler’s data authorization for non-SAP Analytics Cloud users.Note
Users with Manage permission on Schedule Publication, and public and private files, can modify the scheduled publication you've created.
Data Center You're On
-
Microsoft Azure US West (US20)
-
Microsoft Azure Europe (Netherlands) (EU20)
-
AWS Canada (Montreal) (CA10)
-
AWS Seoul (AP12)
-
AWS Europe Central (EU10)
-
AWS US East (US10)
-
AWS Brazil (BR10))
-
AWS Japan (JP10)
-
AWS Sydney (AP10)
-
AWS Singapore (AP11)
-
Ali Cloud China (CN40)
- SAP Analytics Cloud can be hosted either on SAP data centers or on non-SAP data
centers. Determine which environment SAP Analytics Cloud is hosted in by inspecting your SAP Analytics Cloud URL:
- A single-digit number, for example us1 or jp1, indicates an SAP data center.
- A two-digit number, for example eu10 or us30, indicates a non-SAP data center.
For more information on licensing, see Configure Scheduling of Publication.
Data Sources You Work With
-
All imported data sources
-
Following live data sources:
-
SAP BW
-
SAP HANA
-
SAP S/4HANA
-
SAP HANA 2.0
-
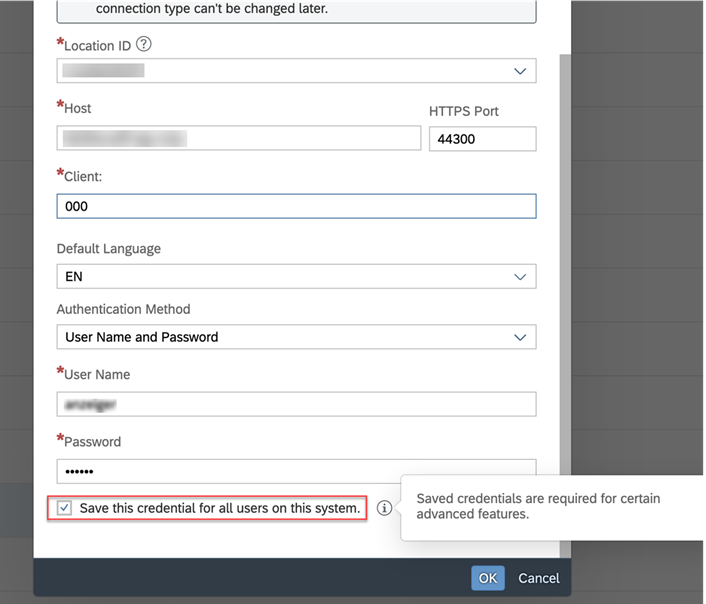
SAP HANA Cloud (you can schedule a story based on SAP HANA Cloud only if the connection type is HANA Cloud)
-
Stories based on live data tunnel connections
-
Schedules of stories based on live connections will always run with the user credentials corresponding to the live connection.
Creating a Scheduled Publication
Context
You can schedule a publication for story or analytic application which is either in classic mode or optimized view mode.
- On the Files page (from the main menu,
 Browse
  Files
Files ), select the story that you want to schedule, and select the
dropdown arrow from the
), select the story that you want to schedule, and select the
dropdown arrow from the  (Share) icon from the toolbar. Select
Schedule Publication. Or
(Share) icon from the toolbar. Select
Schedule Publication. Or -
From the File menu, select Schedule Publication.
Schedule Paginated Stories
While scheduling a story that has paginated tables and sections, the generated output will comprise of all the pages of the section and the all rows of the table. To learn more on the pagination in the Builder panel, see Using Pagination in Stories.When a schedule runs, each publication gets 15 minutes to execute the workflow and generate an output. If your story takes longer than 15 minutes to generate the output, your schedule will fail with an error message Scheduling the publication failed because the export task couldn’t be completed in time.
Before scheduling a story, it is recommended that you do a manual export to make sure that the story doesn’t take more than 15 minutes to be exported. Otherwise, your publication will fail when the schedule runs. Also make sure that the maximum size of the output in either PDF or PPT doesn’t exceed 12 MB.
The Schedule Publication dialog appears.
By default, the name of the story is populated as the name of the schedule. You can edit the name as per your preference.
Procedure
-
To end the recurrence, select the relevant option from the End
Recurrence by dropdown menu.
Note
The No End Date option is deprecated and will be removed by 2024.Q1. We recommend you use the End Date or Number of Occurrences option instead. For more information, see SAP Note 3358834

You can end the recurrence based on the end date or the number of repetitions. You can also choose the No End option to set the schedule to run for 365 days, after which it ends and a new schedule needs to be created.
Best Practices for CSV File Settings:
- Formatting (such as cell color, font styles, and so on) are not retained in the publication.
- The Histogramand Waterfall charts are not supported, make sure you do not include them in the publication:
-
All chart data is exported, not just the currently visible data.
For example, if your chart has a hierarchy, all the nodes of the hierarchy are exported, even if you have not drilled down on the data in your chart.
- The hierarchy export behavior applies to all chart types except Time Series charts. Time Series charts export only the currently selected level.
- During the publication export, hyperlinks are removed and hierarchies are flattened.
- If you have renamed a measure or dimension, you won't see your names in the exported data.
- The measure and dimension names from the data source are also exported.
- SAP Analytics Cloud profile settings do not influence the format of the exported data.
- There is no export of BW display attributes.
- When you expot table data, only All Data export is supported. You can't share Point of View.
- Formatting (such as cell color, font styles, and so on) are not retained in the publication.
- During the publication export, hyperlinks are removed, hierarchies are flattened, and only the table data region is exported.
- You can't export custom cells outside the data region (for example, on a grid page).
- If your table has a hierarchy, all the nodes of the hierarchy will be exported, even if you have not drilled down on the data in your table.
- The All export doesn't include visible content applied to the table such as calculations, comment columns, or renamed dimensions.
- If you have renamed a measure or dimension, you won't see your names in the exported data. The measure and dimension names from the data source are exported.
- There is no export of BW display attributes.
- You can't export the following table features:
- Added row or column calculations including data point comments and dimension comments
- Hidden rows or columns
- Properties such as extra rows or columns for the ID or description
- You can export up to 750 thousand cells per widget.
Publication Delivery Options
Stories may be made up of single or multiple widgets that are based on different types of models connected to different kinds of data sources.
There can be instances where a data source isn't supported, or a connection isn't working as intended, or an incorrect formula or errors during data validation leads to the publication being partially successful. You have the flexibility of choosing whether to deliver such publications or deliver only complete publications. You can choose from the following delivery options under Advanced Settings.
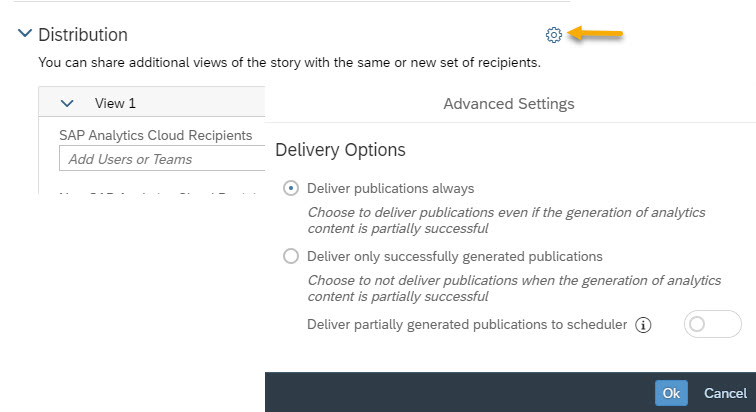
By turning on the Deliver partially successful publications to scheduler toggle, the creator of the schedule receives all the publications irrespective of whether the content is complete or not.
Managing Scheduled Publications
You can view, update, copy, and delete the schedules you've created, from the Calendar.
Context
Make sure you have the Manage permission granted for the object type Schedule Publication, which lets you manage scheduled publications in the calendar. For more information, see Permissions.
Users with Manage permission on Schedule Publication, and public and private files can modify the schedule you've created.

Procedure
- To view the list of scheduled publications you’ve created, choose the view of the calendar you would like to see: Day, Week, or Month.
- To copy the series or an instance of an existing scheduled publication job and reuse it with the desired scheduling parameters, search for the scheduled publication that you want to copy and then, select it. Click (Copy) in the General menu. You can modify the Name and add a Suffix to the title of the schedule and also change the date as per your preference. Select OK .
- You can modify the scheduling parameters from the Details pane after copying the schedule in the calendar.
- To delete a scheduled publication, select the schedule you want to delete, and in the general toolbar at the top panel, click Remove. Click OK to delete a recurrence or an occurrence of a schedule.
Modifying a Scheduled Publication
You can specify filter values while modifying a scheduled publication using the Change Story Filter option and only those filters that were defined during the publication creation will be considered.
Change Story Filter isn’t available for stories and analytic applications that are in Optimized View Mode.
You can view the changes from the View Changes option. To discard the changes, click Revert.
Canceling a Scheduled Publication
As an administrator or a Publication admin, you can discontinue an occurrence or a series of a schedule.
You can't discontinue a scheduled publication that's in progress or has ended. The discontinued publication will still be available on the calendar in the Canceled state and if needed you can create a copy of the scheduled publication. A scheduled publication that's in the canceled state can be subsequently deleted.
Once discontinued, a scheduled publication can't be edited or resumed.