Live Data Connection to SAP S/4HANA On-Premise Using a Tunnel Connection
Setup the Cloud Connector between your SAP S/4HANA system and SAP Analytics Cloud to establish a live tunnel connection.
- Users with Create, Read, Update, Delete and Maintain permissions for Connections.
- Users with Execute permission for Other Data Sources.
- Admin, Application Creator, BI Content Creator, BI Admin, and Planner Reporter standard application roles.
- Setting up a live connection requires working with the SAP Analytics Cloud system owner and different IT and application stakeholders within your organization. Most configuration steps are done on your SAP NetWeaver ABAP Application Server (AS) before creating the connection in your SAP Analytics Cloud tenant.
Prerequisites
-
Configure cross-site cookies: To ensure that Chrome and other browsers allow cross-site access to your SAP on-premise data source cookies from SAP Analytics Cloud, you must configure your SAP on-premise data source to issue cookies with specific attributes. Without these settings, user authentication to your live data connections will fail, and Story visualizations based on these connections will not render.
For steps on how to do this, see SameSite Cookie Configuration for Live Data Connections.
- Setup SSO (optional): If you want users to have a single sign-on experience to your data, check you are using same Identity Provider (IdP) for SAP Analytics Cloud and SAP NetWeaver. For more information on setting up your identity provider in SAP Analytics Cloud, see Enable a Custom SAML Identity Provider.
- If you have multiple authentication methods configured on your ABAP AS, see Alternative Logon Order.
Enable InA on your ABAP Application Server
Context
SAP Information Access (InA) is a REST HTTP-based protocol used by SAP Analytics Cloud to query your data sources in real time. Confirm that your InA package is enabled and services are running on the ABAP AS for your data source.
Procedure
-
Check that the required Information Access Services are active in your SAP
BW/4HANA or SAP BW system.
-
Enter the Service Path: /sap/bw/ina and then
select Execute.
The following dialog will appear:
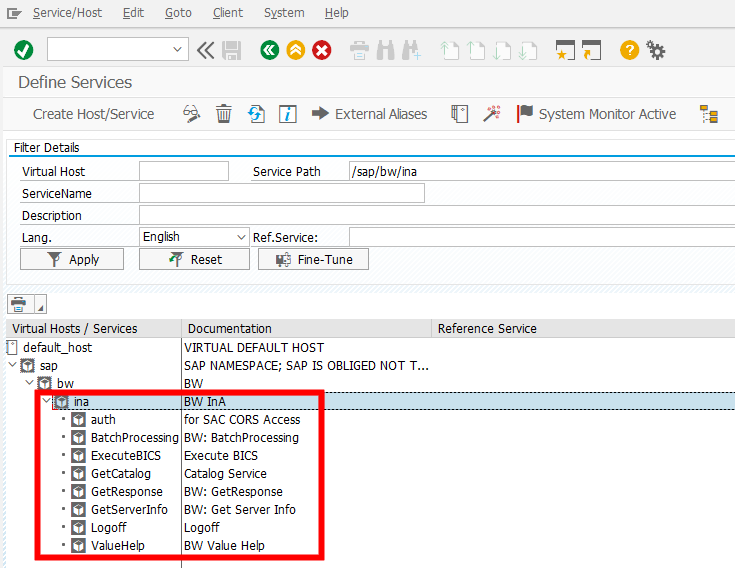
-
Under Virtual Hosts/Services go to:
 default_host
  sap bw ina
 .
.
-
Enter the Service Path: /sap/bw/ina and then
select Execute.
Configure Cloud Connector Tunnel Connection
Context
Procedure
Create the Live Connection in SAP Analytics Cloud
Context
Now that you've configured your data source, you can finally create the live conection in SAP Analytics Cloud.
Procedure
-
From the side navigation, choose
 Connections
  (Add
Connection).
(Add
Connection).
The Select a data source dialog will appear.