Define Valid Member Combinations for Planning Using Validation Rules
In planning models, you can define valid ranges of data that allow data entry and planning operations.
Validation rules let you define the allowed member combinations across multiple dimensions to prevent improper data entry and planning operations in stories and analytic applications based on this model. For the dimensions you define in a validation rule, only the member combinations that you specify as allowed combinations can pass validation.
Prerequisites
-
Before you start creating a validation rule for your planning model, switch on Validation Rules in the model preferences. The Validation Rules workspace is added to the model maintenance page. For more information, see Set Up Model Preferences.
-
You need to save changes to the master data before you can enter the Validation Rules workspace to start maintaining validation rules.
-
Make sure you have the appropriate permission to configure validation rules. Users with the Planning Professional license are granted the Validation Rule permission. Ask your administrator to add this permission to your role. For more information, see Permissions.
What You Should Know
-
You can create three rules for one model.
-
You can define three dimensions in one rule.
-
You can use the same dimension in up to 10 different rules.
-
You can't choose time or version dimensions in a validation rule.
Creating Validation Rules with Existing Attributes
Context
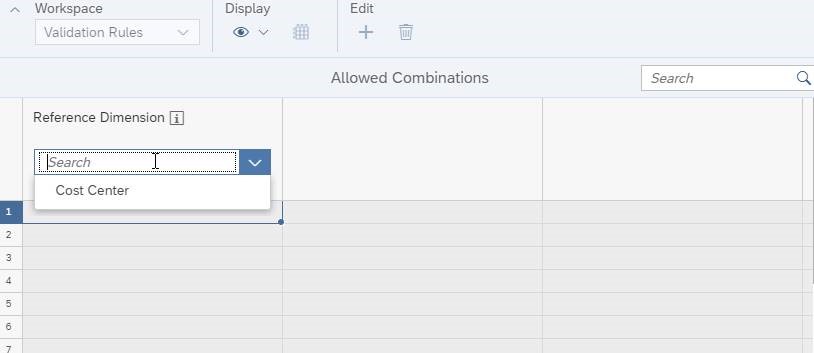
Without using a validation rule to combine two dimensions, you can ensure strict member combinations by maintaining members of one dimension as the other one’s attributes. With validation rules, you can match the existing attributes you maintained for that reference dimension to the matched dimension and create validation rules based on that.
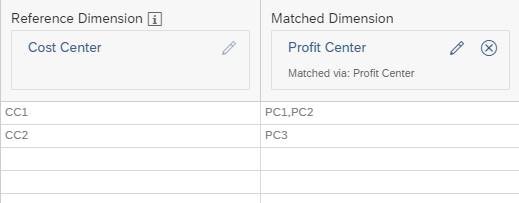
| Cost Center | Profit Center |
|---|---|
| CC1 | PC1, PC2 |
| CC2 | PC3 |
Without a validation rule, the valid Profit Center members PC1 and PC2 are maintained as Profit Center attributes of the corresponding Cost Center dimension member CC1, and PC3 is maintained as attribute of CC2. The values of these Profit Center attributes are identical with the members of the Profit Center dimension.
Using the validation rule feature, you can match the Profit Center attributes PC1, PC2 and PC3 to the Profit Center dimension members PC1, PC2 and PC3 to directly create a validation rule between the Cost Center dimension and the corresponding valid Profit Center dimension members.


In this example, the dimension Cost Center where the attributes are maintained is the reference dimension and the dimension Profit Center you want to map the reference dimension to is the matched dimension.

Procedure
Creating Validation Rules by Combining Dimension Members
Create a validation rule by directly specifying the dimension members that allow data entry. Dimension combinations other than the ones you define in rules are invalid and won’t allow data entry or planning operations.
Procedure
Previewing Validation Rules
You can preview validation rules in a table view:
After you've finished creating the validation rule, click the button (Show/Hide Table Preview) from the toolbar to enter the table preview mode. In this preview page, you can display the combination results of one or more validation rules by selecting or deselecting them from the (Filter) button.
All relevant dimensions of these validation rules are displayed with their combination results being shown in the table as status allowed, blocked or mixed. To switch the row or column display of these dimensions, use the (Display in Column/Row) button.
Later in a story or an analytic application based on this model, planners can only enter data for the valid member combinations for the dimensions you defined in the validation rule. For more details, see Check Validation Rule Results and Warnings for Planning.

