Entering Values in a Table
When working with a table based on a planning model in SAP Analytics Cloud, you can create and edit model values by typing in the table cells.
-
You have permissions and authorizations to make changes to the model values.
Users with BI roles can create private versions and change single booked values. Planner Reporter, Modeler, and Admin roles can use any of the planning tools to enter data on public or private versions. For more information, see Permissions. For more information about working with versions, refer to Create, Publish, and Manage Versions of Planning Data
-
The cell is not locked, either by a value lock or by data locking.
For more information on value locks in stories, see About Value Lock Management. For more information on data locking, see Configuring Data Locking.
-
If the cell is calculated by a formula, the formula must have one or more inverse formulas defined, and the target cells must be booked. For more information, see Inverse Formulas. For restricted measures and accounts, you can also change the values of cells that are included in the scope of the restriction.
-
The value can be disaggregated from the cell to one or more leaf members for each dimension in the model. For more information, see Disaggregation of Values During Data Entry.
When you modify data in a table cell, all of the cells in the visible area (processed area) – including any new cells (records) – will be highlighted.
Only the cells in the currently visible area (currently processed area) will be highlighted. If your table has a vertical scroll bar, cells in areas that haven't been processed yet won't have any highlighted cells.
You can choose to show tooltips that explain why a selected cell does not allow data entry.
To enable these tooltips, from your table select 

 Show/Hide Reason for unplannable data
 .
.
Data entry and copy and paste operations do not affect members that have been excluded from the table by story, page, or table filters on dimensions or dimension attributes. However, data actions and allocation processes can still affect these members.
Members that are selected in a filter but set to invisible are treated as visible members when you type or paste values in the table.
How to Enter Values
When entering values in table cells you can overwrite the existing value with an absolute or relative value. Absolute values are used when you want to type the exact number, and relative values are used when you want the system to help with changes such as increments or decrements.
Whether you do absolute or relative changes you can also choose to use the scale notation.
For example, to use the scale notation to write 750 Million, you could type 750 Million or 0.75B ( .75B will also work).
|
Scale |
Single Letter |
Complete Word |
Short Form |
|---|---|---|---|
|
Thousand |
1T |
1 Thousand |
1K |
|
Million |
1M |
1 Million |
1M |
|
Billion |
1B |
1 Billion |
1Bn |
You can include the scale notation with your value.
Use Relative Values
-
Select the cell.
-
Type the relative value.
For example, type a relative value such as *2 or +500.
| Relative Value Symbol | Description |
|---|---|
| *nn | Multiply by nn |
| /nn | Divide by nn |
| nn% | Increase or reduce by nn percentage |
| +nn | Add nn to the value |
| +-nn | Subtract nn from the value (add a negative amount) |
View, Modify, or Correct an Existing Value
Values formatted to millions or billions are easier to read, but you don't see all the digits of the number.
Double-click in a table cell to display all the digits of the value.
-
Use the backspace key to delete some or all digits of the current value.
-
Use the mouse (or arrow + shift key) to select the specific digits that you want to replace or delete.
Your value is 819325438, and you want it to be 819214438:
-
Double-click the table cell.
-
Use the mouse to select 325.
-
Type 214.
-
Press Enter or click away from the cell.
The value is updated, as are the other cells that reference that cell.
Fluid Data Entry Mode
To have a smoother data entry experience for your table, you can use fluid data entry mode instead. In this mode, data values entered in a fast sequence will be processed together at the same time as a batch; you don’t need to wait for the system to update between entries.
To enable this mode, in the Builder panel look for the property Default Data Entry Mode, and then change the default option to Fluid Data Entry Mode.
Default Data Entry Mode is set to Fluid Data Entry Mode by default for newly created tables.
The option Fluid Data Entry Mode is only available for an optimized presentation table.
The fluid data entry mode is not available for a table built on a BPC live connection model.
If you use the functionality of Add Member in the fluid data entry mode, please first make a data entry on the newly added member and wait for it to be processed before moving on, which will give you a better data entry experience.
When you use cells outside the data region (custom cells) in the fluid data entry mode, cell references won’t update after data entry.
To set or change the time interval for fluid data entry batches, go to System Administration System Configuration, and update the value for Time interval of fluid data entry batches (in milliseconds). Data
values entered with time between every two successive data entries within this set time interval will be treated as belonging to
the same fluid data entry batch.
For example, you set the time interval to 500 milliseconds (0.5 seconds). This means that during your data entry, if there is a 0.5-second of inactivity, a batch is processed, and the next data value you enter will be treated as the first one of a new fluid data entry batch.
-
During fluid data entry, after you change a cell, its parent and child cells are locked, data changes are processed, and then locked cells are unlocked. However, there are rare cases where cells may be locked slowly or unlocked too fast, making both parent and child cells editable at the same time. Please pay attention as you may get unexpected values in the parent or child cells.
-
In a table with data point comments or data locks, if you make data entries in cells before the last fluid data entry batch finishes being processed, their background color may not turn blue.
During fluid data entry, if the table layout is changed (removal or addition of rows/columns), you may get unexpected results like misplaced values or loss of values. Here are some of the scenarios where this issue may arise:
-
changes of data that lead to the removal of rows or columns in booked mode.
-
data entry on a parent node that makes visible its child members and thus a whole row or column in booked mode.
-
selecting or deselecting in page filters that results in the removal or addition of rows/columns.
If you run into this issue, please manually refresh your table to make sure the table layout is shown correctly and your data entry will then work as expected.
Working with Booked and Unbooked Cells
When you change a booked value, the leaf members that aggregate up to that value are adjusted proportionally to reflect your change.
When you enter a new value in an unbooked cell, which displays a dash character (-) instead of a value, values are also booked to one or more leaf members for each dimension that aggregates up to the cell. The Unassigned member usually receives these values. For more information, see Disaggregation of Values During Data Entry.
Working with Versions
Normally, versions can be specified in the table axis and filters. They can also be specified in calculations, either in the account formulas or calculated measures in the Modeler using the RESTRICT or LOOKUP formulas, or restricted accounts or measures in the story. You can refer to the following scenarios to see how the version is determined for a table cell and its corresponding public edit mode created when doing data entry.
No version in the table axis or filters
When no version is specified in the table axis or filters, data entry is made on the version specified in the calculations and its public edit mode is created. For example:
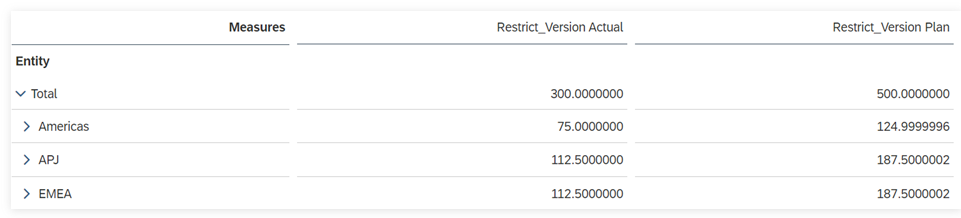
The calculated measure Restricted_Version Actual is calculated by the following formula:
RESTRICT([Measure] ,[d/Version] = "public.Actual" )
The calculated measure Restricted_Version Plan is calculated by the following formula:
RESTRICT([Measure] ,[d/Version] = "public.Plan" )
Data entry is allowed on both Restricted_Version Actual and Restricted_Version Plan, and the public edit mode of Actual and Plan will be created, respectively.
When it comes to data entry on calculated measures calculated by formulas with multiple versions involved, data entry is made on the version of the target of the inverse formula and a corresponding public edit mode of the version is created. For example:
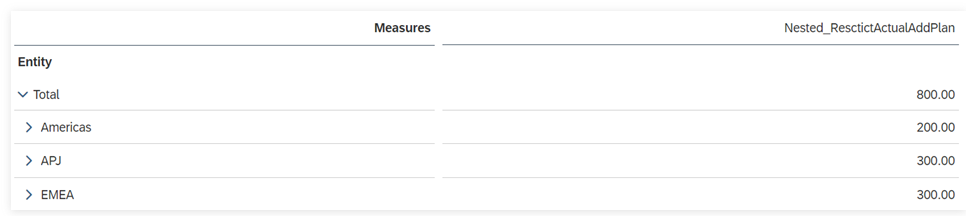
The calculated measure Nested_ResctictActualAddPlan is calculated by the following formula with an inverse function, which includes the two calculated measures mentioned above:
[Restricted_Version Actual] + [Restricted_Version Plan] | INVERSE( [Restricted_Version Plan]:=[Nested_ResctictActualAddPlan]-[ Restricted_Version Actual])
Data entry is allowed on Nested_ResctictActualAddPlan for the Plan version, which is the version restricted in the target of the inverse formula, and a public edit mode of the version Plan is created.
For more information, see Inverse Formulas.
Versions conflict
When there’re conflicts between versions specified in different places for a table cell, data entry follows the rules below:
If versions specified in different places are the same, data entry is allowed and a public edit mode for the version is created. If versions specified in different places conflict, data entry is not allowed. Note that constant selection on version in restricted accounts or measures has priority over other instances of specified versions. For example:
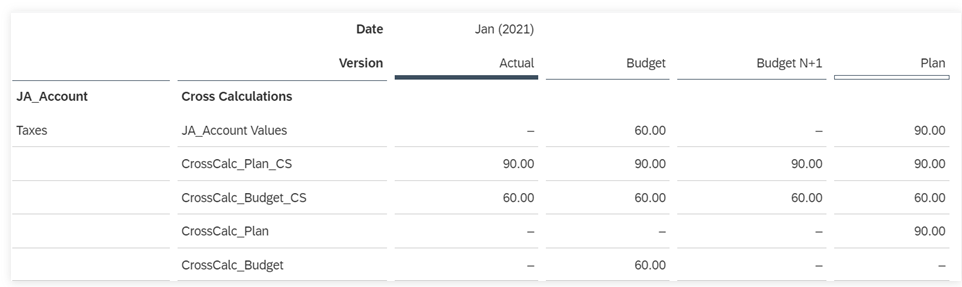
Data entry is allowed on CrossCalc_Plan for Plan but is not allowed for versions Actual, Budget, and Budget N+1, because version is restricted in CrossCalc_Plan to be Plan.
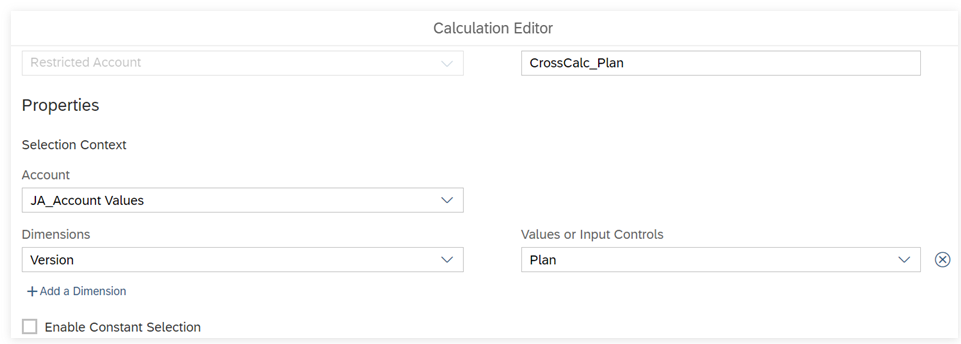
For the cross calculation of CrossCalc_Plan_CS, because Constant Selection is enabled and the constant dimension set to version, the Plan version has priority over Actual, Budget, and Budget N+1 specified in the columns.
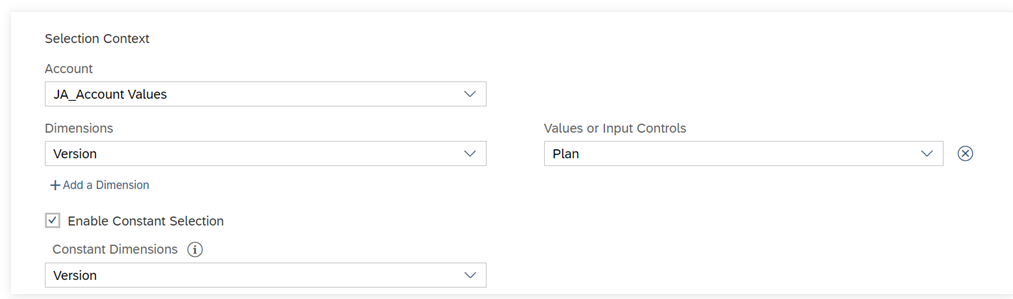
The version for all table cells of the CrossCalc_Plan_CS is treated as Plan and the value of CrossCalc_Plan_CS for Plan automatically fills the cells for other three versions. Data entry can be made on CrossCalc_Plan_CS for all versions, which will always lead to the public edit mode of version Plan being created.
Here is another example with conflicts between versions specified in calculations.

Acc_ResAcc_Budget and Acc_ResAcc_Plan are two restricted accounts that have their version dimension restricted to Budget and Plan, respectively. The two cross calculations (without constant selection) in the columns are the same as those in the table of the last example.
As shown in the table, data entry is only allowed on cells where versions specified in calculations in the row and column are the same.
Let’s dive into an example of data entry on calculated measures using RESTIRCT and LOOKUP that restrict a particular version.
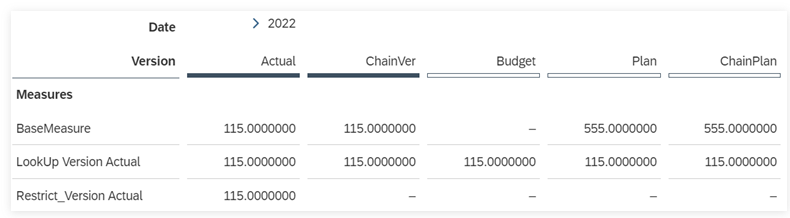
Restict_Version Actual is calculated by the following formula:
RESTRICT([Measure] ,[d/Version] = "public.Plan" )
LookUp Version Actual is calculated by the following formula:
LOOKUP([Measure] ,[d/Version] = "public.Actual" )
For Restict_Version Actual, data entry is only allowed on version Actual (the version restricted in the formula) but not allowed on other versions. Data entry on version Actual will lead to the creation of its public edit mode. Any data entry attempt on other versions will lead to this error message:
Sorry, we couldn’t carry out your data entry because all leaf member combinations for this cell are excluded by filters. Please check any advanced filters or restricted members on the account or cross calculation dimensions, or contact the story owner.
For LookUp Version Actual, data entry is allowed on version Actual (the version is restricted in the formula). Once a data entry is made on version Actual, the public edit mode of version Actual is created and the value is filled for other versions. After the public edit mode of version Actual is created, data entry is allowed on all versions for LookUp Version Actual and entered value is automatically filled for other versions. For how the LOOKUP formula works, see Restrict and Lookup .
If data entry is directly made on any version other than Actual, the following message will show up if it is a public version:
The updated cell cannot be changed as it is not input enabled: The target version is not a plan version.
And the following message will show up if it is a private version:Unable to update the cell because of conflicting versions.