Live Data Connection to SAP HANA 2.0 on BTP Cloud Foundry
You can create a live data connection to an SAP HANA 2.0 system that is operating on an
SAP Business Technology Platform (BTP) system that uses a Cloud Foundry (CF) environment. To
access SAP HANA HDI containers on an BTP system that is running a Cloud Foundry (CF)
environment, you can create a live data connection using the SAP HANA Analytics Adapter for
Cloud Foundry.
Who does this apply to?
- Users with any of these permissions for Connections:
Create, Read,
Update, Delete, and
Maintain.
- Users with Execute permission for Other Data
Sources.
- Users with any of these standard application roles:
Admin, Application Creator,
BI Content Creator, BI Admin,
and Planner Reporter.
- Setting up a live connection requires working with the SAP Analytics Cloud
system owner and different IT and application stakeholders
within your organization. Most configuration steps are done on your SAP HANA
server before creating the connection in your SAP Analytics Cloud
tenant.
Prerequisites
- SAP HANA 2.0 must be installed on an SAP Business Technology
Platform (BTP) system that uses a Cloud Foundry (CF) environment.
-
A SAML 2 Identity Provider (IdP) must be configured. Both the SAP BTP and
SAP Analytics Cloud
must use the same IDP.
For how to set up SAML 2.0 on SAP BTP, see Trust and Federation with SAML 2.0
Identity Providers.
For how to set up SAML in SAP Analytics Cloud,
see Enable a Custom SAML Identity Provider.
- You must have enough quota for the SAP HANA service and
applications.
- You must be assigned an Organization Manager role in your SAP
BTP subaccount.
- If using HDI containers, you must have HDI containers
available on your SAP BTP system. For more information, see Set Up an HDI Container.
Note
The
SAP BTP geo map feature is not currently
supported for this connection type.
Note
If using HDI containers, skip the steps marked
Without
HDI.
(Without HDI) Install the SAP HANA Service
Procedure
-
In the SAP Business Technology Platform (BTP) Cockpit, go to
Subaccounts.
You can either create a New Subaccount to use
with your connection, or choose an existing subaccount.
-
Go to Entitlements, and under SAP
HANA, find the subaccount and increase the counter in
the enterprise column to 1.
-
Return to the Subaccounts area and open the
overview for the subaccount that you have assigned.
Under Quota, the SAP HANA
Service should appear.
-
Go to and select the SAP HANA
Service.
-
Go to the Instances menu and click
New Instance.
-
In the wizard that appears, select your service plan depending on your
subscription.
-
In the Parameter section, provide your SYSTEM user password.
-
Select the size of your SAP HANA instance.
Instances are divided into 16GB blocks and use a minimum two blocks.
You can select a SAP HANA instance up to 2TB in size.
-
Choose if you want to allow the SAP HANA service to be available on the
Internet or only to a specific IP Address.
-
(Optional) Bind any existing applications to the SAP HANA
service.
-
In the Confirm screen, provide a name for your
SAP HANA instance.
-
Click Finish.
The instance will be created and its status will be updated in the
SAP BTP Cockpit in a few minutes.
(Without HDI) Get your SAP HANA database information
Procedure
-
Open your instance dashboard and log in with your SAP BTP login
credentials.
-
Make note of the database endpoint.
You will need this endpoint when connecting to this database.
-
Go to the SAP HANA Cockpit, and in the Overall Database
Status tile, note your tenant database name and instance
number.
(Without HDI) Connect Eclipse to your SAP HANA Service
Procedure
-
Under Systems, select Add
System.
-
In the Host Name, provide the database endpoint
from the preceding section Get your SAP HANA database
information.
Enter the endpoint without the port.
-
Add the Instance Number.
-
Select Multiple Containers.
-
Enter the database name.
The database name should follow the following format:
<HANA Tenant Database Name>:
<Port>.
-
Add a Description and select a
Locale.
-
Select Next.
-
Provide your SAP HANA user credentials and select Connect
using SSL.
This will connect you to the SAP HANA service and you will be
able to view the catalog objects within Eclipse.
Install and configure tools
Procedure
-
Download and install the Cloud Foundry CLI.
-
Download and install the Cloud Foundry CLI MTA.
Install the plugin using the command:
cf install-plugin mta-plugin-windows.exe -f
-
Download and install Oracle JDK 8 or SAP JDK 8.
To verify that the JDK is ready, check the version of the JDK you
have installed. For
example:
-
Download and install Apache Maven.
To verify that Maven is ready, check the version of Maven you have
installed. For example:
-
Download and install Node.js.
To verify that Node is ready, check the version of Node you have
installed. For example:
Also verify that npm (Node Package Manager) is installed with Node.
For example:
-
Set npm for the sap registry modules with the command:
npm config set @sap:registry https://registry.npmjs.org
Deploy the analytics adapter for SAP HANA
Procedure
-
Create a local folder. For example: c:\haa.
This directory is referred to as <HAA_ROOT> in the
following steps.
-
Download or clone the analytics adapter (HAA) project from SAP GitHub.
-
Unzip the file in the <HAA_ROOT>.
(Using HDI only) Build and deploy the analytics adapter
Procedure
-
Start a command prompt window.
-
Build the mta file with the command:
This command will generate a new file named
<HAA_ROOT>.mtar.
-
In the SAP BTP Cockpit, in your subaccount overview, find the CF
API endpoint.
-
In the command prompt, set the CLI variable using the command:
-
Log on to CF using the command:
-
Deploy the mta to CF with the command:
cf deploy <HAA_ROOT>.mtar
After deployment, two new services and three new applications should
appear in the SAP BTP Cockpit.
-
To authenticate with a named user, set USE_NAMED_USER=true.
(Without HDI) Build and deploy the analytics adapter
Procedure
-
Download or clone the mta from SAP GitHub.
-
Start a command prompt window.
-
Build the mta file with the command:
This command will generate a new file named
<HAA_ROOT>.mtar.
-
Extract java-xsahaa.war to
<HAA_ROOT>/haa-java/<Target_Directory>.
Replace <Target_Directory> with the target directory
you created in step 3.
-
Edit mta.yaml with the following:
ID: haa
	_schema-version: '2.0'
	version: 0.0.1

	modules:

	- name: haa-java
	   type: java
	   path: haa-java
	   parameters:
	     memory: 1024M
	     buildpack: sap_java_buildpack
	   properties:
	     TARGET_RUNTIME: tomee7
	     JBP_CONFIG_RESOURCE_CONFIGURATION: "['tomee7/webapps/ROOT/WEB-INF/resources.xml': {'xsahaa-hdi-container':'db-connector'}]"
	     USE_NAMED_USER: true
	     SECONDARY_ROUTING_PERCENT: 0
	   provides:
	    - name: haa-java
	      properties:
	        url: ${default-url}
	   requires:
	    - name: haa-uaa
	    - name: db-connector

	- name: haa
	   type: nodejs
	   path: haa-entry
	   parameters:
	     memory: 512M
	     buildpack: nodejs_buildpack
	   requires:
	    - name: haa-uaa
	    - name: haa-java
	      group: destinations
	      properties:
	        name: haa-java
	        url: ~{url}
	        forwardAuthToken: true
	        timeout: 600000
	   properties:
	     CORS: '[{"uriPattern": "^/sap/bc/ina/(.*)$", "allowedOrigin": [{"host":"<sac-host>", "protocol":"https"}], "allowedMethods": ["GET", "POST", "OPTIONS"], "allowedHeaders": ["Origin", "Accept", "X-Requested-With", "Content-Type", "Access-Control-Request-Method", "Access-Control-Request-Headers", "Authorization", "X-Sap-Cid", "X-Csrf-Token"], "exposeHeaders": ["Accept", "Authorization", "X-Requested-With", "X-Sap-Cid", "Access-Control-Allow-Origin", "Access-Control-Allow-Credentials", "X-Csrf-Token", "Content-Type"]}]'
	     INCOMING_CONNECTION_TIMEOUT: 600000
	     TENANT_HOST_PATTERN: '^(.*)-<space>-haa.cfapps.(.*).hana.ondemand.com'

	resources:
	- name: haa-uaa
	   type: com.sap.xs.uaa
	   parameters:
	      path: ./xs-security.json

	- name: db-connector
   type: org.cloudfoundry.user-provided-service
   parameters:
     config:
        url: "jdbc:sap://<jdbc_server>:<jdbc_port>?encrypt=true&validateCertificate=false"
Note
You can find your JDBC server name and port on your
SAP
HANA Service Dashboard, under the
Direct
SQL Connectivity endpoint.
-
In the SAP BTP Cockpit, in your subaccount overview, find the CF
API endpoint.
-
In the command prompt, set the CLI variable using the command:
-
Log on to CF using the command:
-
Deploy the mta to CF with the command:
After deployment, two new services and three new applications should
appear in the SAP BTP Cockpit.
Grant permissions and set up roles
Procedure
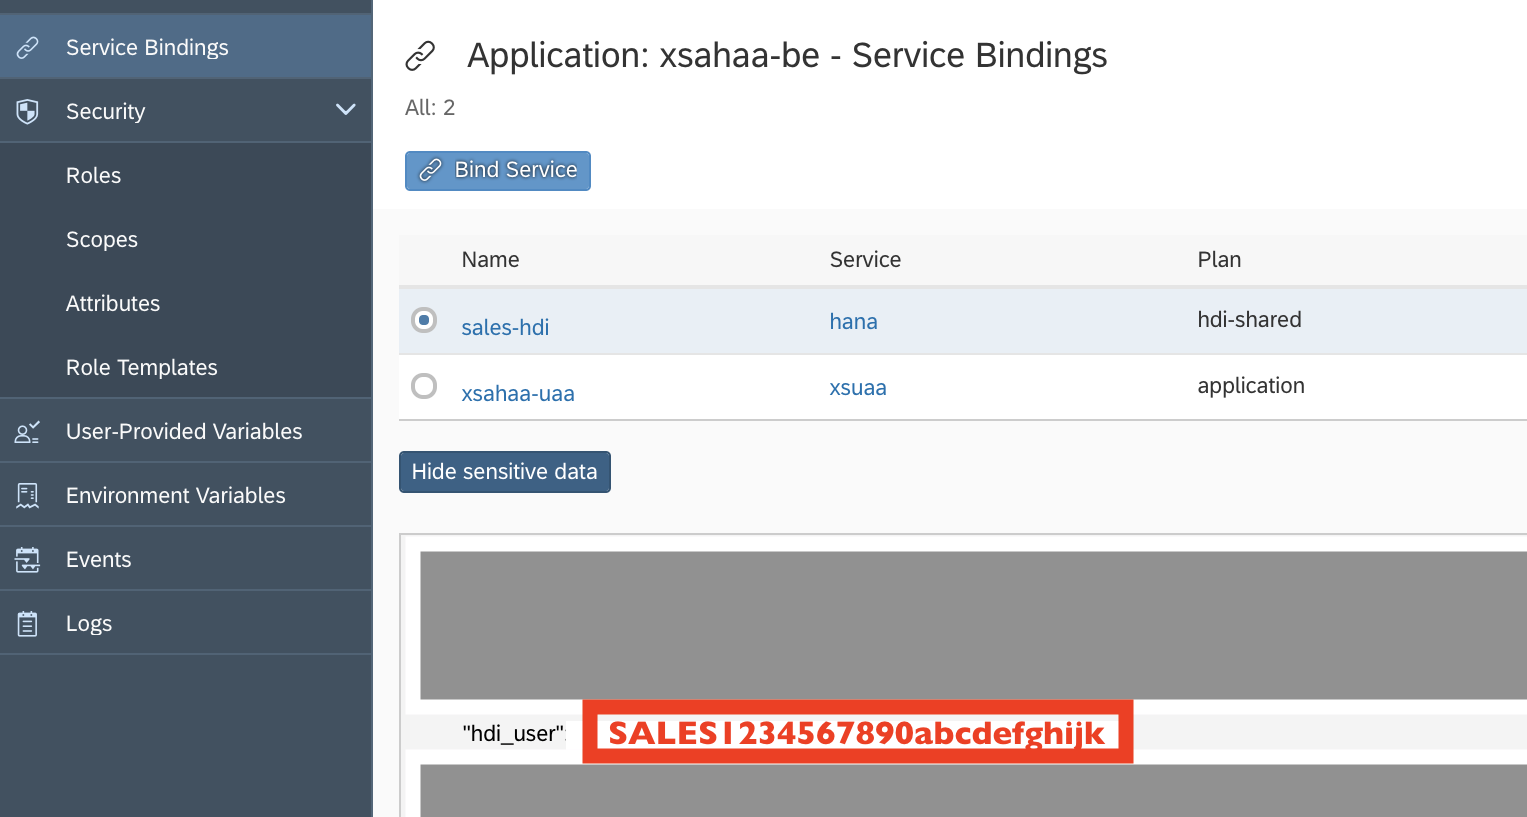
-
Select the haa-java application, click
Service Binding, and select the HDI
service.
-
Click Show Sensitive Data, locate the
hdi_user, and copy the user ID.
-
In the SAP BTP Cockpit, access the SQL Console and run the
command:
grant select on schema _sys_bi to <db_user>;
Replace <db_user> with the HDI user ID you copied in
the previous step.
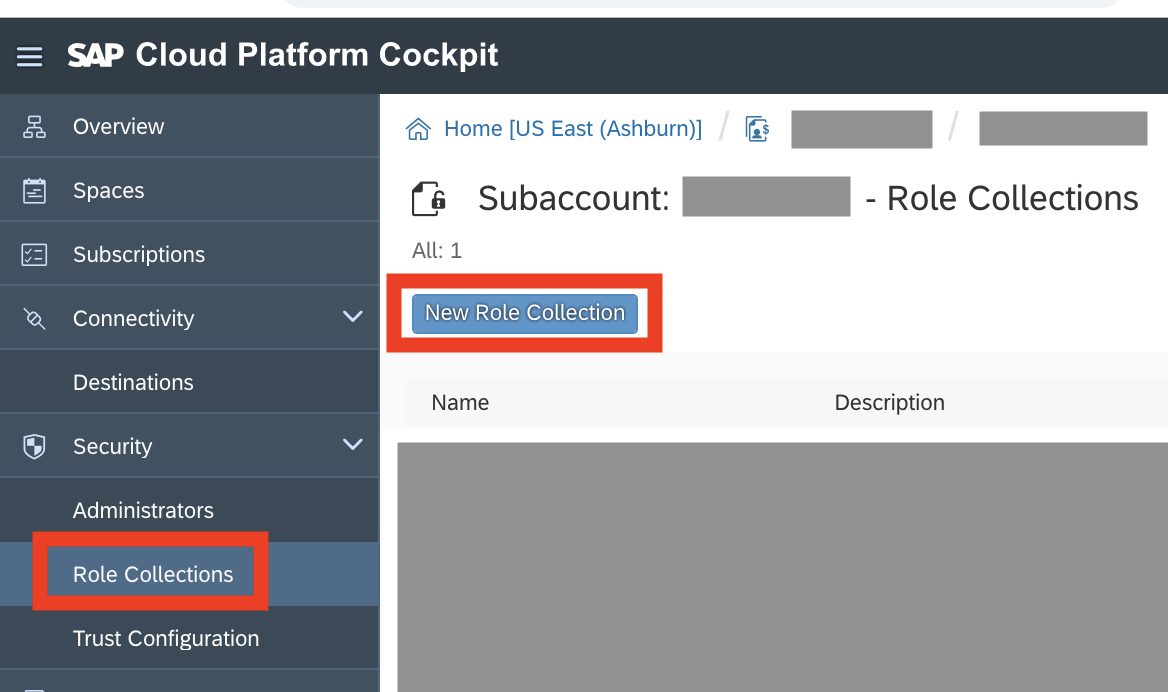
-
Go to the subaccount and click Role
Collections.
-
Create new role collection with the name
SACToHAA.
-
Select SACToHAA, click Add Role
and select SalesApp_User from the list.
Set up trust between XSUAA and the SAP HANA database container
Procedure
Follow the instructions in SAP Note 2470084.
In solution b), no trust has been established between XSUAA and the
HANA Database, under b) SAP BTP, complete steps 1, 2, and 3.
Set up the IdP
Procedure
-
In the SAP BTP Cockpit, under , set the default IDP as inactive.
This ensures you won't be prompted during a data refresh.
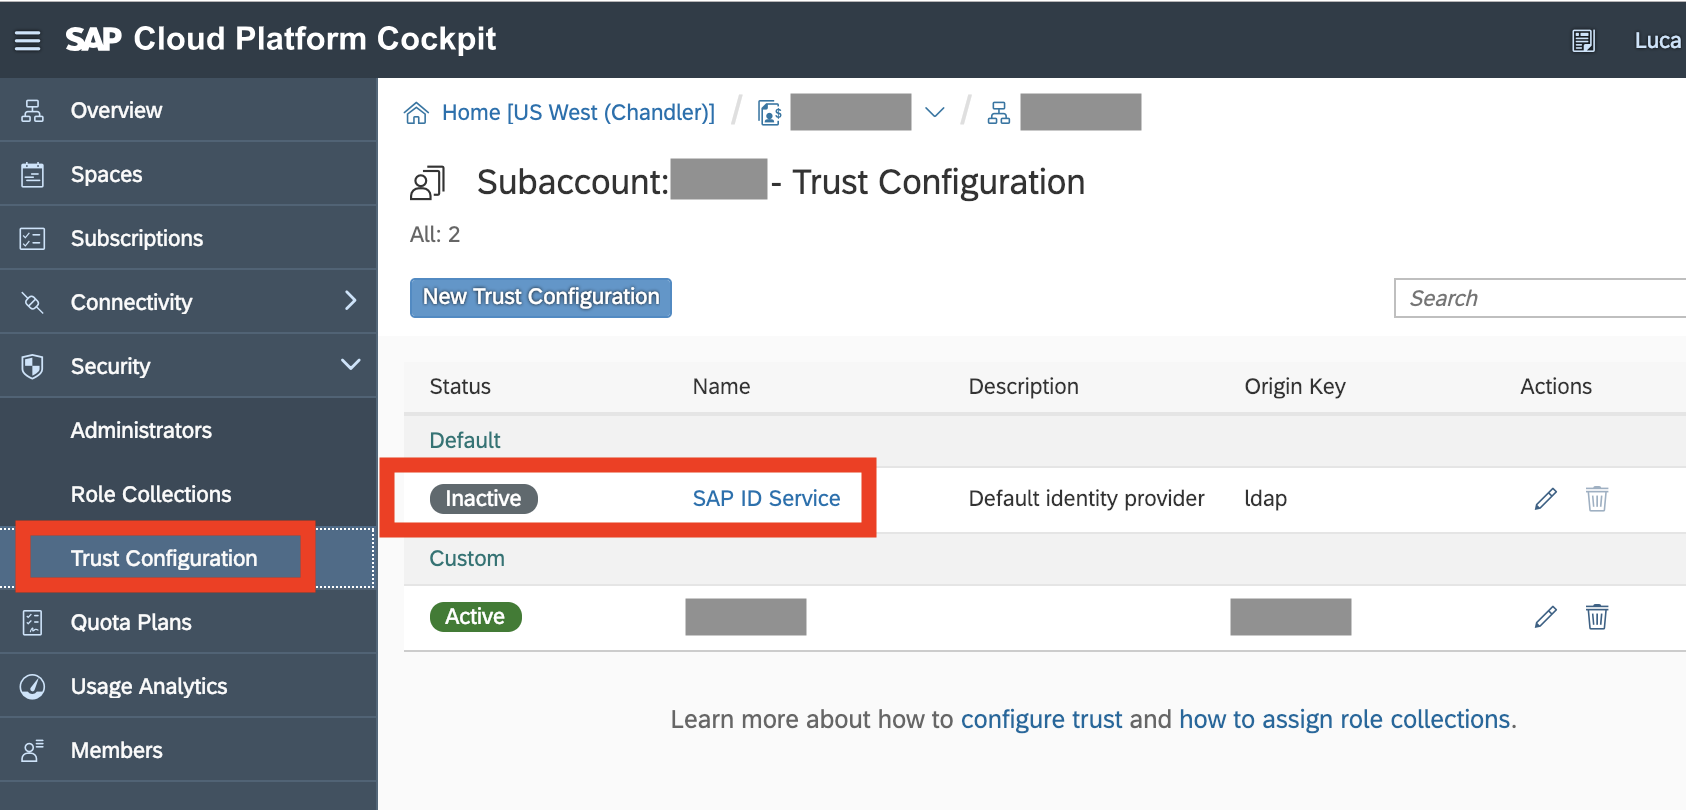
-
Under Custom, select the name of the
Active trust configuration.
-
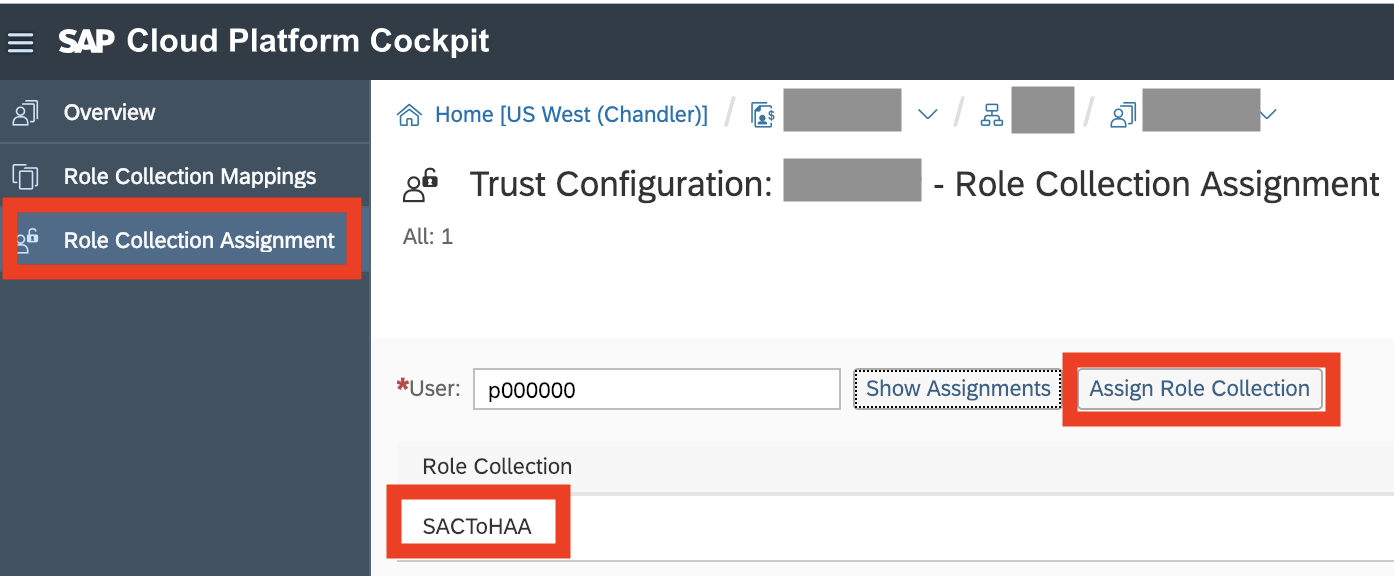
Click Role Collection Assignment, and assign the
SACToHAA role collection to the user ID for your
SAML IdP.
Map SAP HANA users to external SAML IdP users
Procedure
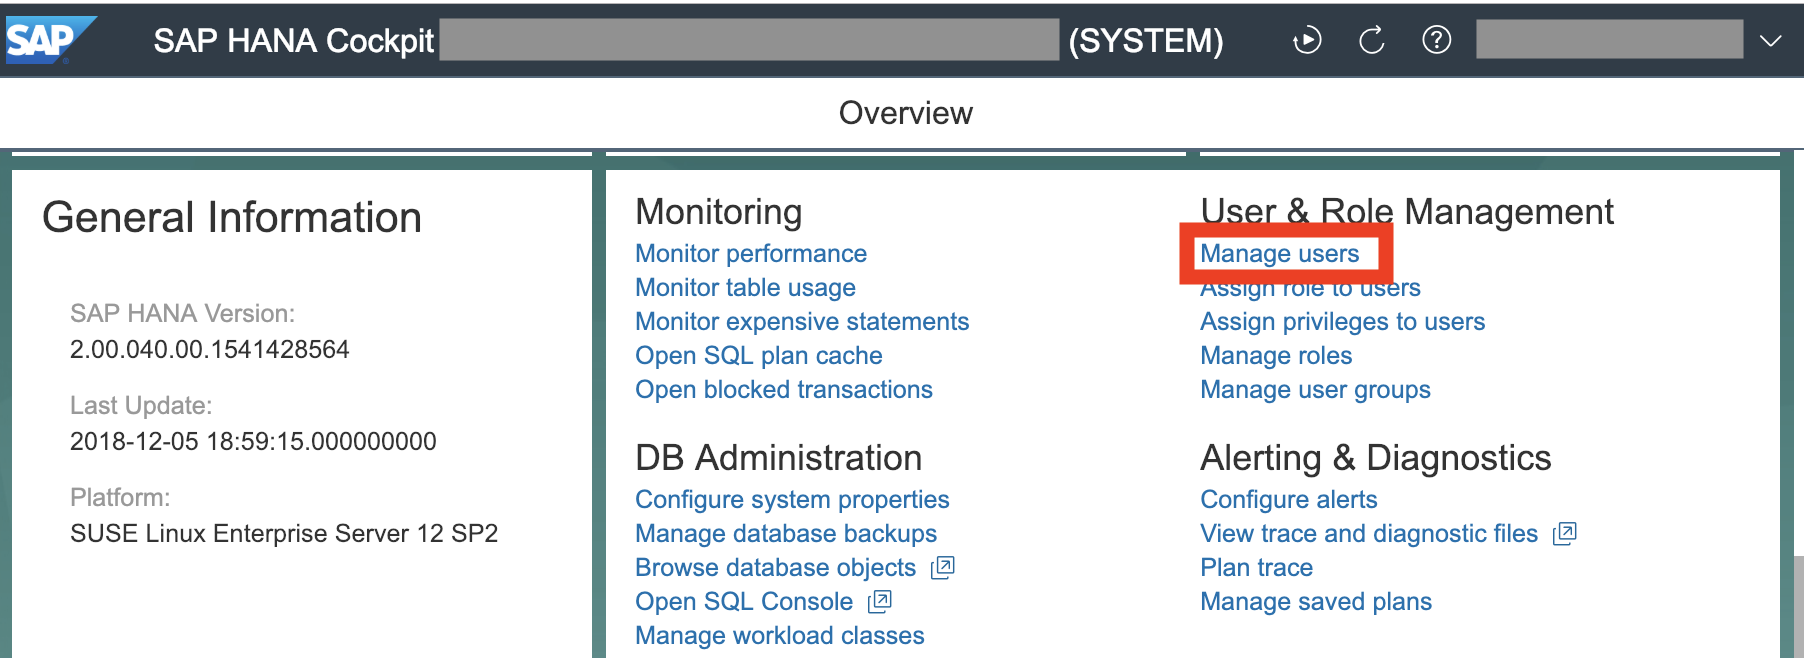
-
In the SAP HANA Cockpit, select Manage
users.
-
Create a new user and give it the user ID you used in the previous
task.
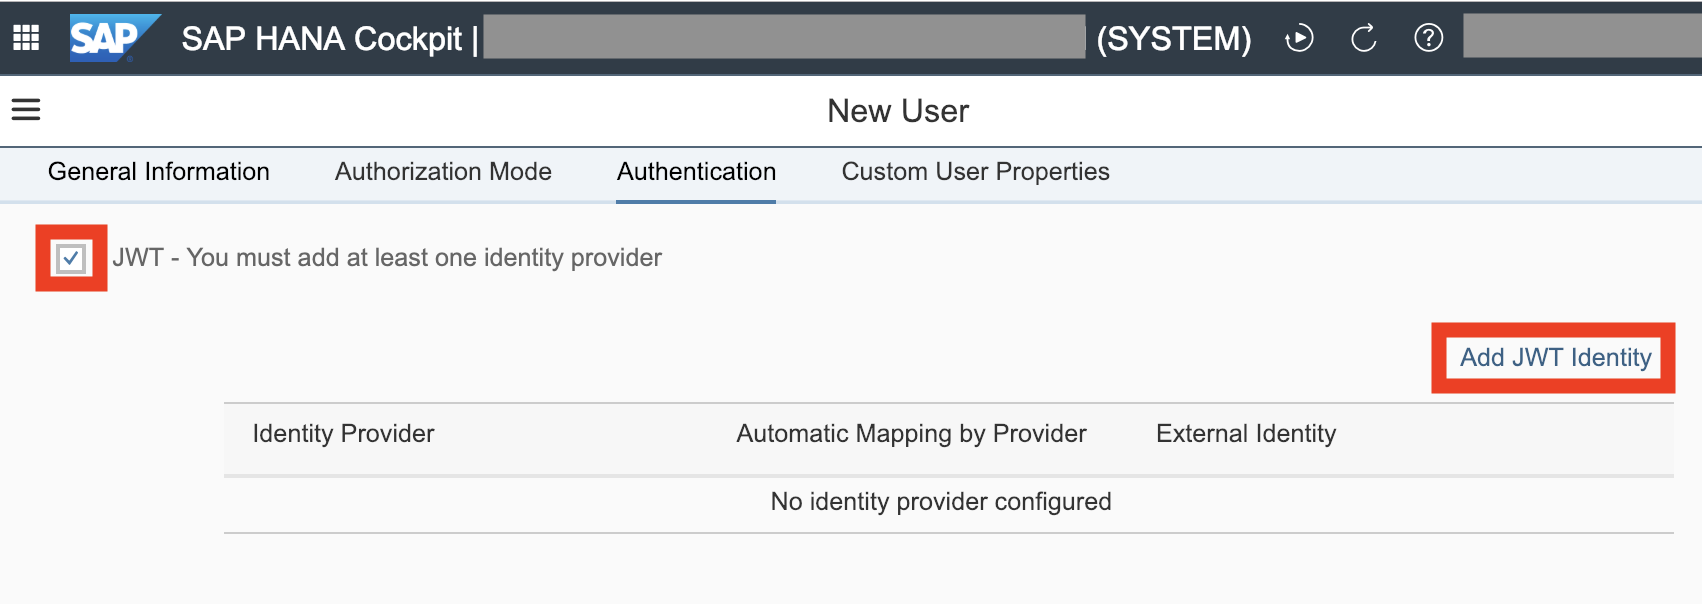
-
Scroll through the authentication area, check the
JWT box.
-
Click Add JWT Identity.
-
Click Save.
-
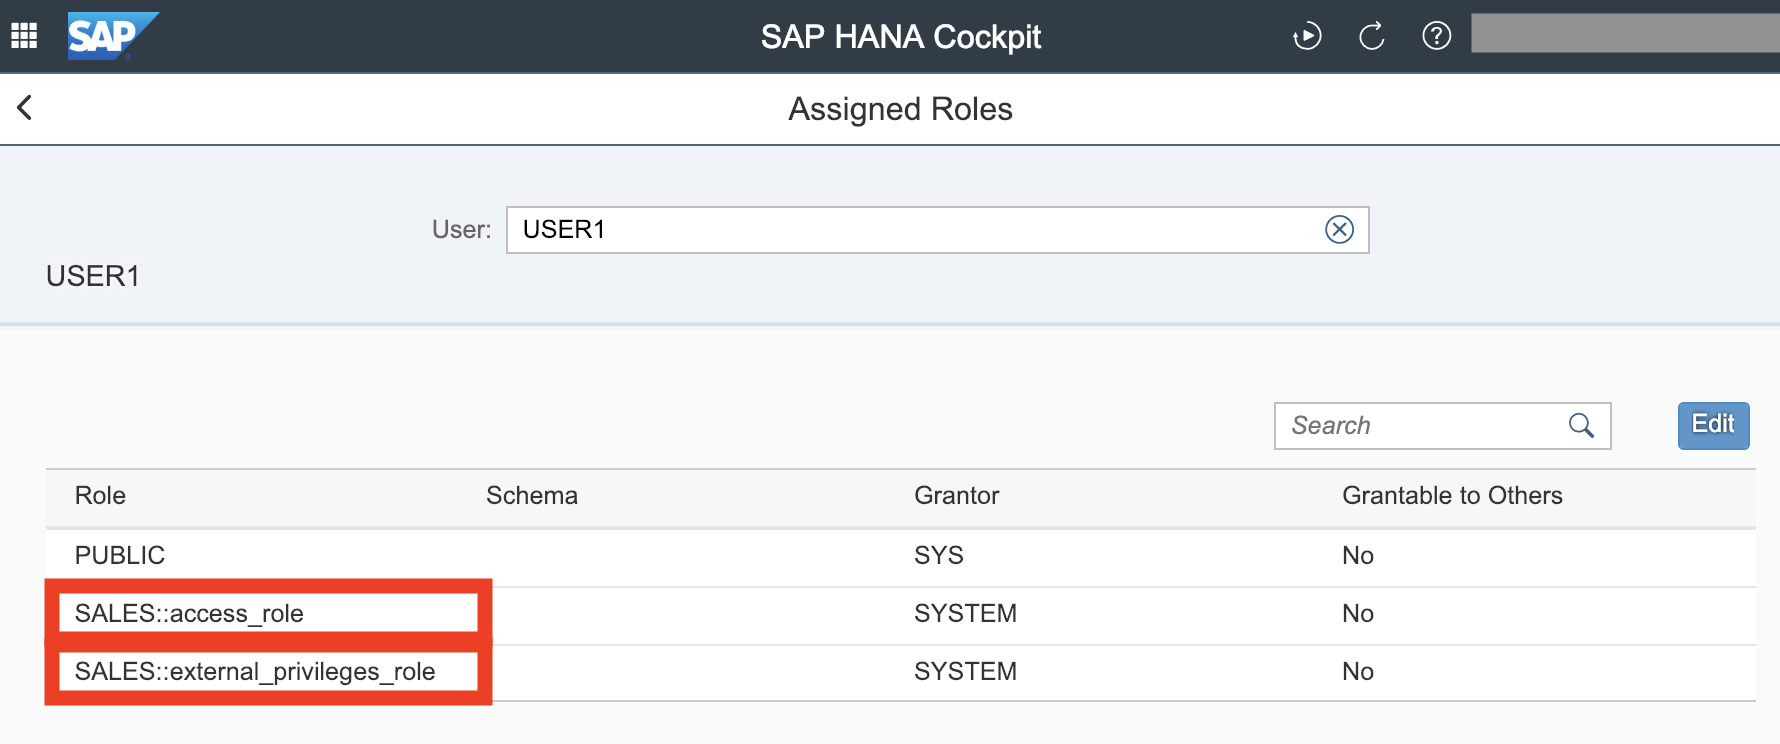
In the Authorization Mode area for the new user,
click Assign Roles.
-
Click .
-
Search for the access_role and the
external_privileges_role defined in your HDI
schema.
-
In the Authorization Mode area for the new user,
click Assign Privileges.
-
Click Object Privileges, then
Edit, and add two new objects:
EXECUTE_MDS and _SYS_BI.
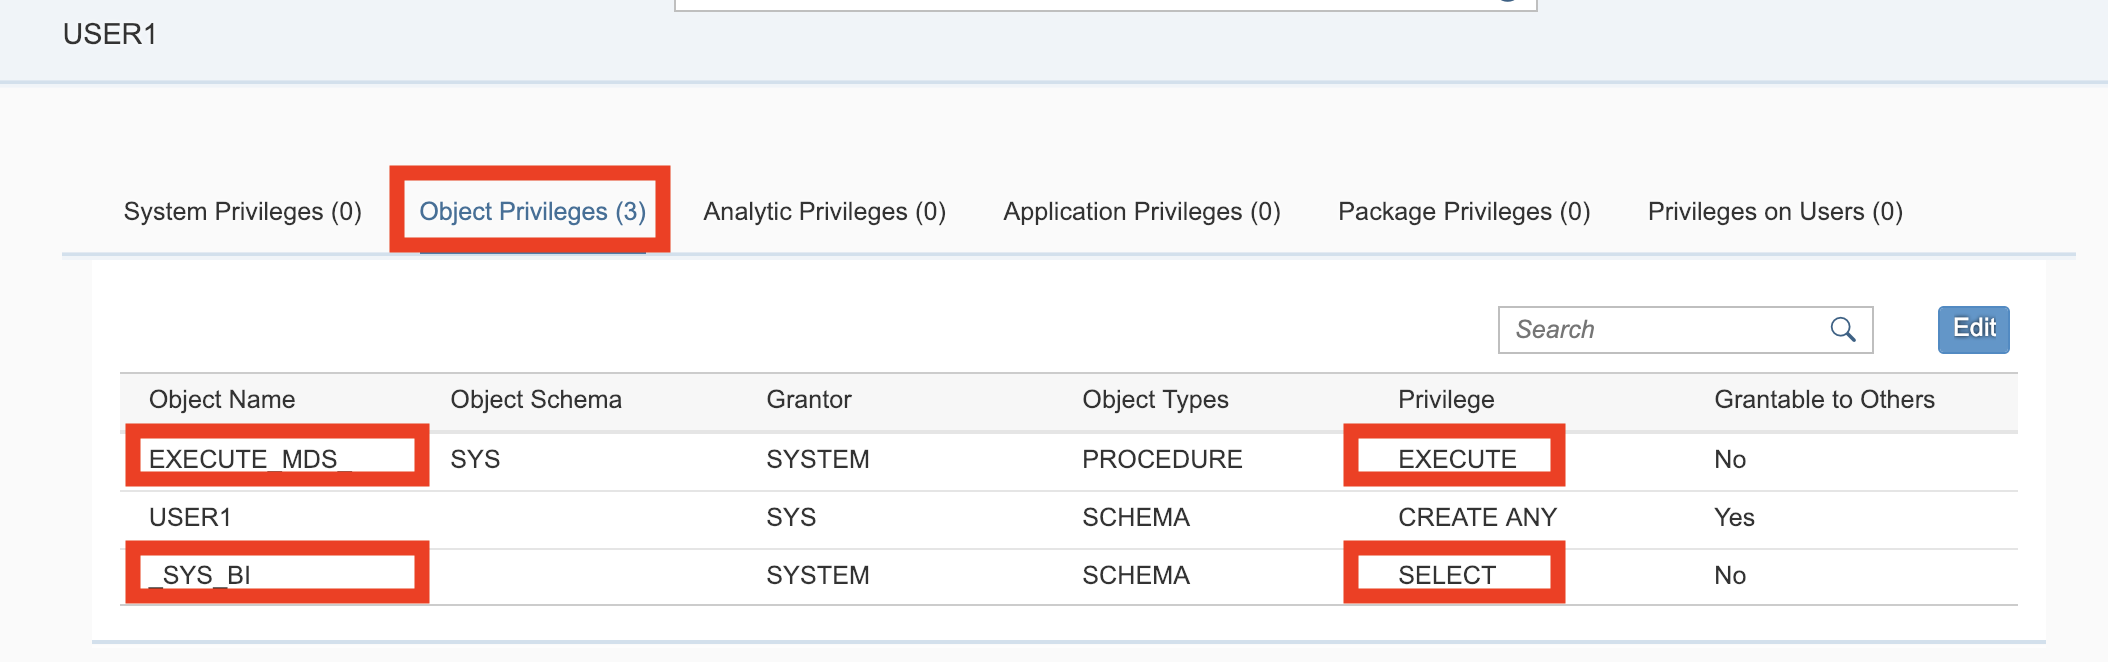
Note
If your HAA version is earlier than
1.5.2, add
EXECUTE_MDS_DEV instead of
EXECUTE_MDS.
Add a remote system to SAP Analytics Cloud
Procedure
-
From the side navigation, choose .
The Select a data source dialog will appear.
-
Expand Connect to Live Data and select
SAP HANA.
-
In the dialog, enter a name and description for your connection.
The connection name cannot be changed later.
-
Set the connection type to Direct.
-
Add your SAP HANA host name, and 443 as the port.
The host should be the haa application route. You can
find this information in the SAP BTP Cockpit on the Application:
haa – Overview page.
-
(Optional) Choose a Default Language from the
list.
This language will always be used for this connection and cannot be
changed by users without administrator privileges.
Note
You must know
which languages are installed on your
SAP HANA system
before adding a language code. If the language code you enter is
invalid,
SAP Analytics Cloud will default to the language specified by your system
metadata.
-
Under Authentication Method, select SAML
Single Sign On.
-
Select OK.
Note
After creating a connection to a remote system and before creating a
model from a remote system, you must log off and log on to
SAP Analytics Cloud
again.
Note
Select the
Enable users to schedule for story
publishing option if you want to let your users schedule
the publishing of stories. For details on scheduling, see
Schedule a Publication.
 Spaces
  Services
  and select the SAP HANA
Service.
and select the SAP HANA
Service.

 Connections
  (Add Connection)