Set Up Your First Allocation Process

For planners who are new to allocations in SAP Analytics Cloud, setting up a basic process will help you understand how they're structured.

Workflow for Allocations

Note

Currently you can choose to create allocations in the allocations app or create allocations as part of a data action step. Eventually the legacy allocations created in the allocations app will no longer be available and all allocations will need to be created in the data action designer. To learn more about creating allocations in the data action designer, see Creating an Allocation Step.

There are a few general steps to set up and run allocations:

  1. Create an allocation process as a container for your steps.

  2. Add an allocation step and set up its structure, including source and target dimensions.

  3. Set up rules for the step to specify source, target, and driver members.

  4. Add additional steps and configure their rules as needed.

  5. When the process is ready, planning users can run it in a story or analytic application, choosing the target version and applying filters as necessary.

Allocation steps can also be created on their own, but you'll need to add them to a process before you set up rules for the step.

Create a Basic Allocation Process

Context

Follow these steps to get started with a basic allocation process that allocates from an IT expense account to the different members of your department dimension.

Procedure

  1. From the side navigation, select (Allocations).
  2. Select the (Create New) button.
  3. Type a name and a description for your process.
  4. Choose Select a model… and pick the underlying model for the process. All of its steps will be based on this model.
  5. Select Create.
  6. In the Overview page for your new process, select Create Step to add the first step.

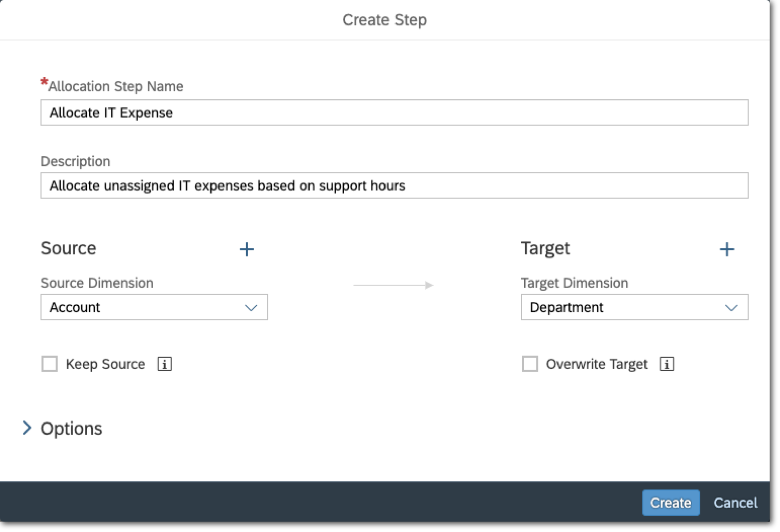
    Now you can set up your step in the Create Step window.

    Setting up an allocation step
  7. Type a name and a description for your step.
  8. In the Source section, select a source dimension from the list.
    This is the dimension that contains source members for the allocation. For example, if you want to allocate IT expenses, you’d select the account dimension.
  9. In the Target section, select a target dimension from the list.

    This is the dimension that contains the target members. For example, you’d choose the department dimension to allocate to different departments.

    In this example, the account dimension isn’t available as a target because it’s already used for the driver values. Date dimensions don’t have an unassigned member where source values are stored, so they’re only available as a target when reallocating from the same date dimension.

  10. Select Create Step.
    Note

    After you create your step, you won’t be able to change most of the settings.

    Your step is added to the allocation process, and you can set up rules for it.

    A simple allocation rule
  11. Set up rules for the step by adding source, driver, and target members.
    1. Select (Create new allocation rule).
    2. Select a member from the Source list to set the member of the source dimension that contains the value to allocate, for example, IT expenses.

      You can also select a parent member like Overhead Expenses.

    3. Select Account, Measure, or Measures and Accounts from the Driver list to set the driver values that determine how the source value is split among the target members, for example, support hours.
    4. Select members from the Target list to set which members will receive values, for example, all departments.
    5. Select Create to add the rule to your step.
  12. Select (Save Allocation rules).

Results

This process is now ready to run in a story or an analytic application. See Run Data Actions, Multi Actions, and Allocations.

You can also add more rules and steps, and apply different settings to customize your structured allocation process. See Build an Advanced Allocation Process for details.

If you want to add the step to a data action, see Creating an Allocation Step.