Build an Advanced Allocation Process
Allocations in SAP Analytics Cloud are highly customizable, and getting to know how different settings work together will help you work on complex use cases.
If you’re not familiar with the basics yet, see Learn About Allocations and Set Up Your First Allocation Process.
Currently you can choose to create allocations in the allocations app or create allocations as part of a data action step. Eventually the legacy allocations created in the allocations app will no longer be available and all allocations will need to be created in the data action designer. To learn more about creating allocations in the data action designer, see Creating an Allocation Step.
This section will cover the following information:
Working with Allocation Rules
Setting up more rules is a quick way to add functionality to your allocation in SAP Analytics Cloud. You can work with rules for a step directly after you create it, or later on by opening the process and selecting the tab for the step.
Adding more rules
If you need to allocate several distinct source members within a step, you can add more than one rule. For example, you can create one rule to allocate IT expenses to each cost center based on support hours used, and another to allocate administrative expenses to each cost center based on headcount.
Open your step and select  (Create new
allocation rule) to pick members for another rule.
Keep in mind that each rule needs to use different source data so that they don’t conflict.
Pasting rules
To quickly add many rules, you can copy data from an Excel spreadsheet or from existing allocation rules.
Make sure to copy the IDs of the dimension members and accounts, not the descriptions.
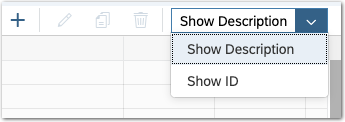
(The table will display descriptions by default. To change this setting, select Show Description and choose Show ID from the list. Then you can copy and paste data within the table.)

If any cells have errors, you can correct them by selecting the rule and choosing  (Edit allocation rule), or by
copying new data to the cells.
Assigning values directly to one target member
For some source members, you might want to assign the entire value to a single target member. For example, you might want all of your administration costs to be assigned to the headquarters location.
In this case, you can pick Direct Assignment as the rule’s driver (or paste _DIRECT_ to rule's driver cell). Then, select a single leaf member as the target.
Direct assignment can also help with data auditing, when you want to send an entire source value to an audit member to keep track of it.
Adding More Sources and Targets
Adding more steps
You can add more steps if your process needs to allocate separately from two or more source dimensions. For example, you might store some overhead expenses in a cost pool dimension, and some just in the account dimension.
You can add more steps to your process by selecting  (Create new step) in the toolbar. You can create new steps, or load any existing steps based on the same
model.
The steps will run in the sequence shown in the Steps Overview pane for the process. Select Details to show or hide this pane.
Allocating to multiple target dimensions
You can add more target dimensions to allocate along multiple dimensions in a step. For example, you can allocate your IT expenses to all departments and all regions in one step.
As you’re setting up your step, select  (Add a
new target dimension) in the Target area to add more target dimensions. To remove one, open the
Target Dimension list and select Remove dimension.
When you create your step, the rules will show a column for each target dimension. Every rule will need to specify at least one member for each target dimension.
Overwriting rules for specific dimension combinations
There might be exceptions to your allocation rules. For example, maybe in Italy all IT expenses are allocated based on headcount instead of support hours.
When you’re creating an allocation step in a case like this, you can add one or more overwrite dimensions. Select  (Add a new source dimension) in the
Source section.
A new column is added to the rules table for each overwrite dimension. When you add a rule, you can choose which members of the overwrite dimension it applies to.
Your source data can overlap when your allocation step includes overwrite dimensions. Conflicts are resolved by running the more specific rule first. For example, the IT expenses for Italy would be allocated first, and then the IT expenses for the rest of the world.
Using Advanced Settings in Your Allocation Step
Reallocating data within a dimension
Instead of allocating unassigned data, you might need to allocate data from specific dimension members that collect costs to other members of the same dimension. In this case, create a reallocation step by adding a dimension as the source or overwrite and as a target.
The unassigned member isn’t needed, so you can reallocate values of a date dimension.
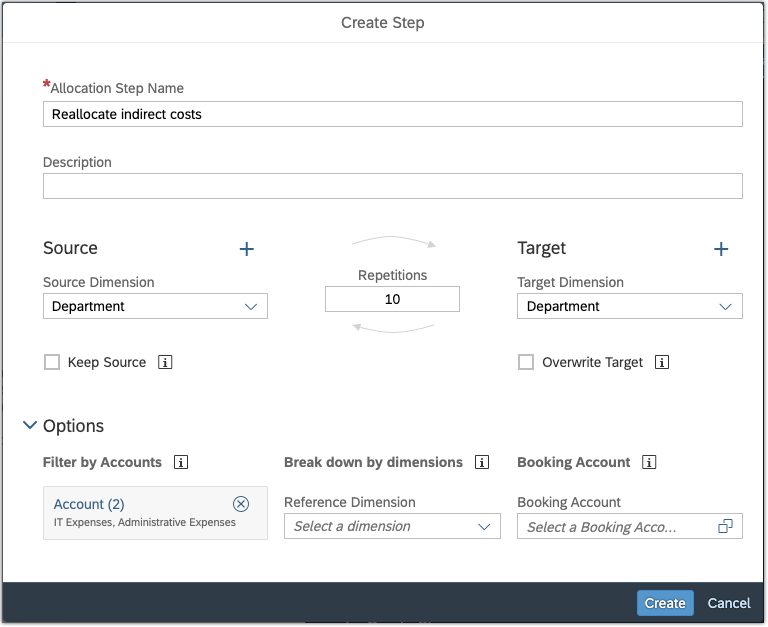
For example, you might want to reallocate indirect costs from service departments such as IT and administration across all your departments. You can add department as your source and target dimension, and then specify the accounts involved using an account filter. (See Adding an account or measure filter for details.)

Repetitions in a reallocation step
If your service departments allocate any values to each other and you want to reduce those values to zero, you can increase the number of repetitions for the step. For example, the IT and administration departments provide some services to each other, so you may need to repeat the allocation several times until their costs are all allocated to other departments. (You can change the number of repetitions before or after creating the step.)
Keeping your source values
If you don’t want to eliminate the source values of your allocation step, select Keep Source. For regular allocation steps, the source values will remain on the unassigned member. If the unassigned member is one of the targets, then some of the values might be allocated to the source value, on top of its original value. For reallocation steps, the source members will retain their original values, plus any value allocated to them as targets.
This setting is often helpful for auditing, when you want to keep a record of the source values that you allocated. You can then add another step that directly assigns those values to a separate audit member.
Note that when there are no driver values at all for a source member, the source value is allocated back to the source member. With Keep Source enabled, the source value will double in this case.
Overwriting your target values
Similarly, you can choose to overwrite any existing values in the target cells. Select Overwrite Target to reduce the value of the target members to zero at the start of the step. (For steps with multiple repetitions, they’ll only be overwritten at the beginning of the step, not during each repetition.)
When you select both Keep Source and Overwrite Target, you can run the step repeatedly without depleting the source values or accumulating extra value in the target cells. For example, you can run the allocation process, and then enter data on the source cells and run it again to get a new result.
Adding an account or measure filter
Usually you won’t want to allocate values from all of your accounts or measures. Filtering accounts and measures that are not used in your allocation step is recommended to help speed up processing.
If your allocation rules won’t explicitly set the source accounts or measures, you can add an account or measure filter to choose which ones are involved. For example, in a step that reallocates values among all departments, you could filter the account dimension to only include indirect cost accounts such as IT expenses and administrative cost. Other accounts will be excluded from the step.
To add a filter to your step, select Options and choose Accounts or Measures underneath Filter by Accounts or Measures. These option will change depending on the type of model and the drivers you selected.
Working with dimensions and accounts with multiple hierarchies
If the source dimension or account has multiple hierarchies available, allocations can only be performed with the default hierarchy.
Breaking your allocation down by reference dimensions
The driver values for each target member are broken down by reference dimensions.
The planning date dimension is a reference dimension by default, unless you also set it as a target. This means that a separate driver value is applied for each time period. For example, think about a case where you’re allocating utility costs to buildings in different regions based on their power consumption, in a model with monthly granularity. If one building is in a region with a very cold winter, it will get a bigger share of the utility costs for those months, instead of just taking an average value over all time periods.
On the other hand, dimensions that aren’t included as a reference or target will have their driver values aggregated.
You can break the driver values down further by adding more reference dimensions. For example, if you want to allocate IT expenses to your departments with different values for each region, you can add region as a reference dimension.
 (Add a new reference
dimension).
(Add a new reference
dimension).Booking values to a specific account
In some cases, it could help to take the results of your allocation step and send them to a separate booking account. This setting can help for auditing because it lets you keep your allocation results separate from other accounts, without changing how the step calculates the values to allocate.
To set one, select Options and choose a single leaf account under Booking Account.
Referencing drivers from a specific version
In some cases, you might want to use driver values that are stored in a specific version, regardless of the target version for the allocation. In this case, add a calculated account to the model that uses a LOOKUP function to refer to that version, and then set this account as your driver. For more information, see Restrict and Lookup.
Working with negative values
Allocations support the use of negative values. However, if reference values for a reference point sum up to zero, part of the source value might not be allocated and will remain on the original member of the target dimension.