Learn About Hierarchies
Hierarchies let you structure your data.
You can create hierarchies during the data preparation stage, or within the modeler after you’ve created a model. Creating hierarchies during the data preparation stage instead of in the Modeler is faster and more automated. However, to make adjustments, or to add or delete members from the hierarchy, you'll need to use the Modeler.
- Level-based hierarchies
- Parents-based hierarchies
- Account dimensions with multiple hierarchies
- Parent-child hierarchies with not-in-hierarchy member
- Level-based hierarchies with not-in-hierarchy node
- Managing hierarchies
- Creating a parent-child hierarchy
- Creating a level-based hierarchy
- Adding a hierarchy to an account dimension
- Video: How to Create Hierarchies in Datasets and Models
Level-based hierarchies
A level-based hierarchy organizes the members of a dimension into levels, such as Country, State, and City.
You can add level-based hierarchies to generic dimensions and organization dimensions
by selecting a dimension, and then from the Dimension
Settings panel, selecting 

 Create Hierarchy Level-Based Hierarchy
 .
.
You then define your level-based hierarchy in the Hierarchy
Builder. Click to create a new hierarchy. Name it, and then select the
dimension columns to use for creating the hierarchy. Select again to
create more hierarchies. At any time, you can select the  icon
beside Hierarchies in the Dimension Settings panel to create,
edit, and delete level-based hierarchies.
icon
beside Hierarchies in the Dimension Settings panel to create,
edit, and delete level-based hierarchies.
Parents-based hierarchies
A parent-child hierarchy organizes the members of a dimension into a set of parent-child relationships.
You can add parent-child hierarchies to generic dimensions and organization
dimensions by selecting a dimension, and then from the Dimension
Settings panel, selecting Create Hierarchy Parent-Child Hierarchy.
When you add a parent-child hierarchy, a new column is inserted into the grid. Add
the parent ID values to the hierarchy column ( ). Select
beside Hierarchies in the Dimension Settings panel to create
more hierarchies.
). Select
beside Hierarchies in the Dimension Settings panel to create
more hierarchies.
To see a parent-child hierarchy's structure, open the Hierarchy Maintenance view by selecting one of your parent-child hierarchies in the Dimension Settings panel. Here, you can drag members to build the parent-child relationships visually. If more than one hierarchy has been defined, you can select which one to work with from the drop-down list.
In the Hierarchy Maintenance view you can filter the members that are currently displayed in the tree to those matching the entered value (either in ID or description) and you can use the action menu to sort all direct children of a parent member by their ID or description (ascending or descending).
Account dimensions with multiple hierarchies
Account dimensions can have multiple account hierarchies.
Having multiple account hierarchies offers more flexibility in terms of reporting and data entry, and is more practical to group accounts differently. That's also useful if you're looking to forecast next year's budget in a dedicated updated hierarchy while still working on the current budget in another account hierarchy.
In the Modeler, each parent column in the account dimension corresponds to an account hierarchy. Visually, each hierarchy you add to the account dimension is matched with a new parent column, as illustrated in the screenshot below.
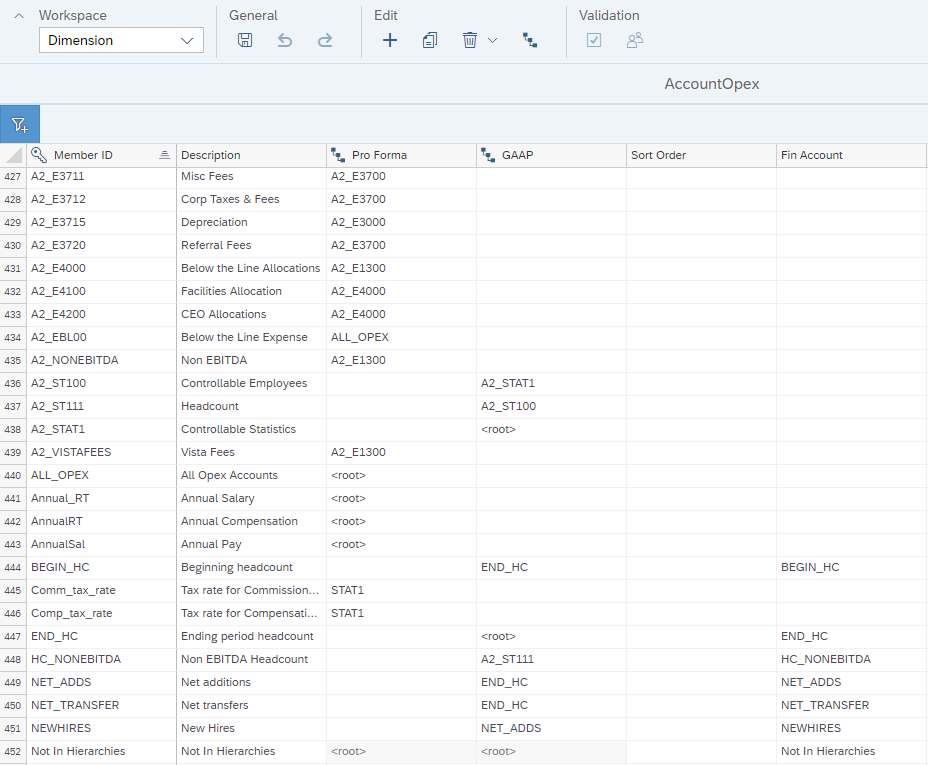
You can add additional hierarchies in the Modeler via the Dimension Settings panel. Once you've added a hierarchy, you can move on to the member assignment and enter values for each member of the hierarchy, just like you would for parent-child hierarchies in generic dimensions. All cells that you leave empty with no value are automatically considered as not part of the hierarchy and aren't exposed in consumption features anymore if this hierarchy is selected.
If you account dimension has multiple hierarchies, the application sets the first hierarchy of the account as the default hierarchy. However, you can switch to any hierarchy within the account dimension and set it as default. Your default hierarchy is important, as it's also taken into account for allocation or data locking for instance. Note that changing the default hierarchy is only allowed if there are no stories that depend on the model. To know which hierarchy is the default one, look for a blue star next to a the hierarchy's name in the Dimension Settings panel. If the default account hierarchy is deleted, the next hierarchy becomes the default hierarchy. Story calculations that existed before additional account hierarchies were added will break and must be saved again.
In stories, tables and charts also benefits from having multiple hierarchies, and you can switch from one to another depending on the data you want to display.
Formulas and calculated accounts work that you add in the modeler are supported by all hierarchies. However, if a calculated account doesn't make sense one hierarchy from a business perspective, make sure that the calculation is not part of that hierarchy so that it's not getting exposed in stories.
Parent-child hierarchies with not-in-hierarchy member
In some situations, you might want to create a parent-child hierarchy for a dimension, but not want to include all of the dimension members in the hierarchy. When you add a parent-child hierarchy to a dimension, by default, members that don’t have a parent node specified (that is, they don't have a value in the hierarchy column) are not part of the hierarchy and will neither be shown in result sets nor in stories, filters, applications, etc. ...
However if you want to show these orphaned members in the hierarchy you can do so by using the option Group and show under "Not in Hierarchy" in the Empy Hierarchy Values dropdown in the Dimension Settings panel. This will add a Not in Hierarchy member to the dimension that will act as a parent for all orphaned members. To remove orphaned members from the hierarchy choose the option Remove from Hierarchy in the Empy Hierarchy Values dropdown.
Depending on which parent-child hierarchy is being shown in a table, different members will be under the Not In Hierarchy parent member.
For more information, see Entering Values with Multiple Hierarchies.
-
If you haven chosen Group and show under "Not in Hierarchy" and you remove a member from the hierarchy, that member and all of its descendants are moved to the Not In Hierarchy member, as a flat list. Any previously existing sub-trees are discarded.
-
If you haven chosen Group and show under "Not in Hierarchy" and you delete a member from the dimension, and it has descendants in a parent-child hierarchy, the descendants are moved to the Not In Hierarchy member.
-
You can adjust the properties of the Not In Hierarchy member, except its position in the hierarchy (it's always assigned to root).
-
If you have chosen Remove from Hierarchy, the Not In Hierarchy member is removed.
-
If you have chosen Remove from Hierarchy, the totals for example in tables will not be equal when displaying a dimension with and without hierarchy.
-
If you have chosen Remove from Hierarchy and you remove a member from the hierarchy, that member and all of its descendants are removed from the hierarchy and not shown anymore. Any previously existing sub-trees are discarded.
-
If you have chosen Remove from Hierarchy and you delete a member from the dimension, and it has descendants in a parent-child hierarchy, the descendants are removed from the hierarchy and not shown anymore.
Level-based hierarchies with not-in-hierarchy node
-
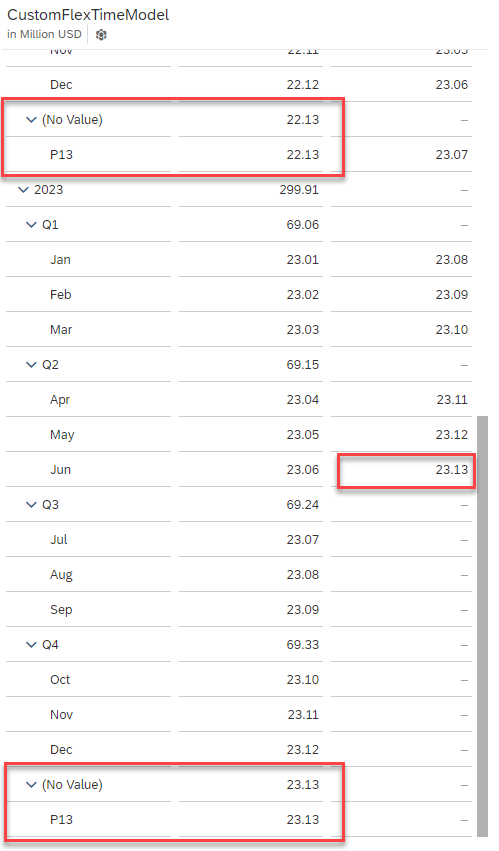
Show as "(No Value)" in Hierarchy
Members with empty property values are shown with (No Value) entries at the respective hierarchy levels. This is the old default for all already existing dimensions with level-based hierarchies.
-
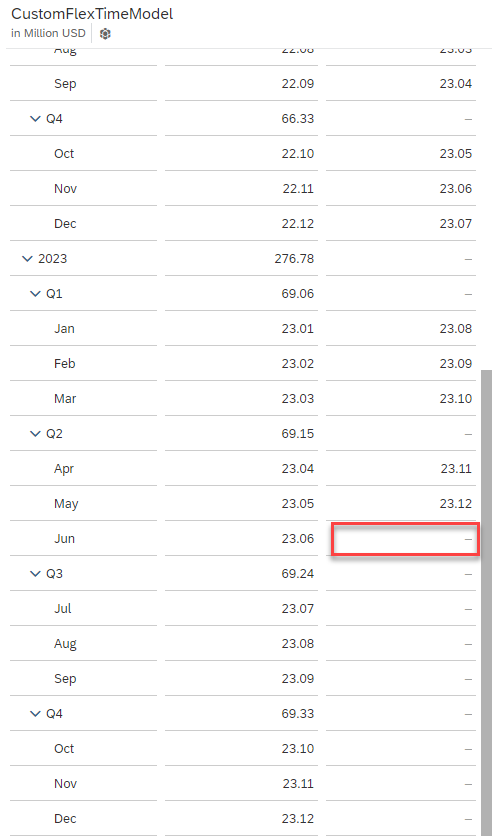
Remove from Hierarchy
This option is the (new) default for dimensions with newly created level-based hierarchies (where no level-based hierarchy previously existed).
The members will be removed for the consumption layer, for examples in stories. This means they are excluded for filters, result sets, etc.
-
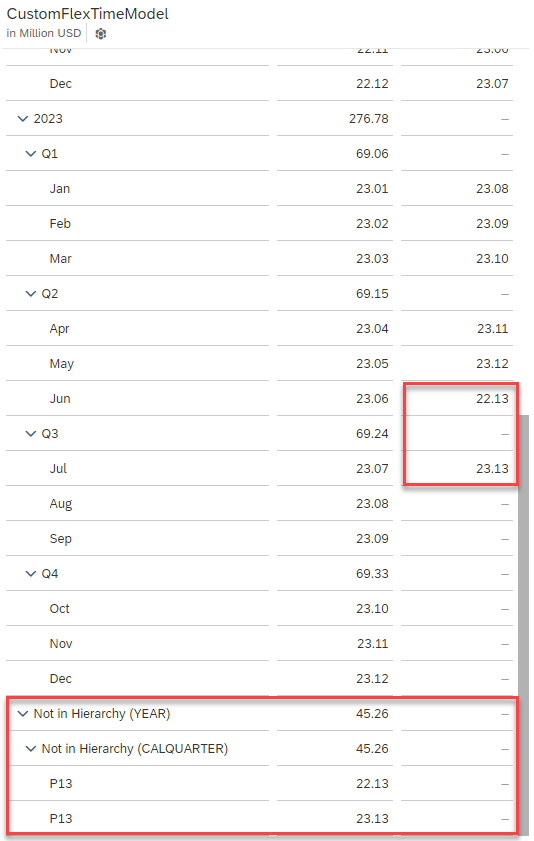
Group and show under "Not in Hierarchy"
This option creates a Not in Hierarchy node per level if at least one property value is missing for at least one member.
These nodes have a combined text of Not in Hierarchy and the level property id in brackets, for example Not in Hierarchy (CALQUARTER)
Your choice has not only has implications on the consumption in story (for example, in a table) but also impacts formulas.
| Show as "(No Value)" in Hierarchy | Group and show under "Not in Hierarchy" | Remove from Hierarchy |
|---|---|---|
|
|
|
As you can see in the example, the second measure column changes as a calculation with dynamic time navigation function (Restrict and Lookup) has been used there. Depending on where the members are located within the hierarchy, the values of the used formula vary. See for example June 2023.
Managing hierarchies
You can set or change the default hierarchy for any type of dimension, for both level-based and parent child-hierarchies, in the hierarchy builder.
Other types of dimensions don't support custom hierarchies:
- For the Date dimension, hierarchies are predefined based on the model granularity, and whether you've enabled fiscal time for the model. You can specify a default hierarchy in the settings for the Date dimension.
- The Version dimension doesn't have a hierarchy, since different versions are separate and don't have parent-child relationships.
The Hierarchy Maintenance screen lets you manage hierarchies visually. It displays an icon
()
next to members that belong to the selected parent-child hierarchy. You can also use
the All/In Use switch to display
either all members of the dimension, or only members of the selected hierarchy.
Creating a Parent-Child Hierarchy
Use parent-child hierarchies to structure your data into parent-child relationships. When the data is displayed in a story, hierarchies can be expanded or collapsed.
- Start creating your model. After the data import, you can see the data integration view
where you perform data preparation before creating a model.
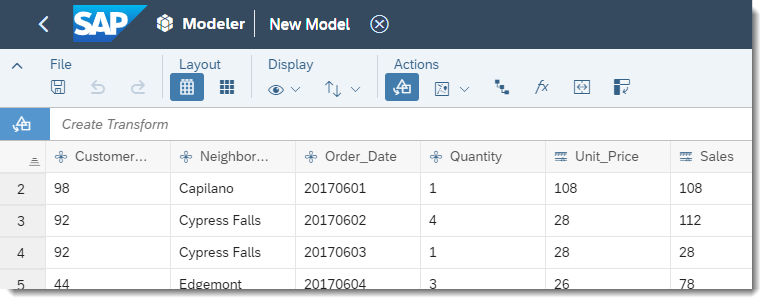
- Select the column that you want to be the child in the parent-child
hierarchy.
For example, if you're creating a geography hierarchy, with Country as the parent and City as the child, select the City column. Note that you can change the column name by double-clicking the column header.
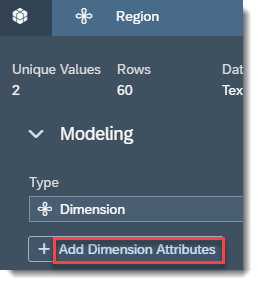
- In the Details panel, select Add Dimension
Attributes.
- Select Parent-Child Hierarchy (Parent).
- In the Select parent list, choose the column that you
want to be the parent in the hierarchy.
The column's icon changes to show that it's now the parent in the hierarchy.

- Repeat the above steps if you want to create more parent-child
hierarchies.
Note
The parent and child columns don't need to represent levels in a hierarchy. For example, if you're setting up a hierarchy similar to a company org chart, the columns could contain data like this:
Child Parent John Mary (John's manager) Pierre Mary (Pierre's manager) Mary Joanna (Mary's manager) Kevin Joanna (Kevin's manager) Otto Kevin (Otto's manager) NoteIf a column is mapped to a hierarchy parent of a dimension, an empty cell in that column means that the corresponding dimension member doesn't have a parent in that hierarchy. In other words, that member is a top-level node of the hierarchy.For example, if you have the following columns, the resulting hierarchy will have A as the top-level node, with two child nodes A1 and A2:
Product (child) Product group (parent) A1 A A2 A A The dimension member A still belongs to the hierarchy. If you want a newly created dimension member to be excluded from a hierarchy of that dimension, don't map the hierarchy to a column.
- Select Create Model.
In the Modeler, you now see the dimensions and attributes of your model, including the hierarchy you created. If you want to make any changes to the hierarchy, see the following steps.
Creating a Level-Based Hierarchy
- Start creating your model. After the data import, you can see the data integration view where you perform data preparation before creating a model.
- In the toolbar, select (Level Based
Hierarchy).
- In the Hierarchy Builder, type a name for the hierarchy.
- Select dimensions to build your hierarchy.
You can drag the column tokens to change the order of the levels.

- Select Generate a 100% unique bottom level for my
hierarchy if the data values in the lowest level don't
correspond to unique dimension member IDs; in other words, a single dimension
member has multiple hierarchy parents.
For example, let's say you want to build a dimension with a level-based hierarchy using these two columns:
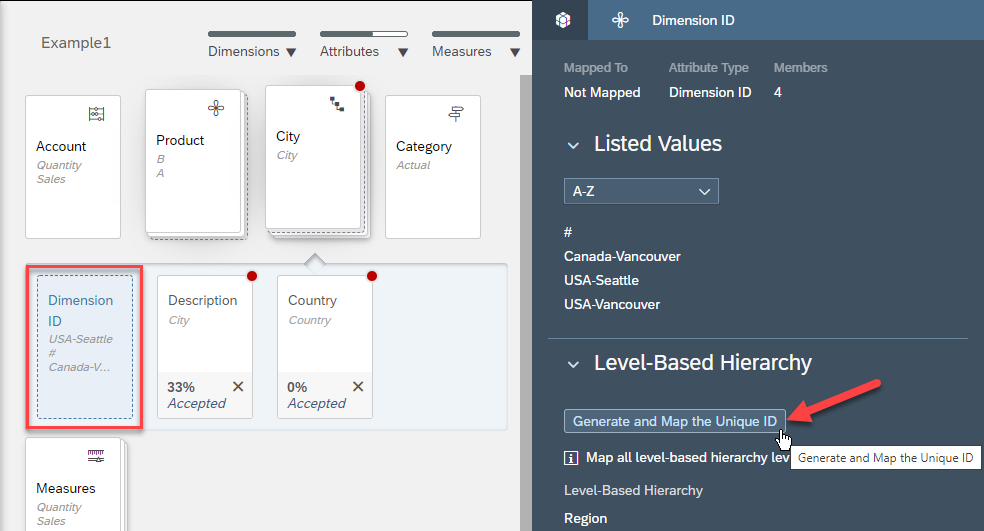
City Country Vancouver Canada Vancouver USA Seattle USA When you create the hierarchy, a new column is generated, with unique values that serve as the dimension member IDs:
City-ID City-Description Country Vancouver-Canada Vancouver Canada Vancouver-USA Vancouver USA Seattle-USA Seattle USA Note that when you subsequently import data into this model, this dimension member ID needs to be mapped from the imported source data as well. If the source data doesn't already have a column that contains such values, you can generate the dimension IDs again by selecting the card that represents the dimension member IDs of the dimension, and selecting Generate and Map the Unique ID.
- Select OK when finished.
To see detailed information about the new hierarchy, select the hierarchy column. Information is shown in the Details panel.
- If you want to add more level-based hierarchies, or copy, edit, or delete a
hierarchy, select (Level Based
Hierarchy) to open the Hierarchy Builder
again.
- When you've finished creating hierarchies, select Create Model.
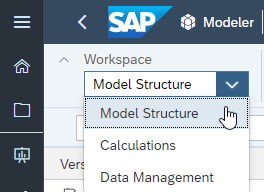
- In the Modeler, switch to the Model view.
- Open a dimension that you've created a level-based hierarchy for.
You'll see the hierarchy you created in the Dimension Settings panel. If you want to make any changes to the hierarchy, select the hierarchy to open the Hierarchy Builder.
Adding a hierarchy to an account dimension
- In the Modeler, select an account dimension.
- In the Dimension Settings panel, scroll down to the Hierarchies section.
- Click .
- Add an ID and a description to the hierarchy.
The hierarchy you've just created is now listed in the Hierarchies section of the Dimension Settings panel.
- To make it the default hierarchy, click , and click Set as Default Hierarchy.
- To edit or delete the hiearchy, click , and click Edit or Delete.
Video: How to Create Hierarchies in Datasets and Models
Open this video in a new window
In this video you will drill down between hierarchical levels in a story, create a level-based hierarchy in a dataset, create a level-based hierarchy in a model, create multiple parent-child hierarchies in a model, and choose how to display a non-default hierarchy in a story.