Story and Page Filters
Use SAP Analytics Cloud story and page filters to narrow the scope of your analysis.
The Story Filter allows you to apply filters for all charts and tables in a Story that are based on the same model. The Page Filter is the same as a Story Filter, but applies to just one page in a story. (An Input Control is one type of page filter.)
You can also apply a filter to a single chart or table.
In some circumstances, when a filter is applied to a chart and there is only one resulting data point or item, the chart's legend will be hidden.
-
From the chart action menu (
 ), select
Show/Hide.
), select
Show/Hide. -
If the Legend option is already showing, hide it and then select it again.
Convert Between Story Filters and Page Filters
You can convert between story filters and page filters.
If you have a story filter and you want the filter to apply only to the charts on one story page, you can convert the story filter to a page filter.
The workflow for converting a story filter to a page filter involves the following steps:
-
With a canvas or responsive page open, select a story filter from the filter bar.
-
Select Convert to Page Filter.
The new filter appears as an object on the canvas or responsive page.
You can resize the filter object by selecting it and dragging its sizing handles. If you enlarge the filter object, it becomes an input control that you can use to select filter values.
If the filter is set to allow viewers to change the filter values, and to allow multiple filter values, you can enlarge the filter object on the page so that the filter values appear in a list, with checkboxes. Then you can change filter values by selecting and deselecting the checkboxes.
If you want to convert a page filter to a story filter, you can select the page filter and choose  (More Actions)
  Convert to Story Filter
 . The story filter will apply the filter to all pages in the story.
Measure-Based Filters
Measure-based filters are filters that are based on a range of values in a measure. For example, if you want to include in your story only your company locations that have more than 200 employees, you could create a filter based on an Employees measure.
For more information, see Measure-Based Filters.
Effects of Multiple Filters (Cascading Effect)
Changes you make to a story or page filter affect related filters in the same story or page. (Story filter changes affect both story filters and page filters in the story.)
Story filter changes cascade down to page filters and page filter changes cascade down to group filters, but no filter changes cascade up.
However, when multiple group filters are configured to affect the same set of widgets through linked analysis, the cascading effect is applied to all the group filters.
For more information on group filters, see Group Filters.
For example, when you change a page filter value, any related page filters on the same page are updated automatically. If you have both Country and Region filters on a page, and you change the Country filter value from All to Sweden, the Region filter updates to show only regions within Sweden. All other region names are hidden. You can select Show Inactive Values to display those hidden values.
When an input control with the Show unbooked members option turned on has filters cascading their changes into it, the unbooked members won't be included in the input control's list of members.
Some filters are not affected by other filter changes:
- Range filters
- Hyperlink filters
- Multi-dimension filters (filters that apply to a combination of dimensions)
You can turn off the cascading effect in the settings for the filter or input control. When the cascading effect is turned off, any filter value selection changes made in this filter do not affect other filters, and any filter value selection changes made in other filters do not affect this filter.
Date and Time Range Filters
You can define time periods based on years, half-years, quarters, months, weeks, or days (depending on the time granularity defined in the underlying model), and apply the date range as a filter, so that only details in the selected time period are visible.
If your data is recorded very frequently; for example, sensor data, you could use the Timestamp dimension type, and be able to define time range filters based on hours, minutes, seconds, and milliseconds.
The ranges can be fixed or dynamic; for example, you could choose the fixed range January 2019 to December 2019. If this story is opened in 2020, the story will still show 2019 data. Dynamic date ranges shift based on the current date. They offer a few more granularities such as current year, current quarter, and current month, and you can offset the range from the current date.
Examples of dynamic date ranges:
- If you want to display data from three years ago, to two years into the future, you would choose Year granularity, enter 3 under Look Back, and enter 2 under Look Ahead. If the current year is 2019, then the date range is 2016 to 2021.
- If you want to display data for the current quarter, you would choose Current Quarter granularity. If the current date is June 1, 2019, then the date range is April 1, 2019 to June 1, 2019.
- If you want to shift the entire range forwards or backwards instead of basing it around the current date, choose Offset as the range type. For example, to set the range as the year before the previous year, you choose Year granularity, select Look Back as the offset direction, Year as the offset granularity, and 2 as the offset amount. If the current date is June 1, 2019, then the date range is 2017. Note that the Offset Granularity can’t use a shorter period than the overall Granularity.
- If you switch on Include Range up to Current Period, the date range ends at the current period. If you choose Year granularity, and enter 3 under Look Back, and the current date is June 1, 2019, then the date range is January 1, 2016 to June 1, 2019. For offset ranges, the Include Range up to Offset Period setting works the same way using the offset period instead of the current period.
Offset ranges aren't available for filters applied to maps.
It is also possible to define multiple range time filters and apply these together. You could use this, for example, to compare the first two months of the year over a three year period by defining three separate ranges for months Jan–Feb for each of the three years. When these ranges are applied as a single filter, everything else except the selected periods is filtered out.
In some workflows, for example, planning, you might want to set the current date of a dynamic date range filter to be different from today's actual date. To learn how to do this, see Customizing the Current Date.
- You can have multiple date dimensions in your story.
- You may want to restrict the date ranges that viewers of the story can
choose. For example, if you don't want viewers to be able to select future
dates, disable the Look Ahead field by selecting
 (Show/Hide), and clear the check mark beside Look
Ahead.
(Show/Hide), and clear the check mark beside Look
Ahead. - For fixed date range filters, if you define a range using the Day granularity, all other ranges in the filter can have only the Day granularity. The same restriction applies to Week. However, the Year, Half-Year, Quarter, and Month granularities can be mixed. This restriction doesn't apply to dynamic date range filters; for example, you can define one range with day granularity and another range with year granularity.
- If you choose Day granularity, you can manually type dates into the date fields. If you do type in dates manually, you'll need to use the date format defined by the Date Formatting setting in your user profile. Dates entered in any other formats won't be recognized as dates.
- Time Range filters work for booked data only.
Static vs. Dynamic Filters
When you create a filter (a story filter, page filter, or calculation input control) for a flat dimension, if you select “All Members”, a dynamic filter is created. This means that the latest dimension member descriptions are always fetched from the model. But if you select individual dimension members, and not “All Members”, a static filter is created. This means that the dimension member descriptions are remembered from the time when the filter was created.
Example: Say you create a filter with a list of countries, and initially the list of countries is: Canada, USA, and Germany. If you create a static filter, those three full country names will be remembered. Later, someone changes the dimension member descriptions in the model or the back-end server to CA, US, and DE. The static filter will still display Canada, USA, and Germany, instead of CA, US, and DE. A dynamic filter though, will display the updated member descriptions whenever the story is opened.
Story Filters in the Optimized Story Experience
To access the story filters that are not currently displayed in the story filter bar, select See More Filters, and then select a filter from the dropdown list.
Some story filter options (such as converting between story and page filters) are not yet supported.
Modifying Member Selections
As a story designer, you can decide how your users apply changes to multi-selection filters:
-
Immediately update the chart or table contents as members are selected or deselected in the filter.
Make your changes in the filter dialog and then use Apply Selections to apply all those changes at the same time.
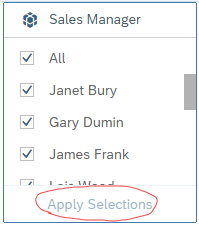
This is the default setting for new member filters that allow multiple selections.
You can choose which method to allow for each filter by showing or hiding the option Apply Selection Button.
-
Story filters: select the filter and then select
Show/Hide Apply Selection Button. -
Page filters (input controls): right-click the filter and then select
Show/Hide Apply Selection Button.