Get Started with Data Actions for Planning
Data actions are a flexible planning tool for making structured changes to model data in SAP Analytics Cloud, including copying data from one model to another.
Data actions are designed by modelers and then run by planners in stories or analytic applications, or scheduled to run in the calendar.
A data action is created based on a planning model, and consists of one or more steps that are carried out on a public or private version of the target model.
Data actions can be created from the side navigation or accessed in the file repository (Files). Recent data actions will also show in the Recent Files section of your home screen.
Permissions for Data Actions
The permissions for data actions depends on a combination of role-based permission for data actions and folder-based permissions in the file repository.
In order to have certain permissions for the data actions in a file repository folder, you need to have specific corresponding permissions for data actions that are assigned by the system administrator outside of the file repository, on the Roles page. For more information, see Create Users and Permissions.
If you do not have the required role-based permissions for data actions, then your permissions in the file repository for data actions are restricted.
There are many possible combinations of role-based permissions and how they impact folder-based permissions in the file repository. Two examples are data action designer and data action user.
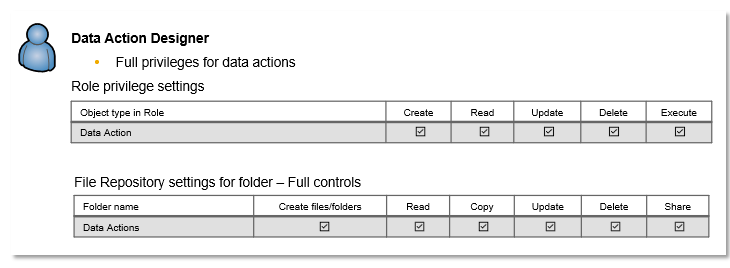
If you are a data action designer with full permissions for your role, assigned by the system administrator, then you will have full permissions for data actions you access in the file repository.
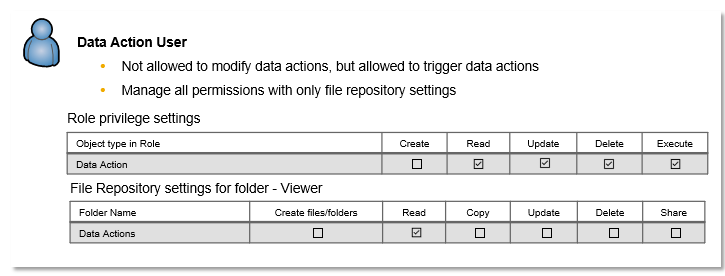
In the second example, if you are a data action user with Read and Execute permissions assigned by the system administrator for data actions, you have Read permission in the file repository. This permissions combination does not allow you to make changes to the data actions, but you can trigger them. As a data action user, you also manage all permissions only from the file repository settings.
There is no Execute permission for the folder-based permissions, so having Read permission functions the same as having Read and Execute permission in the roles settings. Having Read permission is a prerequisite for other permissions.
After the basic permissions of Read and Execute are given in the roles settings, all additional permissions can be managed directly in the file repository settings. Being able to add additional permissions in the file repository setting streamlines the process by making it unnecessary to manage the permissions in both places.
Having Update and Delete permissions in the roles settings requires a Planning Professional license. If you have a Planning Standard license, you can have only Read and Execute permissions for the roles-based permissions.
Adding Steps to Data Actions
-
Copy step: This type of step copies data within a model based on a set of rules, filters, and aggregation settings. For example, you can use it to copy data from 2018 to 2019. To learn how to create a copy step, refer to Adding a Copy Step.
-
Cross-model copy step: With this type of step, you can copy data from a different source planning model based on a set of filters and automatic or manual mapping between dimension members. For example, you can bring together data from headcount and expense planning models into a central finance model. To learn how to create a cross-model copy step, refer to Adding a Cross-Model Copy Step.
-
Allocation step: This type of step lets you run an allocation step as part of your data action. It allocates values from a source dimension to a target dimension by driver values, or by direct assignment. For example, an allocation step can help allocate overhead costs to different departments. To learn more, see Learn About Allocations. To learn how to add an allocation step to data actions, refer to Adding an Allocation Step Using Legacy Allocations.
-
Embedded data action step: With this step, you can run another data action as a step in your data action. For example, you can quickly reuse a common set of steps in several different data actions, or multiple times within a single data action. (Multi actions are also available to run multiple data actions in sequence, along with predictive and publishing steps.) To learn how to create an embedded data action step, refer to Adding an Embedded Data Action Step.
-
Conversion step: For models with measures, conversion steps let you copy between measures while applying currency conversion. To learn how to create a currency conversion step, refer to Convert Currencies in a Data Action.
-
Advanced formulas step: Each step lets you create a script of transformations and calculations to apply to the data within defined scopes of the target model. Some formulas from the Modeler are supported, as well as additional advanced formulas. They let you carry out planning and simple consolidation tasks like cash flow planning, accounts receivable planning, and carry forward operations. You can build simple advanced formulas using the visual editor, or get full control using a script editor. To learn how to create an advanced formula step, refer to Add Advanced Formulas to Your Data Action.
Adding Parameters
You might want to quickly update a value or change a member in several different places throughout a data action, or allow a user to set their own values when they run the data action. In this case, you can use parameters for those values.
There's always a default parameter for the target version, but you can add others that represent either numbers or dimension members. To learn how, see Add Parameters to Your Data Actions and Multi Actions.
Running Data Actions
-
Using a data action trigger in a story or analytic application: Run Data Actions, Multi Actions, and Allocations
-
Scheduling it in the Calendar: Schedule Data Actions in the Calendar
-
Using a script object in an analytic application: Use Data Actions Technical Objects
-
Running a multi action that contains the data action, using a trigger in a story or analytic application: Run Data Actions, Multi Actions, and Allocations
Managing Data Actions
From the file repository (Files), you can move, edit, copy, delete, show columns, or filter your data actions by using the toolbar. Additionally, you can check on the status and details of your data actions by going to the Data Action Monitor. For more information, see Monitor Data Actions.