Export Data Source Reference
Personal Files
Context
- From the (
 )
Main Menu, select
)
Main Menu, select  Files.
 - Open the model you want to export.
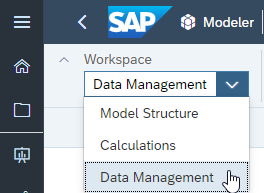
- Switch to the Data Management screen.
- Select


 Export Model As File Create New Schedule
 .
. The Export Model As File dialog is displayed.
NoteIf data export has been restricted for this model, you won't be able to proceed. For details, see Export Models and Data. - Choose whether you want to export data to a file on your local system, or to
a file server, and then select a folder location to save the exported model
to.
If you don't see the option to export data to a file server, see Allow Data Import and Model Export with a File Server.
- Set the maximum number of rows per file.
If the number of rows in your model exceeds the maximum number per file, the data will be split into multiple files during the export process.
- If you want Excel to ignore the regional CSV separator setting, and use the
separators within the exported CSV file, select the Add separator
information for use in Excel check box.
Excel uses regional settings to determine which separator it recognizes for CSV files. For example, in regions where a comma is used as a decimal separator, the CSV separator is typically a semicolon. If you're exporting your model to a CSV file that might be used in different regions with different standard CSV separators, you should select this check box to ensure that Excel will recognize the separators within the CSV file.
- If you want to export only leaf members, select the Export leaf account members only check box.
- If you want to export only booked data, so that you don't have to delete empty rows, select the Export booked data only check box.
- In the Select Data section, select the dimensions and
measures to export.
If you’re exporting a new model type with multiple measures, as opposed to a classic account model, make sure that you export all measures in a single export job. By default, all measures are selected, but if you don't want to export them all, select only the ones you need. If your model has only one measure, the application selects it by default for the export job.
Note- For Fact Data Only export, you can reorder the CSV output columns by clearing the Dimensions check box, and then selecting columns in the order you want.
- For Fact Data Only export, calculated measures can’t be exported.
- Optional: Choose
 to filter on a
dimension. This allows you to reduce the number of returned records.
to filter on a
dimension. This allows you to reduce the number of returned records.
By default, dimension members you select are the ones included in the results. Choose Exclude selected members to filter out selected members. For example, assume there are four quarters Q1, Q2, Q3, and Q4 in your Date dimension for a particular year, and you select Q1 and Q2 in the filter:
- By default, Q1 and Q2 are included, whereas Q3 and Q4 are excluded.
- Choosing Exclude selected members will exclude Q1 and Q2, and include Q3 and Q4.
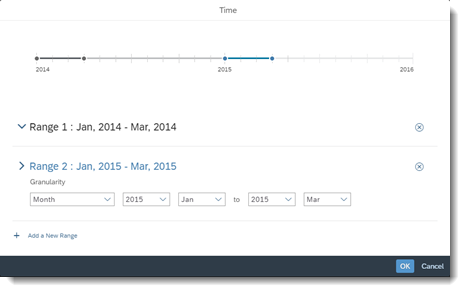
Date dimensions allow you to Filter by Member or Filter by Range. You can add multiple ranges to your filter to specify the exact time periods you want to include. Note that Month is the lowest level of a Date dimension that can be exported. A time line visualizes the complete range of your filters.
- Optional: Choose
 (Columns) to select individual columns
you want included. You can rename dimensions, and the dimension name is concatenated to the name of the column heading after exporting. Models are exported as a flat file, with each selected dimension column listed one after another. For example, a dimension named Product with columns named ID, ParentID, and Description is exported as follows:
(Columns) to select individual columns
you want included. You can rename dimensions, and the dimension name is concatenated to the name of the column heading after exporting. Models are exported as a flat file, with each selected dimension column listed one after another. For example, a dimension named Product with columns named ID, ParentID, and Description is exported as follows:ProductID ProductParentID ProductDescription PRD001 HPRD0001 Athletic Shirts PRD002 HPRD0002 Tennis Shoes - Optional: Select Use hierarchy levels from,
and then choose a dimension whose hierarchy information you want to
see in the exported results.
A column is exported that includes the parent ID and shows the parent-child relationships between members of that dimension.
- In the Scheduling section, choose when you want to
export your model.
- Choose Export Now if you want to export only once now.
- Choose Scheduling Recurrence to define a recurring export schedule.
When setting up a recurrence, create a name for your schedule and determine how frequently you want the export to occur.
- Choose Schedule to save your export schedule or Export if you chose to export now.
Results
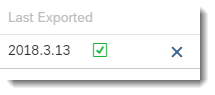
View all your export schedules by choosing Export Model As File Manage Existing Schedules. From the Scheduled Exports dialog, you
can see the time and status of the last scheduled export, as well as delete
existing schedules you no longer need:
Successfully exported models are found in the Files area
under the folder you specified. From the () Main
Menu, select Files .
Next Steps
The export limit depends on the type of data being exported. If calculations aren't included in the export job, the default export limit is 6 million rows.
If account calculations are included, the default limit is 1 million rows, but think of this as 1 million rows of calculation input.
For example, if your export consists entirely of calculations, with each output cell being the sum of four other cells, the maximum number of rows that could be exported would be 1 million divided by 4, which is 250,000 rows.
Or, if your query is divided into months (or years), and you selected five months (or years), the maximum number of rows that could be exported would be 200,000 rows.
The actual result can vary depending on the model and filter complexity.
If you think your export will be bigger than this, try filtering out some data before you begin. The export can take a long time, but you can use other SAP Analytics Cloud features while you're waiting.
Related Information
Export Table Data as a CSV or XLSX FileSAP BPC
- SAP Business Planning and Consolidation 10.0, version for SAP NetWeaver (BPC for NW)
- SAP Business Planning and Consolidation 10.1, version for SAP NetWeaver (standard configuration only)
- SAP Business Planning and Consolidation 10.0, version for Microsoft (BPC for MS)
- SAP Business Planning and Consolidation 10.1, version for Microsoft (BPC for MS)
- SAP Business Planning and Consolidation 11.0, version for SAP BW/4HANA (standard configuration only)
- SAP Business Planning and Consolidation 11.1, version for SAP BW/4HANA (standard configuration only)
When doing this, we recommend you keep the Denote fiscal year setting as By year in which it ends unchanged, as only this setting is supported by BPC's fiscal year during data import and export.
If currency conversion was set to ON when importing BPC data, only local data will be written back to BPC; If currency conversion was set to OFF when importing BPC data, all values in the RPTCURRENCY dimension will be written back to BPC.
To export to BPC, the system must be set up correctly to connect to BPC. For more information, see Data Connections.
Exporting from a Write-Back Model
If you've enabled write-back to BPC, users can write data back to BPC from stories:
- In a story, select the
 (Version
Management) icon on the toolbar.
(Version
Management) icon on the toolbar. - Click the
 (Save) icon for the version that you want to
write back to BPC.
(Save) icon for the version that you want to
write back to BPC.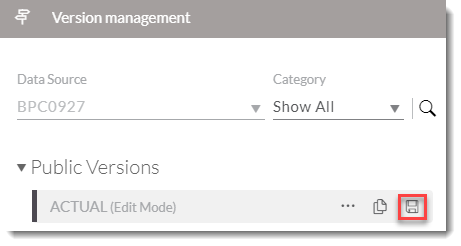
In an SAP Analytics Cloud write-back model, if the connection is an OAuth connection which you haven't authenticated, or your OAuth authentication has expired, then a dialog will pop up for you to enter your BPC credential and complete the OAuth authentication process. If SSO is enabled, you can directly sign in without entering again your BPC credentials.
Try not to activate BPC data on the BW DataStore Objects (advanced) or compress BPC data on the BW InfoCubes/InfoProviders at BPC side. Otherwise you might not be able to retrieve delta data from corresponding BPC model.
Users can also retrieve up-to-date data from BPC without first writing data back. For detailed information, refer to the section "Importing into an Existing Model" after clicking BPC Data in Import Data to Your Model.
Exporting from a Basic Model
Exporting data is very similar to importing data:
- Specify the connection to be used for export.
- Provide target model information.
- Map source data to the target model structure.
- Add filters for the source dimensions to be exported.
Specifying the Connection
You first need to select the connection to the BPC system. This can be an existing connection or one that you create on the fly during the export. For more information on creating connections, see Data Connections.
Providing Target Model Information
You must specify the environment and then select the model to be exported. A query is automatically generated with a predefined name. You can rename it freely.
Mapping Data
You map the source model data to the target model data in the mapping dialog.
Define the mapping in the following fields:
- Target Dimension: In this area, you can select the target BPC dimensions to map to the source dimensions. Matches are automatically suggested by the system, but you can change them.
- Source Dimension: Lists the dimensions in the source model. If you choose the option Not Mapped, you need to specify a default member for the target dimension to write data to.
- Filter: You can set a filter for each column to control how much data is exported.
Select the Export blank values check box if you want to include in the export any members where the name given by the property column is blank. If you select this check box, also choose what you want to replace the names of those members with from the Replace with field.
After you complete the data export, if you want to schedule the execution of export jobs, follow these steps:
- Before you start to schedule the export jobs, we recommend you first check
about the BW lock server settings configured in BPC. Export jobs sometimes
can result in a large amount of data written back to BPC in parallel, which
might exceed the limit of BW lock server settings. Usually in this case we
recommend you go to transaction code RSPLSE and set "Lock attempts" to 3 and
"Wait time in seconds" to 5. For detailed steps, refer to the note
928044

- Select an export job.
-
Select
 (Schedule
Settings), and choose between the following options:
(Schedule
Settings), and choose between the following options:Frequency Description None Select this option when you want to export the data manually. Once The export is performed only once, at a preselected time. Repeating The export is executed according to a recurrence pattern. You can select a start and end date and time as well as a recurrence pattern. -
Select Save to save your scheduling settings.
Related Information
Data ConnectionsSAP S/4HANA
Prerequisites
You are using a supported version of SAP S/4HANA. For more information, see System Requirements and Technical Prerequisites.
If you want to export your quantity-related data to S/4HANA's quantity measure, make sure your target SAP S/4HANA is version 1911 or higher.
Context
Make sure the date dimension of the SAP Analytics Cloud model to be exported has either Month or Year granularity.
Make sure the SAP Analytics Cloud model has fiscal year settings turned on. Its date dimension will be mapped to S/4HANA's fiscal year or fiscal year period field by default.
The roles assigned to you must include the following permissions:
- Execute action of Other Datasources
- Read action of the model to be exported
- Create or Maintain action of a connection; Or Read access to a shared connection created by others
- SAP S/4HANA: Exporting Data from SAP Analytics Cloud to SAP S/4HANA
- SAP S/4HANA Cloud: Exporting Data from SAP Analytics Cloud to SAP S/4HANA Cloud
SAP Integrated Business Planning
Prerequisites
You are using IBP 1908 or higher versions.
Context
The roles assigned to you must include the following permissions:
- Execute action of Other Datasources
- Read action of the model and dimensions to be exported
- Create or Maintain action of a connection; Or Read access to a shared connection created by others
- From the ()
Main Menu, select Files.
- Open the model whose transaction data you want to export.
- Switch to the Data Management screen.
- In the Export Jobs area, choose the
(Export) button and select Export Data to SAP Integrated Business
Planning.NoteYou can also choose to export data to IBP via a generic OData service connection. In this case, select Export Data To OData Services from the list.
- Choose a connection.
If no connections have been created, you can choose Create New Connection from the drop-down list. For detailed information, see Import Data Connection to SAP Integrated Business Planning.
Click Next.
- On the left side of the Target Data Selection dialog, choose an IBP Planning Area.
- Select the corresponding target fields in the IBP system that you want to export data to.
- Click Next.
On the Mapping page, map SAP Analytics Cloud dimensions and measure to the corresponding IBP fields you selected in the previous step. To map measures, select a measure card, and in the Source Measure drop down, select the source measure. If you're exporting a new model type with multiple measures, as opposed to a classic account model, repeat this step for each measure to complete the measure mapping. If there’s only one source measure, the application selects it by default.
NoteCurrently, we don't support exporting data to the target time dimension with Week granularity and a Timestamp type when the selected source dimension is Date.
NoteFor any target IBP field, if you have no source dimension to map data to and choose the option Not Mapped, you need to specify a default value for the target field.NoteIf the IBP attribute names aren't the same as the column names in your SAP Analytics Cloud model, you can create an extra property column, with names that match the names in IBP. Then when you export the data, you can map the new property column to the IBP attributes.Mapping Tips:
Currently each time you can only export one measure. If you want to export multiple measures to IBP, you need to perform data export for each measure respectively.
Date dimension in SAP Analytics Cloud should have the same granularity as date relevant field in IBP. Whether SAP Analytics Cloud has fiscal year settings turned on or not, only calendar year will be exported to IBP.
- In the Source Filters area, filter members of the
SAP Analytics Cloud dimensions that you want to export. If you choose a single base member,
only that value will be exported; if you specify more than one member or a
parent member, the value will be aggregated during the export; if left
empty, all the data in the dimension will be aggregated.NoteIBP currently doesn't support version mapping during the data acquisition. If you maintain multiple versions in SAP Analytics Cloud, make sure you set filter for a specific version. Otherwise, transaction data from different versions will be aggregated.
If you export data of multiple UoMs or currencies to IBP, make sure you filter a specific UoM or currency.
- Select the Export blank values check box if you want
to include in the export any members where the name given by the property
column is blank.
If you select this check box, also choose what you want to replace the names of those members with from the Replace with field.
- Click Finish to complete the export.
You can continue to work on other tasks while the export runs in the background.
- If you want to schedule the execution of export jobs, follow these steps:
- Select an export job.
- Select
(Schedule Settings), and choose between
the following options:
Frequency Description None Select this option when you want to export the data manually. Once The export is performed only once, at a preselected time. Repeating The export is executed according to a recurrence pattern. You can select a start and end date and time as well as a recurrence pattern. - Select Save to save your scheduling settings.
BW and BW/4HANA (Using an OData service)
Prerequisites
. Please note that
only BW Standard ADSOs with write change log (optional) and write
interface-enabled are supported.Generally, you are using one single connection for importing and exporting data. But in this case, you need to create two connections: one for importing data to SAP Analytics Cloud and one for exporting data from SAC, which is described here. To import data to SAP Analytics Cloud, see Import Data Connection to an SAP BW or SAP BW/4HANA System.
Context
- Execute action of Other Datasources
- Read action of the model and dimensions to be exported
- Create or Maintain action of a connection, or Read access to a shared connection created by others
For more information, see Permissions
- From the ()
Main Menu, select Files.
- Open the model whose transaction data you want to export.
- Switch to the Data Management screen.
- In the Export Jobs area, choose Export and select Export Data to OData
Services.
- Choose a connection.
If no connections have been created, you can choose Create New Connection from the drop-down list. For detailed information, see Exporting Data Connection to OData Services. Click Next.
- On the left side of the Target Data Selection dialog, choose an application.
- Select the corresponding target fields in the target system that you want to export data to.
- Click Next. On the Mapping
page, map SAP Analytics Cloud
dimensions and measures to the corresponding target fields you selected in
the previous step. To map measures, select a measure card, and in the Source
Measure drop down, select the source measure. If you're exporting a new
model type with multiple measures, as opposed to a classic account model,
repeat this step for each measure to complete the measure mapping. If
there’s only one source measure, the application selects it by default.Note
Please specify a default value for the target field in case you have no source dimension to map data to, and have chosen Not Mapped. Every measure must be mapped to a source measure. If the source measure unit type doesn’t match the target measure unit type, the application shows a warning message.
TipIf the target attribute names don't correspond to the column names in your SAP Analytics Cloud model, you can create an extra property column with names that match the ones in the target attribute. Exporting the data, you can map the new property column to the target attributes.
TipCurrently, each time you can only export one measure. If you want to export multiple measures to the target, you need to perform data export for each measure respectively. For more tips and tricks analyzing BW data integration issues, please check SAP Note 3026199
.NoteThe date dimension in SAP Analytics Cloud should have the same granularity as the date relevant field in the target. Only the calendar year will be exported to the target, regardless of the fiscal year settings.
- In the Source Filters area, filter all members of the dimensions that you want to export. If you choose a single base member, only that value will be exported. If you specify more than one member or a parent member, the value will be aggregated during the export. If left empty, all the data in the dimension will be aggregated.
- Select Export blank values if you want to include any
members whose name given by the property column is blank.Note
If you select this check box, choose a new name for these members using the Replace with field.
- Choose Next to define the scope of the export.Note
Note that if no target dimension is selected, you will enable a replacement, but no cleanup of exported data.
- Select Finish to complete the export.Tip
You can continue to work on other tasks while the export runs in the background.
- If you want to schedule the execution of export jobs, follow these steps:
- Select an export job.
- Select (Schedule
Settings), and choose between the following options:
Frequency Description None Select this option if you want to export the data manually. Once The export is performed only once, at a scheduled time. Repeating The export is performed according to a recurrence pattern.
You can select a start and end date and time as well as a recurrence pattern.
- Select Save to save your scheduling settings.