Import Data to Your Model
The process to import data differs depending on your model type, the data source, and the platform you are working on.
This section only describes how to import data to a model. After you import data, it must be prepared so that it's ready to be consumed both in models and stories. For more information about data preparation, check out Import and Prepare Fact Data for a Classic Account Model, or Import and Prepare Fact Data for a Model with Measures.
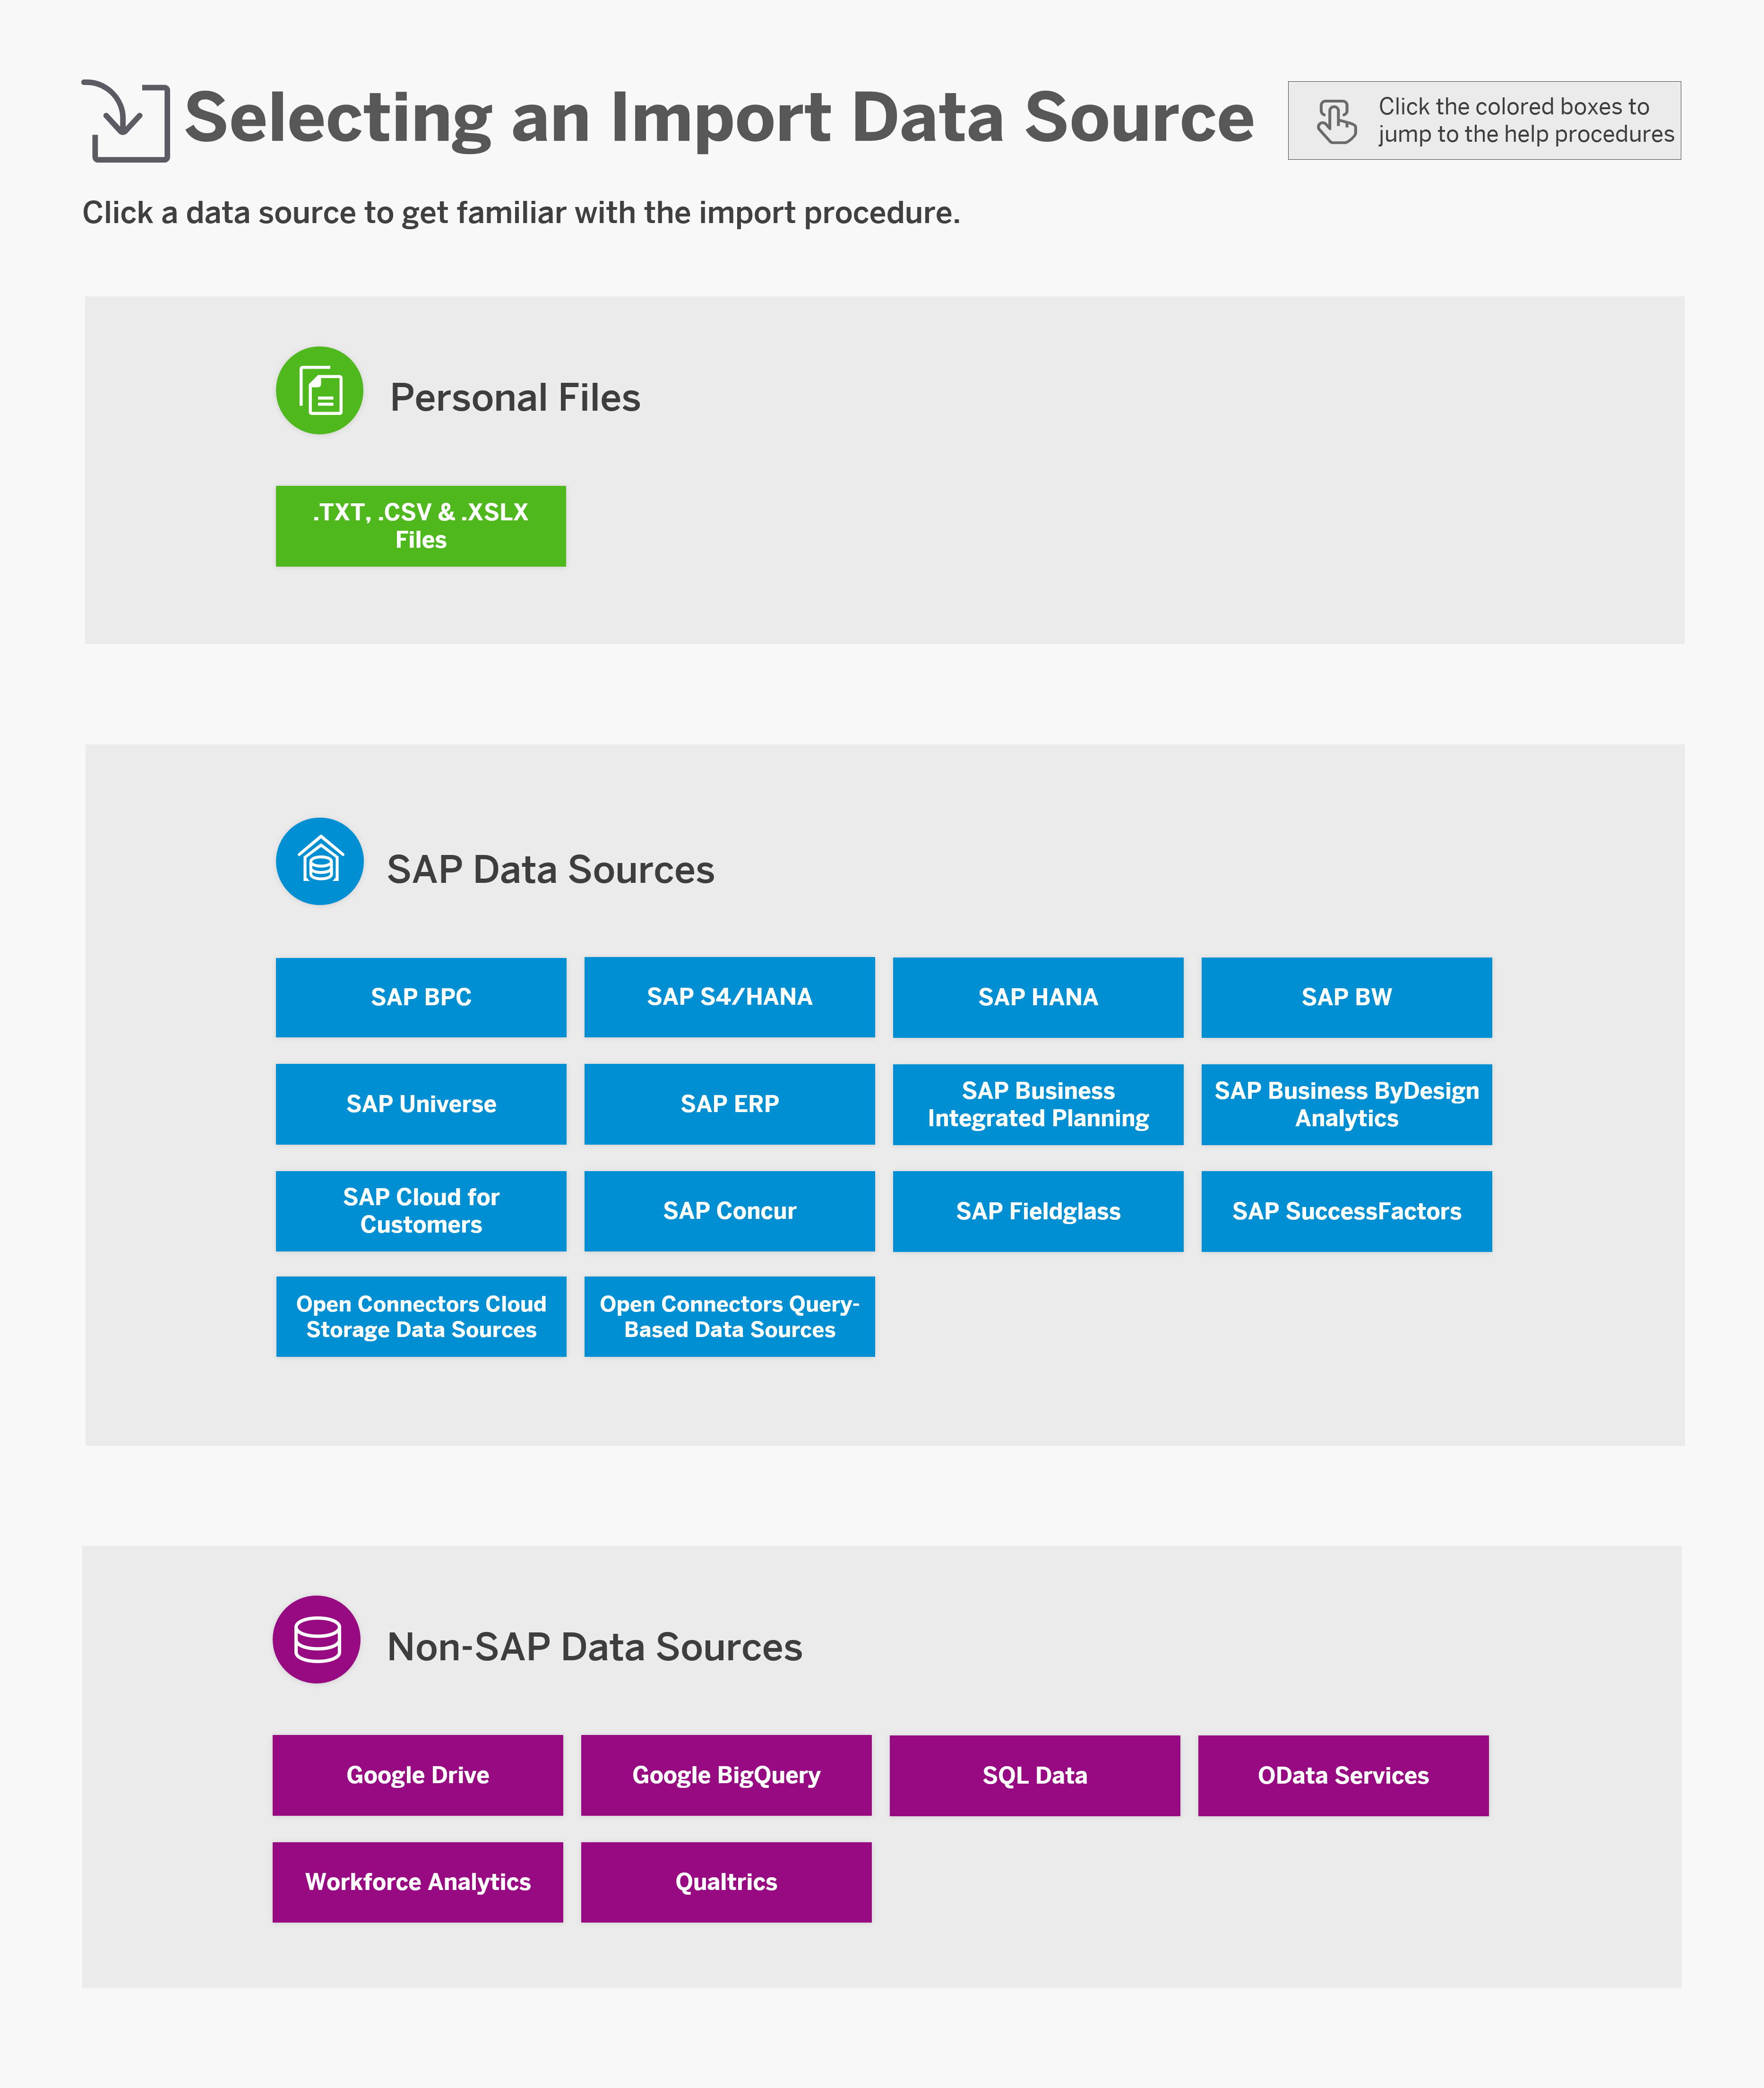
In the image below, you can see all the data sources supported when importing data to a model. Click any of them to access a detailed procedure.
This image is interactive. Hover over each area for a description. Click highlighted areas for more information.
Building a Query
Build a query to import data from an app or a data source into a new or existing model.
To build a query, you move data elements from the Available Data area into the Selected Data and Filters areas to create new measures and dimensions to be imported to your model, and apply filters to them.
An entity ( ) can be
expanded to select one or more of its members. The following icons represent types of
data you can select, and their properties:
) can be
expanded to select one or more of its members. The following icons represent types of
data you can select, and their properties:
| Icon | Type |
|---|---|
|
Entities |
 |
Numerical properties |
 |
Generic properties (strings, Boolean values, UUIDs, and so on) |
 |
Complex properties In SAP Universe queries – the set of data that can be selected from and/or filtered on (similar to the Entity in other queries) |
 |
Date type properties |
 |
In SAP Universe queries – data that can be filtered on |
When building a query, you can select the  icon to search for specific values
in the Available Data area, select the
icon to search for specific values
in the Available Data area, select the  icon to
display the list of reports from your source data in real time, or select the
icon to
display the list of reports from your source data in real time, or select the  icon to change
the way values are displayed:
icon to change
the way values are displayed:
- Description – The Description is displayed and used to search values.
- Description and ID – The Description and ID are both displayed. The ID is used to search values.
- ID – The ID is displayed and used to search values.
Filters
When you add a data element to the Filters area, you can use operators,
such as equal to, except, greater than, and so on, and select the  icon to
open the Select Values From dialog. In this dialog, you can
search and select the values you want to filter on. The list displays the unique
values from the first 1000 records. It is possible to search for a value not
displayed in the list using the search function.
icon to
open the Select Values From dialog. In this dialog, you can
search and select the values you want to filter on. The list displays the unique
values from the first 1000 records. It is possible to search for a value not
displayed in the list using the search function.
Some entities, such as Boolean values, can have only a single filter value. Entities such as strings or integer values can have multiple values in a filter. To select multiple values, select the check box of each value you want to add to the filter or Select All to select all the values in the list. Selecting multiple values for a single filter treats the filter as a large OR function, filtering out values that do not match any of the selected values.
Incremental Load Filters
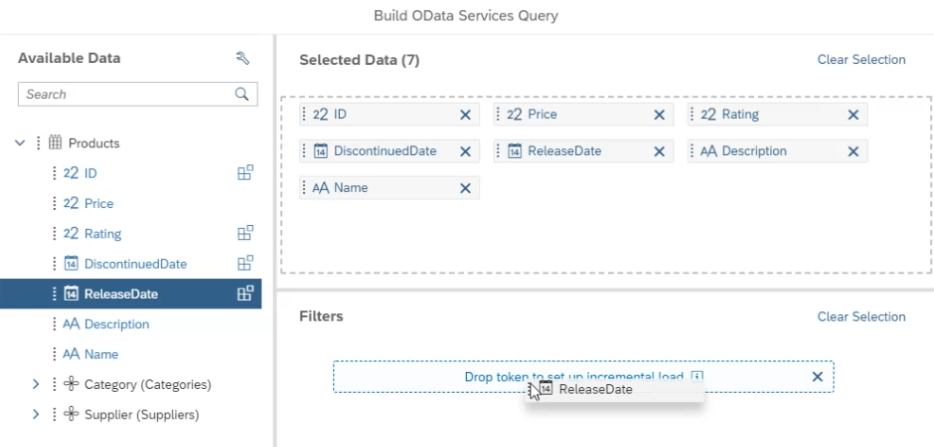
When you create a query, you can set an Incremental Load. An incremental load is based on time or numeric data fields and lets you bring the newest set of data since the last import when you refresh. For example, you can set an incremental load based on the "Release Date" field of a "Product" entity to bring in the newest data based on the release date.
To set an incremental load, in the Filters area, select Set Incremental Load and then drag and drop an incremental-load-enabled property to the incremental load box that appears.
To ensure that duplicate data is not added during refresh, there are a few restrictions on the data field that you can use for an Incremental Load:
- The values must be unique.
- The data must be incremental.
- Previously imported data must be unchanged.
Updates for previously imported data must be brought in by a new import using a specific query for that data region.
These restrictions are not enforced by the application, so you must ensure your data follows the restrictions.The incremental load will only take effect if there is a valid value recorded for the filter in the query builder or the import settings panel. Once an effective incremental load filter is present for your query, it is recommended to use Append as the import method for the data refresh job running that query. You can change the import method from the Import Settings section on the Data Management screen.
If you want to use the import method Update or Clean and replace subset of data, don't remove the Incremental Load field during wrangling. Otherwise, rows with the same dimensionality will be aggregated.
In addition, if you use Clean and replace subset of data pay special attention to the granularity of the date dimension used in your model. For more information on import methods, please see Update and Schedule Models.
The next time the source is refreshed, the latest value will be recorded for the Incremental Load Filter. Once the Incremental Load Filter has a value, you should switch the import method to Append.
Deleting or Replacing an Existing Incremental Load Filter
If you change the Incremental Load Filter to a different field, the new filter will not take effect until after the next refresh.
Example:
You set an Incremental Load based on the CreateDate field, and the latest row contains the date "Jan 14, 2018", so the system saves that value. The next time a data refresh occurs, a filter will be applied to grab only data that is later than "Jan 14, 2018".
If you change the Incremental Load to a different field, for example TransactionID, the system does not overwrite the old value until the next refresh. If you change the Incremental Load Filter back to CreateDate before a refresh, the load will still have the old value and, if you refresh now, it will still grab anything after "Jan 14, 2018".
To ensure the data is correct when you change an Incremental Load filter, make sure you perform the following steps:
- Change the Incremental Load Filter to a new field you want.
- Change the import method accordingly because the Incremental Load Filter will not apply right after you’ve switched it.
- Perform a manual refresh - The first refresh right after replacing or deleting
the old incremental load filter will bring in the full set of data. Confirm a
valid value is present for the incremental load filter after the manual refresh.
 Example of an Incremental Load Filter with a valid value
 - Change the import method. More information.
- These steps needs to be performed manually without the interruption of an automatic scheduled refresh job running on the same query.
- If the data source was using the Append import method before using the Incremental Load Filter, then you can skip steps two to four.
Import Data into Public Dimensions
You can import master data from an external data source into a public dimension.
Context
If you update model data by importing data into a model using the “Update dimension with new values” option, public dimensions are not updated. Follow this procedure to import data into public dimensions. Dimensions and their attributes can be imported:
- Descriptions
- Properties
- Parent-child hierarchies
You can use this procedure to import data into public account dimensions as well. The following account dimension properties are supported at this time:
- ID
- Description
- Account Type
- Hierarchy
- Unit Type
- Measure Unit
- Scale
- Decimal Places
- Rate Type
Unit Type and Measure Unit both correspond to the Units & Currencies column in the Modeler, for account dimensions.
The Unit Type value should be either Currency or Unit. When the value is Currency, the Measure Unit column is blank. When the value is Unit, the Measure Unit value can be a unit of measure or a packaging unit, such as Bottles or Pieces.
Importing Data Access Control Information
You can import data access control (DAC) information into a public dimension, to respect the access control that you've already defined in your on-premise system.
The DAC properties that can be imported are:
- Read
- Write
- Data Locking Owner
- Person Responsible
The values in the DAC column need to be formatted as follows:
- Names separated by semicolons
- All upper-case text
When you finish the column mapping and click Finish Mapping, a job will be submitted and shown in the Data Management tab. This job will start to run automatically after a few seconds, so you don't need to (and shouldn't) execute the job directly. Also, while the job is running, you can navigate away from the Data Management page; the job will continue to run in the background. When the job completes, a completion status will be displayed.
- This feature is available for generic and organization dimensions, but not account dimensions.
- Be sure that the user and team names to be imported are valid, because the information isn't validated during the import process.
- Both user and team names are supported, but team names need to be prefixed with the keyword “TEAM:”. For example: TEAM:ABCTEAM.
The following procedure describes how to import data from a file into a public dimension. If you import data from other supported data sources, refer to the following topic for data-source-specific details:
Import Data to Your ModelProcedure
-
From the
 Modeler
start page, go to the Public Dimensions tab.
Modeler
start page, go to the Public Dimensions tab.
-
Select
 (Import
Data).
(Import
Data).
-
If any cells in the grid appear with red highlighting, those cells have data
quality issues, and those rows will be omitted from the model if you don't
resolve the issues. Select a highlighted cell to see information about the issue
in the Details panel.
When you select a column or cell, a menu appears, with options for performing transforms. There are two parts to this menu:
- Choose the
 Quick Actions option to perform actions such as
deleting rows that contain the selected value.
Quick Actions option to perform actions such as
deleting rows that contain the selected value. - Select the
 (Smart
Transformations) icon to list suggested transformations
to apply. You can also select Create a Transform
to customize a transform in the transformation bar.
(Smart
Transformations) icon to list suggested transformations
to apply. You can also select Create a Transform
to customize a transform in the transformation bar.
- Choose the
Allow Data Import and Model Export with a File Server
The SAP Analytics Cloud agent must be configured in order to allow importing data from a file server or exporting a model to a file server.
Prerequisites
If you have used the SAP Analytics Cloud Agent Simple Deployment Kit to install the SAP Analytics Cloud Agent, you must update the file server import allowlist file following the instructions in the Post-Setup Guide instead of the instructions below.
Context
For importing data, a file server location allowlist must be configured. Only file server paths allowed by this allowlist can be accessed when creating a model from file, or importing data from files.
For exporting models, another file server location allowlist must be configured. Only file server paths allowed by this allowlist can be accessed when exporting a model.
Procedure
-
In SAP Analytics Cloud, go to

 (Main
Menu)
(Main
Menu) 
 System
  Administration System Configuration
 .
.
-
Select
 (Edit).
-
Select
 (Save).
-
Go to (Main
Menu)
 Connection Connections
  (Add
Connection) Import Data Connection File Server.
(Add
Connection) Import Data Connection File Server.