About Adding Data to a Story
You can import data as a dataset or model from an external data source into a new story.
When you import data into a story, a “private” or “embedded” entity is created in the background. This entity contains your data structures - dimensions, measures, and dimension attributes such as descriptions or hierarchy information. The imported data is embedded in the story as a self-contained entity. It will not appear in the folder list for use with other stories.
When importing data into a story, the import process analyzes the source data and creates an initial inferred data view with proposed dimensions and measures. You then further refine the proposal by geo enriching dimensions, specifying certain columns as either dimensions or measures, and fixing any data-quality problems.
The overall workflow for adding data to a story involves the following:
- Import your data.
- Optional: specify descriptions or hierarchies for the dimensions, or specify a column to be a measure.
- If necessary, cleanse your imported data and fix any data-quality problems. For more detailed information about preparing data, see About Data Wrangling, Mapping, and Transformation in Datasets.
- Embed the dataset by saving the story, or by switching from
Data to Story view.NoteIf you are importing a model, please refer to Models in Stories.
Agile versus Basic Data Preparation
-
An agile experience that is geared to consume datasets for adhoc and flexible analysis. This is the default experience for adding data to a story. For a better understanding of datasets, see About Datasets and Dataset Types. You can import and immediately use data to create visualizations within your stories. Using this experience, you can smoothly move between the data and the story layout views. You can quickly edit the imported data to suit the changing requirements of your story creation process. Other benefits of this agile data preparation experience:
- Data structures and data types are inferred during the initial data import, letting you immediately start working on story layout.
- A Dataset Overview panel listing all the dimensions and measures included in the imported dataset is displayed. You can use this panel to make some quick changes to your data structures.
- You can immediately consume the imported data and any consequent data modifications to charts and other visualizations in your stories.
- You can easily create level hierarchies based on the imported dimensions.
- Unresolved data quality issues will not prevent you from consuming unaffected data cells to create charts and other visualizations.
-
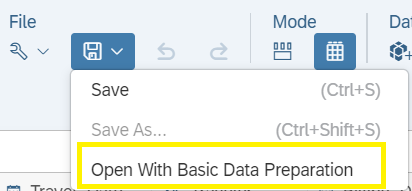
A basic data preparation experience that is geared to working with models, and where data structure is a paramount consideration. These scenarios include working with live data where structure is defined by the source of data, and governed data that is centrally controlled. You can launch this experience after importing your data. Under the Save toolbar, select the Open With Basic Data Preparation option.
 Note
NoteThe basic data preparation experience supports the following functionalities that are not available in the default data preparation experience:
- Appending data to an existing embedded dataset.
- Mapping newly uploaded data into an existing dataset.
- Acquiring data from a Dow Jones data source.
- Using multiple headers when performing a transformation to convert columns to rows.
- Using Smart Insights when working with variance chart.
- Building a parent-child hierarchy.
How to Add Data
You can import and immediately use data to create visualizations within your stories.
Add Data (Classic Design Experience)
-
Launch your story.
From the (
 ) Main
Menu, select Stories, and then
select Canvas.
) Main
Menu, select Stories, and then
select Canvas.In the dialog, select Classic Design Experience, and then select Create.
- Select the Add Data option.
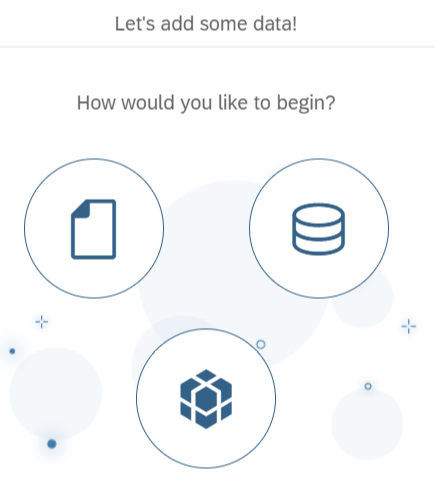
The Let's add some data! dialog is displayed.

- Import your data by selecting one of the following options:
-
Data uploaded from a file: use this option for an Excel or CSV (comma-separated-values) file stored locally or on a file server.
Choose the file you want to import.
-
Data from a data source: use this option for data stored in a supported data source (for example, SAP HANA).
Select the dataset you want to import from your source.
-
Data from an existing dataset or model: use this option for data stored in an existing dataset or model.
TipIn the classic design experience, this option will add the model and open the Data Exploration view.
The Acquiring Data process is launched. Upon completion, the Data view for the story is displayed.NoteIf you import a large-volume dataset, you are informed that a data sample will be used rather than the entire dataset. Select Got it to continue. If you want the entire dataset to be validated when performing any data preparation tasks, select Validate Full Dataset at the bottom of the Dataset Overview panel. This will give you a better sense of how many issues, such as mismatched values for specific data types, exist in your dataset. -
- Use the Story/Data control to switch to Story. There, you can quickly create and view charts or other visualizations based on your imported dataset, and add tables where you can carry out simulations. See Running Simulations on Embedded Data for details.
- View the imported data in more detail. More information is available in View Datasets.
- Save the story – the embedded dataset will be stored as part of the story.
Add Data (Optimized Design Experience)
-
Launch your story.
From the (
 ) Main Menu,
select Stories, and then select Canvas.
) Main Menu,
select Stories, and then select Canvas.In the dialog, select Optimized Design Experience, and then select Create.
-
From the toolbar, select .
The Let's add some data! dialog is displayed.
- Import your data by selecting one of the following options:
-
Data uploaded from a file: use this option for an Excel or CSV (comma-separated-values) file stored locally or on a file server.
Choose the file you want to import.
-
Data from a data source: use this option for data stored in a supported data source (for example, SAP HANA).
Select the dataset you want to import from your source.
-
Data from an existing dataset or model: use this option for data stored in an existing dataset or model.
For data stored in SAP Datasphere:
-
Select an SAP Datasphere live data connection in the model selection dialog to browse SAP Datasphere spaces.
-
Select an analytic model, a view (analytical dataset), or a perspective.
For more information on how to leverage SAP Datasphere data in stories, check Live Data Connections to SAP Datasphere.
NoteTo be able to consume SAP Datasphere data in stories, make sure that you have the DW Consumer role assigned in SAP Datasphere. This role is required for SAP Datasphere data consumption in stories in SAP Analytics Cloud. -
-
Replacing a Dataset in a Story
You can now replace any public or private dataset in your story with another public dataset. When you replace the dataset in your story, the configuration of all the widgets in your story is preserved. This means there's no need to rebuild your charts and tables.
Your new dataset must contain all the measures and dimensions, and the same measure and dimension names and types as your original dataset. However, your new dataset can also contain additional measures and dimensions not found in the original dataset.
- Open a story in Data view (
 ).
). - Select
 beside your current
dataset name.
 - Select
 to open the
Select Dataset dialog.
 - In the
 (Search) field, type the
name of the new dataset with which you'd like to replace your current
dataset, and select it from the list.
 - A Replace Dataset dialog appears informing you about the potential differences in your story after replacing the dataset. Select OK.
- Your dataset is now replaced.
- Select
 (Save) to save your
story based on the new dataset.
-
If you want to base your Smart Discovery results on your new dataset, you need to run Smart Discovery again, from the Story view.


