Add, Delete, and Edit Dimensions and Measures
Adding Dimensions to a Model
You can create dimensions, and add existing dimensions to new or existing models.
Context
When you create a model by importing data, dimensions are created from the imported data. But when you create a new blank model, you add dimensions manually.
You can add Account, Organization (only one), Date, or Generic dimensions, to both new and existing models.
Procedure
-
Choose


 Add new Dimension
 .
.
-
Select
 to go back to the dimensions
list.
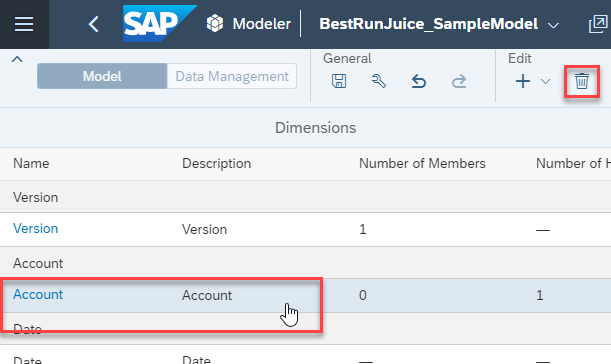
During the design stage, you can delete dimensions from the model. To delete a dimension, select its row in the dimension list, and select
to go back to the dimensions
list.
During the design stage, you can delete dimensions from the model. To delete a dimension, select its row in the dimension list, and select . Once you've saved the model
and exited the design stage, you won't be able to delete dimensions.NoteYou can also delete public dimensions that aren't being used in any models. To do this, select
. Once you've saved the model
and exited the design stage, you won't be able to delete dimensions.NoteYou can also delete public dimensions that aren't being used in any models. To do this, select Modeler, and then on the Public
Dimensions tab, select one or more dimensions and choose
Delete.
Modeler, and then on the Public
Dimensions tab, select one or more dimensions and choose
Delete.
Adding Measures in the New Model Type
In the new model type, you can add multiple base measures to hold different types of data.
Context
You might have a single base measure in a simple model, such as monetary amount. A more complex model will often have more measures like price, unit quantity, number of hours, headcount, amounts in local and global currencies, and so on.
Other than data type, these settings are similar to those available for account members. If your model has an account dimension, each model value will belong to both an account and a measure, and sometimes the settings will contradict each other.
You can decide whether to apply the settings from accounts or measures in these cases by changing the structure priority. See Set Structure Priority and Create Custom Solve Order for more information.
After your base measures are set up, you can create calculated measures on top of them, including conversion measures if you’ve set up currency conversion in your model.
Procedure
Results
Deleting Dimensions from a Model
When deleting dimensions from a model, make sure that you check on potential dependencies to ensure that your model is still valid.
Select a dimension, either in the group view or the list view, and select Delete:
You can delete a dimension from a model after the model has been saved. If the dimension still has related objects such as stories or data actions, you can still delete it, and the application lets you know about these releated objects so you can review them and take apporpriate action.
| Modeler Impacts | Account Formulas | When deleting a dimension from a model, the calculations that reference that particular dimension are invalid. |
| Variables | When deleting a dimension from a model, if there are variables with value domain on the deleted dimension, make sure to fix the value domain. | |
| Currency Conversion | When deleting a dimension from a model, if that that dimension is a currency conversion dimension, check the model settings to reset the currency conversion. | |
| Data Locking | When deleting a dimension from a model, if that dimension is part of data locking, the dimension is removed from the driving dimensions. Also, data locking settings of the model are reverted to the default locking state. Make sure to check data locking settings in the model after you’ve deleted the dimension. | |
| Validation Rule | When deleting a dimension from a planning model, if that dimension is
the reference dimension that serves as a basis of a validation rule, the
rule is deleted. If the dimension is the only matched dimension, then the validation rule is deleted. If the dimension is one of multiple matched dimension, the validation rule is updated with the remaining dimensions. |
|
| Advanced Modeler Impacts | Value Driver Tree | If the dimension you have deleted is used in a value driver tree, the value driver tree gets invalid. Warning messages are given in the builder panel to solve the issues. |
| Data Action | If the dimension you have deleted is used in a data action, you can
still save the model. However, make sure to consider the following
impacts:
|
|
| Private Versions |
If the dimension you have deleted is used in the planning area of an existing private version, the planning area of this private version is disabled, and the owner of the private version is notified. For more information about the planning area, see Optimize Planning Models Using the Planning Area. After you’ve disabled the planning area, data outside of the planning area is no longer visible. However, you can still query, publish, or delete the version. |
|
| Data Auditing | After you’ve deleted a dimension from a model this dimension will also be removed from data audit table. | |
| Commenting | After you’ve deleted a dimension from a model, each comment entered on members of that dimensions are deleted. | |
| Data Acquisition | Any import job with a mapping based on the dimension you’ve deleted is no longer valid. Make sure to redesign the import job manually. | |
| Story Widgets | Charts, Input Controls and Story Filters | After you’ve deleted a dimension, the application displays validation errors for charts, dynamic texts, input controls and story filter that relied on that dimension. Warnings are given in the Builder panel to resolve the issues. |
| Hyperlinks | Hyperlinks with dimension context are still displayed, but they’re inactive. Make sure to fix them manually. | |
| Tables | After you’ve deleted a dimension, tables are updated automatically and show data on an aggregated level. Table filters based on the dimension are no longer valid. Styling rules will adapt to the aggregated view but may need to be adapt. | |
| Cross Calculations | Cross calculations are removed automatically from tables. | |
Editing Dimensions
You can change a dimension's description, and also add properties (columns), members (rows), and hierarchies to a dimension.
Modeler start page, under the
Public Dimensions tab.
| Task | Steps |
|---|---|
| Add a member (row) | Choose
(Add) in the Edit
section of the toolbar. |
| Delete one or more members | Select the members, and then choose
(Delete) in the
Edit section of the toolbar. |
| Delete all members of the dimension | Select the dimension, and then select  Delete all members. Delete all members.Note Dimension members can't be deleted if there is
transactional data, or data in a private version, belonging to
the underlying model. |
| Copy a member | Choose  (Copy) in the Edit
section of the toolbar.
(Copy) in the Edit
section of the toolbar. |
| Add multiple member descriptions | Select a dimension, and in the Dimension Details panel, scroll down to the Languages and Translation section, and switch on the Enable Multiple Languages toggle. For more information, see Adding Member Descriptions in Multiple Languages. |
In the Dimension Settings panel:
- You can modify the Description of the dimension.
- You can create, delete, and edit hierarchies. For details, see Learn About Hierarchies.
- You can insert a new property (column): select in the
Properties section of the Dimension
Settings panel.
- You can delete a column: find the corresponding property in the
Properties section of the Dimension
Settings panel, and select .
- You can change these rights and access settings:
- Data Access Control
- Hide Parents
- Responsible
- Data Locking Ownership
- You can enable a public dimension for translation.
Adding Member Descriptions in Multiple Languages
By default, each member within a dimension has a description property that provides additional information about the member. You can edit this description manually and add multiple descriptions in different languages.
Context
Depending on your business needs, you might have to add translated descriptions to make them more accessible. If you’re a global customer, this allows you to cater for all end users in their local language. Models that leverage dimensions with multiple language descriptions can then be consumed as usual in stories.
This functionality is available for all public and private dimensions (except date and version dimensions) with up to 49 languages. Each language can be maintained either manually, or via the master data upload that leverages wrangling features. In the Modeler, you can add, edit, update, and delete descriptions, which provides more flexibility for public and private dimensions in a model. The default language is derived from the user preferences, according to the Data Access Language setting.
For the descriptions to be effective, you need to update the dimension in the Modeler first and specify all the languages you would like to use. Once that’s done, you can manually add the description per language. Each language you add has a corresponding column in the dimension.
Procedure
Hiding Accounts or Measures
Hide accounts or measures if you don't want them to be available in stories.
Context
You can set members of the account dimension (measures or accounts) to be visible or invisible to other users. For example, if you're creating intermediate calculations based on measures, you may not want those intermediate calculations to be available for other users to add to stories, so you would hide those calculated account members.