Navigate Within Analytic Applications
Explore the menu options and objects in your analytic application in SAP Analytics Cloudand get a deep insight in your data.
You have opened an analytic application and want to view and analyze your data.
An analytic application in SAP Analytics Cloud is an analytical application that visualizes data in various forms and lets you navigate the data. It can also allow planning.
Analytic applications can range from simple static dashboards showing static numbers to highly customized applications with many options to browse and navigate data, change the visualization, navigate across multiple pages or areas, up to an extensively customized look and feel according to customer branding.
Here's an overview of the main menu options that you can find within an analytic application:
Toolbar Options (Design Time)
| Menu/Functionality | Description/Submenu |
|---|---|
|
File |
 Edit Analytic Application:
 Save:
Save:
 Copy and Paste:
 Share:
|
|
Views |
Outline Info Panel |
|
Insert |
Panel, Tab Strip, Flow Layout Panel, Page Book, Text, Input Field, Text Area, Dropdown, Checkbox Group, Radio Button Group, Button, Slider, Range Slider, Input Control, Filter Line, Image, Shape
|
|
Tools |
Chart Scaling Conditional Formatting Linked Widgets Diagram  Performance Optimization:
|
|
Data |
 Refresh:
 Edit Prompts:
|
|
Display |
 Theme:
Edit CSS |


Toolbar Options (Runtime)
 button in the toolbar to leave the fullscreen. In view time mode the toolbar is
fixed and always displayed in the application in its full version depending on the application's context.
button in the toolbar to leave the fullscreen. In view time mode the toolbar is
fixed and always displayed in the application in its full version depending on the application's context.Your choice of menu options in the toolbar changes depending on the type of application and the data it contains (analytic or planning application). The most important functions can be reached by quick access buttons.
Functions related to planning applications such as Publish Data and Version Management are only shown if there is a planning-enabled table available in the application. If not, the functions are hidden. An exception for this is a planning application that is based on a BPC model: In this case only Publish Data is displayed.
-
Edit
This section contains the following functions:Menu Option Description Refresh -
Refresh: Reload the analytic application to get the most recent data.
-
Auto Refresh: Automatically refresh the analytic application at an interval set by the application designer.
-
-
Tools
This section contains the following functions:
Menu Option Description Edit Prompts You can filter and display data by setting variables for a data model used in the analytic application. Charts or tables built from the model get updated based on the values you enter.
Subscribe to Data Change Insights In view time, you can subscribe to data change insights of your analytic application or optimized story to keep informed and track of data changes on a regular basis.
Before subscription, make sure that specific charts are included by setting subscription mode from Data Change Insights in their More Actions menu. You can also set a value range to be included in or excluded from triggering data change insights there.
For more information, refer to Subscribe to and View Data Change Insights.
Schedule Publication You can schedule a publication to distribute analytic application view to selected users or groups via email, either at a predefined time or with frequency.
For further information, refer to Schedule Publication for an Analytic Application.
Predictive Forecast You can select a single cell that can be edited to start a predictive time series forecast. For more information, refer to Run Predictive Forecasts on Table Cells. Allocate There are two ways to allocate values:-
Distribute Values: Use the planning panel to quickly move values in a table.
For more information, refer to Assign and Distribute Values with the Planning Panel.
-
Execute Allocation Process: Once an allocation process is set up, you can run it in the analytic application to speed up planning tasks.
For more information, refer to Run Data Actions, Multi Actions, and Allocations.
For background information on allocations, refer to Learn About Allocations.
Version History Use the version history function to quickly undo or redo private or public version changes. For more information, refer to Undo, Redo, and Revert Changes to Versions.
Version Management With this option you can copy, publish, delete and share public and private versions. For more information, refer to Create, Publish, and Manage Versions of Planning Data. NoteThe Value Lock Management function can be found in the context menu of the table. Use this option to create value locks so that data in the selected cell can't be changed or edited. This option is only displayed if the table is based on a planning model that supports frontend value locks. For more information, refer to About Value Lock Management.
NoteThe options Version History and Version Management display a check symbol if one of them is selected.
-
-
Display
This section contains the following functions:
Menu Option Description Comment Mode You can show or hide all the comments in the analytic application by toggling on or off Comment Mode from the Display menu. NoteYou can only view and create comments on a widget or a cell of a table that is based on a planning model.
For more information, refer to Work with Comments in Analytic Applications.
-
For planning applications you'll find the Publish Data button quite prominenty displayed in the toolbar. This button lets you quickly publish or revert your edits to public versions.
-
By clicking Edit Analytic Application you can switch to the edit mode of the analytic application where you can make changes to your application, for example by adding more widgets or changing the model. When you edit the application you can use the action menu options described in the following paragraph.
Action Menu Options (Design Time)
 (More
Actions) to see all the options available in the menu.
(More
Actions) to see all the options available in the menu. Note that these options vary depending on the widget type and the data it contains. Just make a choice and the selected widget will get updated right away!
In the following paragraph you'll find as an example the action menu options for charts

|
Function |
Description |
|---|---|
|
|
Allows you to apply an ascending or descending sort to your chart. Select the measure or dimension you want to sort, and the sort direction. To sort on a measure that isn't included in the chart, select Advanced Sorting, choose a measure, and then set the sort criteria. |
|
|
Show a specified number of the lowest or highest ranked members. The following options are available:
When a Top N filter is applied, text is displayed at the top of the chart indicating the filter direction and value. To change the filter, select the filter text and input new values. |
|
|
Shows the difference between versions of a measure or the difference between time periods. For more information, refer to How to Add a Variance to a Chart |
|
a) b) |
a) CGR: add a Compound Annual Growth Rate line to a chart that has date values on its axis. b) Comment: add comments to your widget and show or hide them by switching the toggle on or off. For a list of options you can add, refer to Chart Context Menu Options. |
|
|
Allows you to show or hide chart elements. By default, most elements are shown. The following elements can be hidden:
The following elements are specific to time-related charts:
|
| Edit Scripts | Opens the script editor where you can edit the chart scripts. |
|
|
You can manually change the axis values. For more information, refer to Modify Axes on Single or Dual Axis Charts. |
|
|
Copy options include the following:
|
|
|
Allows you to export data from your chart as a CSV file, with or without formatting. For more information, refer to Export Table Data as a CSV or XLSX File. |
|
|
Opens the Styling panel. For more information on styling options, refer to Formatting and Styling Items on a Story Canvas. |
|
|
Expands the tile to fill the canvas. |


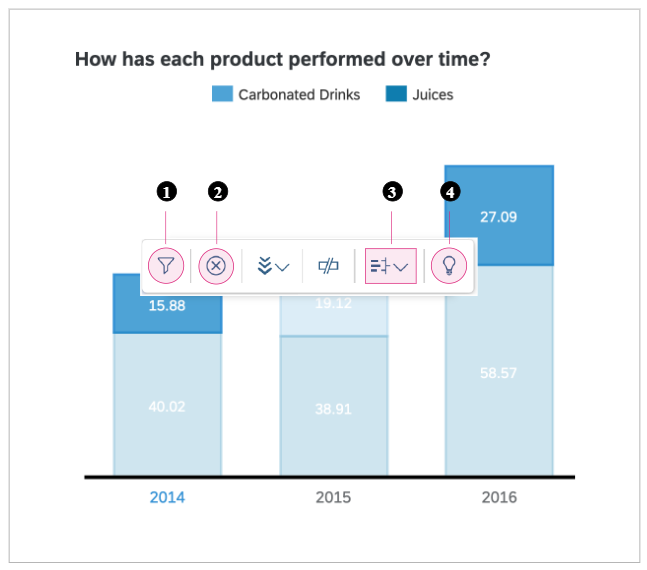
Context Menu Options (Runtime)
Note that the menu options you get vary depending on how the chart or table was created and the data it contains. Just make a choice and the selected chart or table will get updated right away!
| Function | Description |
|---|---|
1.Filter  |
Focus the chart on a specific set of data. |
2.Exclude  |
Hide data that are not immediately useful for your current analysis. |
| Drill a) b)
c)
d) |
Drill down on data that has multiple levels so you can display your data at the level you want. a) Choose a level to Drill Down. For example, drill down to Countries from Location. b) Choose a level to Drill Up. For example, drill up to Countries from Cities. c) Expand/Collapse: see all levels of the hierarchy. For example, you can see Cities, Countries and Location data altogether. d) Set Drill: change the hierarchy back to the default level or choose another hierarchy and level to display from a list. For example, if the current level is Countries, you can reset the hierarchy back to Cities, the default level that the application designer has set, or you can drill down on Department data instead. |
|
3.Compare To |
Compare the selected data point of a chart with date or time data to itself from previous time periods. If you are working with a bar chart, simply click on a bar and hover over another bar to see their difference in value. |
4.Break Axis  |
Get more information about the data of a selected chart or table. |