Automate a Workflow Using Multi Actions
Multi actions help you orchestrate a set of operations across multiple planning models and versions in SAP Analytics Cloud. They link together a sequence of steps such as data actions, version management steps, and predictive steps, which all run from a single planning trigger.
Get to Know Multi Actions
Multi actions can help users save time when they need to run multiple data actions in sequence, publish versions, run predictive scenarios, or combine these operations.
Consider using multi actions if your planning process involves running data actions on multiple versions or models, or publishing data between data actions.
Comparing Data Actions and Multi Actions
Multi actions and data actions are similar in some ways. They both consist of a sequence of steps that you set up in a separate designer. When they’re ready, users can run them in stories or analytic applications using a planning trigger.
The focus is different, however: Data actions let you design a variety of calculations to manipulate planning data; multi actions are all about combining existing operations in a way that simplifies a task for users.
To use multi actions, you also should understand how data actions, parameters, and embedded data action steps work. Refer to Get Started with Data Actions for Planning, Add Parameters to Your Data Actions and Multi Actions, and Adding an Embedded Data Action Step for details.
For example, embedded data actions also let you run multiple data actions with different parameter values. But unlike multi actions, they only work on a single version at a time, and they can only publish that version at the end of the operation.
To determine whether to use a data action or a multi action, check this table:
| Use case | Example | Object type |
|---|---|---|
| Run a data action multiple times on the same version, and then publish it afterwards | You want to run depreciation calculations on several fixed assets for a single budget version. | Data Actions or Multi Actions |
| Run data actions on multiple different target versions | You plan on multiple versions simultaneously and you want to populate all of them with initial data. | Multi Actions |
| Run data actions on multiple different target models | You need to copy data from a strategic planning model to multiple models such as workforce, sales, and finance models. | Multi Actions |
| Run a data action, publish data, and then run another data action | You want to copy initial data to a version, publish it, and then run an advanced formulas calculation on the version to prepare for planning. | Multi Actions |
| Run data actions to prepare data for time series forecasting, refresh the predictive model, and the predicted forecasts in the story version. |
You want to refresh the input data for predictive planning and refresh the predicted forecasts. |
Multi Actions |
Permissions and Prerequisites for Multi Actions
Before creating a multi action, set up the models and data actions involved. For more information, refer to Create a New Model and Get Started with Data Actions for Planning.
To work with multi actions, you’ll need a role with permissions for the multi actions object. These permissions can be set in general, and individually for each multi action. For background information, refer to Permissions.
| Permission | Description | Standard roles | License requirement |
|---|---|---|---|
| Create | Lets you create multi actions. | Admin, Modeler | SAP Analytics Cloud for Planning, professional edition |
| Read | Lets you open the multi actions start page and open multi actions in the designer. It’s also required to add a multi action to a planning trigger, and to run a multi action. | Admin, Modeler, Planner Reporter, Viewer | SAP Analytics Cloud for Planning, professional edition or standard edition |
| Update | Lets you edit existing multi actions. | Admin, Modeler | SAP Analytics Cloud for Planning, professional edition |
| Delete | Lets you delete multi actions. | Admin, Modeler | SAP Analytics Cloud for Planning, professional edition |
| Execute | Lets you run a multi action. | Admin, Modeler, Planner, Reporter, Viewer | SAP Analytics Cloud for Planning, professional edition or standard edition |
If you do not have the permissions listed above, you can still add a planning trigger with a multi action to a story, but you will not be able to execute it.
To carry out specific tasks for multi actions, you may also need permissions for the data actions involved, as well as access to the model data that will be changed.
This can include permissions for the model as well as privileges for data access control, model privacy, and data locking, if they are set up. For details, refer to Learn About Data Security in Your Model.
You can read, update, delete, and execute a multi action that you’ve created without multi action permissions, but you will need the required permissions to publish your changes.
| Multi action permissions | Data action permissions | Model data access | |||||
|---|---|---|---|---|---|---|---|
| Task | Read | Update | Execute | Read | Execute | Read | Maintain |
| Add a data action step to a multi action | X | X | X | X | |||
| Add a version management step to a multi action | X | X | X | ||||
| Add a predictive step to a multi action*** | X | X | X | ||||
| Set up a multi action trigger* | X | ||||||
| Run a multi action with a data action step** | X | X | X | X | X | ||
| Run a multi action with a version management step** | X | X | X | X | |||
| Run a multi action with predictive step** | X | X | X | X | X | X | |
*You can add a planning trigger to a story withoutrRead permission for the multi action, but you will need this permission to select the multi action in the multi action designer. Setting up multi action triggers also requires permissions to edit a story or analytic application.
**If Publish target version automatically was selected on the multi action, a role with the maintain permission for the planning model is required to successfully publish the changes. You can still run the multi action, but the changes will not publish. For details about publishing permissions, see Create, Publish, and Manage Versions of Planning Data.
***You will also need predictive scenario permissions to add a predictive step to a multi action. For more information, refer to Roles and Permissions for Predictive Scenarios.
Permissions for Multi Actions in the File Repository
The permissions for multi actions depends on a combination of role-based permission for multi actions and folder-based permissions in the file repository.
In order to have certain permissions for the multi actions in a file repository folder, you need to have specific corresponding permissions for multi actions that are assigned by the system administrator outside of the file repository, on the Roles page. For more information, see Create Roles and Permissions.
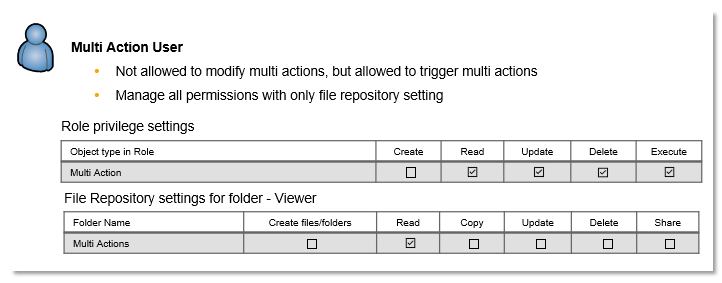
If you do not have the required role-based permissions for multi actions, then your permissions in the file repository for multi actions are restricted.
There are many possible combinations of role-based permissions and how they impact folder-based permissions in the file repository. Two examples are multi action designer and multi action user.
If you are a multi action designer with full permissions for your role,
assigned by the system administrator, then you will have full permissions for multi
actions you access in the file repository. 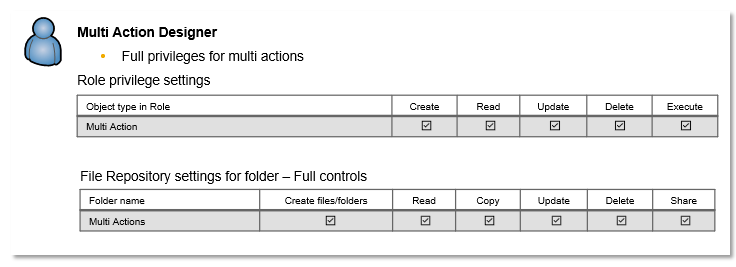
There is no Execute permission for the folder-based permissions, so having Read permission functions the same as having Read and Execute permission in the roles settings. Having Read permission is a prerequisite for other permissions.
After the basic permissions of Read and Execute are given in the roles settings, all additional permissions can be managed directly in the file repository settings. Being able to add additional permissions in the file repository setting streamlines the process by making it unnecessary to manage the permissions in both places.
Having Update and Delete permissions in the roles settings requires a Planning Professional license. If you have a Planning Standard license, you can have only Read and Execute permissions for the roles-based permissions.
Managing Multi Actions
You can access and manage multi actions from the file repository. To navigate to the file repository, choose (Files) from the side navigation.
In the file repository, you can move, edit, copy, delete, show columns, or filter your multi actions by using the toolbar. If you have ownership of a multi action, you can share it by choosing (Share). For more information, see Manage Files and Folders and Share Files or Folders.
You can also access your multi actions from the multi action start page or in the Recent Files section of your home page.
Create a Multi Action
Prerequisites
You’ll need permissions to create and update multi actions, and read access to any data actions you want to include. For details, refer to Permissions and Prerequisites for Multi Actions.
Context
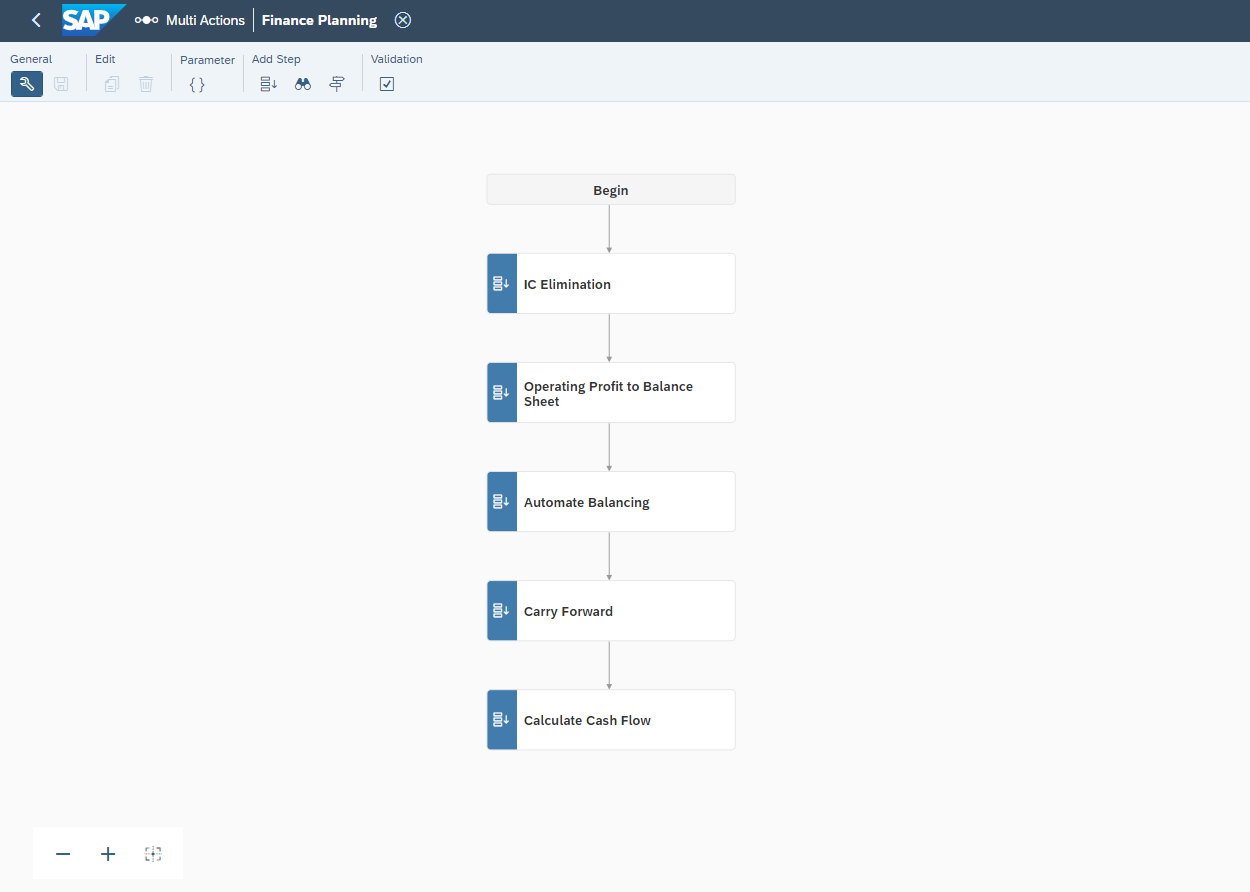
Planning modelers and admins can create multi actions in the multi actions app by adding steps, arranging the sequence of steps, and adding parameters.
-
Data Action Step: Runs a data action with parameter values that you specify in the step, either by setting fixed values or by applying parameters from the multi action.
-
Version Management Step: Publishes a version from the model that you specify. You can set the version, or apply a parameter from the multi action.
-
Predictive Step: Runs a time series forecast predictive scenario to answer business questions using a predictive model. This step retrains a predictive model based on the current state of your data, and then writes a forecast to a public or private planning version.
-
Data Locking Step: Allows data locks to be set directly from the multi action trigger. Setting data locks protects your data from unwanted changes. To learn more about data locking, see Configuring Data Locking.
-
Data Import Step: Runs using data imported from other sources. You can use data from multiple different sources by adding multiple data import steps to the multi action.
NoteThe following import jobs are not supported for multi actions:
-
Job group
-
Export job
-
Unsupported data source types such as Concur, ERP, Fieldglass, Dataset, and SalesForce
-
Imported models from local files
-
-
API Step: Integrates on-premise and cloud-based external applications using an HTTP Application Programming Interface (API).
If there’s an error while running a step, the following steps won’t run. The previous steps will still take effect.
If you will be adding multiple data actions based on the same model and version, it is recommended to embed these data actions into a new data action first. You can then add the new embedded data action to your multi action to improve performance. For more information on embedded data actions, refer to Adding an Embedded Data Action Step.
Additionally, in Multi Action Settings, you can enable Allow External API Access. With this
option being enabled, external systems can consume multi action APIs to access various capabilities offered by multi actions,
such as data import and planning. Note that this option is enabled by default. To access it, in the toolbar, choose  (Show Multi Action
Settings).
(Show Multi Action
Settings).
For more information about multi action public APIs, see https://help.sap.com/docs/SAP_ANALYTICS_CLOUD/14cac91febef464dbb1efce20e3f1613/loioe5ade1ed7c274d929a18bcc859102c40.html.
Procedure
-
From the side navigation, select
 (Multi Actions) and choose Multi Action in the Create
New section.
(Multi Actions) and choose Multi Action in the Create
New section.
If you want to base your multi action on one that already exists, you can select it in the multi actions list instead and choose
 (Copy the
selected multi action).
(Copy the
selected multi action). -
Start adding your steps to the canvas.
Step Type Procedure Data Action Step - Select
 (Add Data
Action Step) from the toolbar.
(Add Data
Action Step) from the toolbar. - Type a name for the step.
- From the Data Action list, select the data action that will run during this step. You
can use the
 (Open
Data Action) button to open the data action.
(Open
Data Action) button to open the data action. - Under Publish to Target Version after Execution, choose the
desired behavior for publishing your changes:
-
Do not publish: Changes will not be published. These changes can be published manually or published as part of another process.
-
Publish and fail if there are warnings: All of your changes will automatically be published. If any restrictions such as data locks apply to the data you’re trying to publish, then the publish will fail.
-
Publish and ignore warnings: All of your changes that are not affected by restrictions will automatically be published. If any restrictions such as data locks apply to some of the data you’re trying to publish, then the affected data will be discarded.
Note-
All of your unpublished changes to the target version will be published, even if they weren’t part of the data action.
-
This option only applies to public versions. If the data action runs on a private version or on a BPC write-back model, you'll need to publish the data manually.
-
-
If the target version is a public version and you want the data action step to run on the recommended planning area (unless otherwise defined in edit mode), select Use recommended planning area if target version isn’t in edit mode.
-
If the target version is a public version, the data action step will run on the data in edit mode. If edit mode has not been activated already, the data action step will use the recommended planning area.
-
- For each of the data action’s parameters, specify a parameter from the multi action, or set a fixed value, member, or measure. For more information about parameters, refer to Add Parameters to Your Data Actions and Multi Actions.
Version Management Step - Select
 (Add Version Management Step)
from the toolbar.
(Add Version Management Step)
from the toolbar. - Type a name for the step.
- From the Model list, select the model whose version you want to publish. If the model isn’t used in the multi action yet, choose Select other model …
- Set the version to publish. You can choose a fixed version, or use a parameter. For more information about parameters, refer to Add Parameters to Your Data Actions and Multi Actions.
-
You can select a public version, or create a parameter to select a private version when running the multi action. Note that publishing to a private version will publish to the public version that the private version was copied from.
-
Predictive Step - Select
 (Add Predictive Step) from the
toolbar.
(Add Predictive Step) from the
toolbar. - Type a name for the step.
- From the Predictive Scenario list, select a Time
Series Forecast Predictive Scenario to run
during this step. You can use the
(Open Predictive Model) button to
open the predictive scenario page. To learn how to create a
predictive scenario, refer to Creating a Predictive Scenario.
-
Note
Only time series forecast predictive scenarios based on planning models can be used in a predictive step.
-
- Select the corresponding Predictive Model from the Predictive
Model list.
-
Choose a predictive model based on a planning model. You will create a predictive model when creating the predictive scenario. For more information, refer to Creating a Predictive Model.
-
- From the Save Forecast to Version list, select the version to
write the forecast to.
-
This can be a fixed public version, or a parameter. If you choose a parameter, you can select a private or public version when running the step.
-
The forecast will write to the selected version, but won't publish the changes automatically.
-
Note
If you select a public version, the predictive step will write to the data within the recommended planning area, unless the public version is edit mode for All Version Data. For more information about planning on public versions, refer to Planning on Public Versions.
-
- To generate the forecast for past periods, enable
Save Forecast Values for Past
Periods. To learn more, see Save Predictive Forecasts Back into your Planning Model. Note
Enabling Save Forecast Values for Past Periods increases the amount of data being processed, and therefore takes more time to save. Only enable this option if you plan to use the results.
Data Locking Step -
Select
 (Add Data Locking Step) from
the toolbar.
(Add Data Locking Step) from
the toolbar. Type a name for the step.
From the Model list, select the model that you want to apply data locks to. If the model isn’t used in the multi action yet, choose Select other model …
NoteIf the selected model does not have data locking enabled, you will receive an error message. To enable data locking, go to model preferences and turn on the data locking switch.
- Review the Filters and make changes as needed. The filters are driving dimensions that, by default, have All values applied. By selecting a filter, you can choose specific members or parameters.
-
Under Data Locking, choose which Target State you want to use for your data:
-
Open: Data is unlocked and can be changed by any users who have permissions to change data for the model
-
Locked: Data cannot be changed.
-
Restricted: Data can be changed only by a user who has effective ownership of locks.
-
Data Import Step - Select
 (Add Data
Import Step) from the toolbar.
(Add Data
Import Step) from the toolbar. - Type a name for the step.
- Under Source, choose either Import Model Data or Import Master Data.
- From the Model list, select the model whose version you want to
publish. If the model isn't used in the multi action yet,
choose Select other model...Note
The default selection in the Models list is All Models. When All Models is selected, all public dimensions are listed. To find a specific public dimension of a specific model, first choose the corresponding model in the Models list.
- From the Import Job list, select the import job you want to use
for this step. You can use the (Open Data
Management in Modeler) button to open the
data management page. If the import job you want to use is
not available, refer to Import
Data to Your Model. The Related Data
Source automatically fills in the data
source of the import job.
API Step -
Select
 (Add API Step) from the
toolbar.
(Add API Step) from the
toolbar. -
Type a name for the step.
-
From the Connection list, select the connection you want to use. If the connection you want to use is not available, go to the Connections page and add the HTTP API connection under Connect to Public API. For more information, check this blog post Integrate External Applications Using Multi Actions in SAP Analytics Cloud
 .
. -
Enter the API URL.
NoteOnly HTTPS is supported. Any URL other than HTTPS will cause an error. The host and port in the API URL should be consistent with the corresponding connection.
-
In the Method field, POST is automatically selected. The POST request sends data to the API server.
-
Expand the Default Header Fields and check the Key/Value pairs.
-
If needed, you can add header fields. Additional header fields allow only 'Prefer':'respond-async' and customized headers with keys beginning with 'X-', except x-forwarded-host.
-
To set multiple values for a header field, you can separate the values using a comma or enter multiple header fields with the same key.
-
-
Enter the request payload in the Body. The request payload must be in JSON format. If you need more space for the request payload, select the (Edit JSON) button.
-
If desired, add parameters for the value. You can do this by choosing
 (Insert
Parameters) in the designer panel or by
choosing (Insert Parameters) in
the Edit JSON dialog.
(Insert
Parameters) in the designer panel or by
choosing (Insert Parameters) in
the Edit JSON dialog.-
When adding parameters, you can also choose to add .baseMembers to include all child members of the chosen parameter. However, this is not supported for number parameters. To learn more about the types of parameters, see Add Parameters to Your Data Actions and Multi Actions.
-
If you choose multiple values for a parameter, the values are sent as an array, separated by commas.
-
Adding parameters is not supported for keys.
-
-
Under Response, choose a fixed field to get the response from or, if the external application does not use standard field names, configure the fields mapping.
-
Get the API trigger status from the HTTP status code, or from both the HTTP status code and response body.
NoteExpected results are a response with HTTP status code 202 (job in progress), 200 (job was successful), or any error status (400 to 599). If you selected Get API trigger status from HTTP status code and response body, the response body will also be evaluated. A JSON response with the fields jobld, status, and message is expected, with the status field having a value of DONE (job was successful), FAILED, or IN_PROCESS. Example: {"jobId":123,"status":"IN_PROCESS", "message":"Exporting"}
- Configure the fields mapping. To overwrite the default field values:
-
Enter a valid JSON from the external application that has all the required fields.
-
Map the fields from the external application with the fields in the API step.
-
Map the status values of the external application with the fields in the API step.
-
-
-
Under Get API Execution Result, in the Method field, choose Asynchronous Return or Synchronous Return.
-
Choose a fixed field to get the API execution result from or, if you are using Asynchronous Return, you can configure the fields mapping.
NoteExpected results are a response with HTTP status code 202 (job in progress), 200 (job was successful), or any error status (400 to 599). If you select Get API execution result from HTTP status code and response body, the response body will also be evaluated. A JSON response with the fields status and message is expected, with the status field having a value of DONE (job was successful), FAILED, or IN_PROCESS. Example: {"status":"DONE", "message":"Successfully exported 300 records"}
The steps will run in order. You can also insert a step into the sequence by hovering over the preceding step and selecting the + icon.
To quickly create a step that’s similar to an existing step, hover over the step and select


 Duplicate
 .
. - Select
-
If necessary, change and reorder your steps.
To change the order, hover over a step and select
Move Up or Move Down.To delete a step, select it and choose
 (Delete Step) from the toolbar.
 -
Check the multi action for validation messages.
If a step has a warning or error icon, select it to see the problem in the panel.
If the Validation section of the toolbar shows a warning icon
 , hover over it to see where to fix the problem.
 -
When the multi action is ready, select
 (Save).
(You can save the multi action while there are errors, but you won’t be able to run it.)
Results
You can also schedule your multi action in the Calendar. For more information, refer to Schedule Multi Actions in the Calendar
Example Scenario: Creating Multi Actions with Data Action Steps
For planners who are new to multi actions in SAP Analytics Cloud, learn how to create data action steps that automatically publish the data changes.
Context
Multi actions help you orchestrate a set of operations across multiple models and versions in SAP Analytics Cloud.
In this scenario, we will create a multi action using a data action copy step and a data action cross-model copy step. These data actions span across different models and publish the changes after each multi action.
Procedure
-
Select (Add Data Action Step) from the
toolbar.
-
Select (Show Parameters
List).
Parameters are not carried over from data actions. You can either select a value for the data action parameters when creating a multi action or create a new parameter to prompt input with the multi action runs.
In this example, we will create new parameters so that the members "TargetVersion", "FromDate", and "ToDate" can be selected when running the multi action.
-
Create parameters for "FromDate" and "ToDate" with the following configuration:
-
Parameter Type: Member
-
Model: Sales model (previously used to create this data action)
-
Dimension: Date
-
Cardinality: Single
-
Hierarchy: Any
-
Level: Any
-
Input: Dynamic
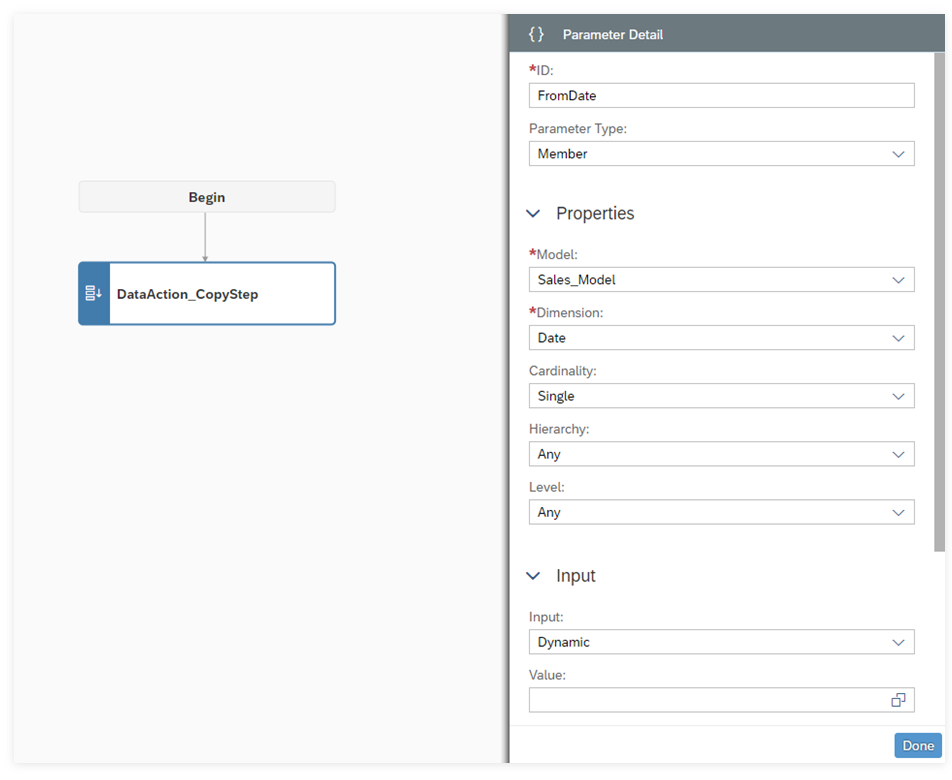 A configured parameter for "From Date".
 -
-
Select Publish target version automatically.
 A completed data action step.
 -
Select (Add Data Action
Step) from the toolbar.
-
Select Publish target version automatically.
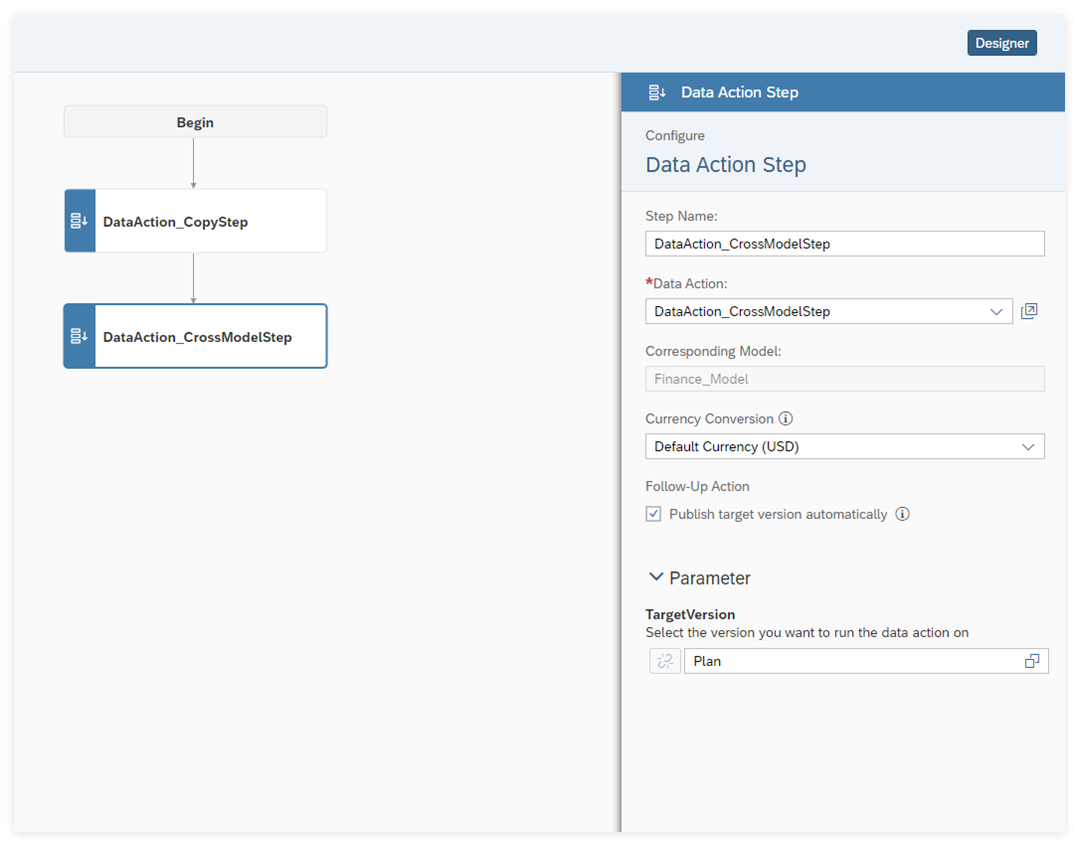 A completed multi action with two data action steps.